I still remember the first time a row of cleaned tins sat on my kitchen counter and felt like a small promise. There was a handful of rusty labels, a little paint smudge on my thumb, and the odd satisfaction of turning something discarded into something orderly.
Upcycled Tin Can Organizer Crafts felt like a friendly weekend challenge rather than a chore.
Over a few afternoons I tried a pencil cup, a hanging herb caddy and a bedside trinket tin, learning which finishes caught light and which textures made a corner feel cozier. Upcycled Tin Can Organizer Crafts became a tiny way to tame clutter and keep small pleasures on display.
Rustic twine-wrapped pencil cup for the desk

This tin turned into a favorite on my work table, its rough twine lending warmth against the cool metal. I liked the way the fibers caught stray sunlight and how the faint scent of hemp nodded to afternoons spent on scrap projects.
The rim retained a slight dent that felt honest and lived-in, and pencils leaned against the interior with a gentle clink. It was the kind of organizer that invited fingers to tidy a handful of pens and made a cluttered corner seem calmer without fuss.
Steps
- Empty and rinse a tin can, leaving it completely dry before handling.
- File any sharp edges along the top until the rim feels safe to touch.
- Begin wrapping natural twine around the can from the base, overlapping snugly and holding each turn in place.
- Secure the final length of twine by applying a small amount of clear craft adhesive along the last wrap.
- Allow the adhesive to set before placing writing tools inside.
Hanging herb caddy: fresh scent in small spaces

I hung three tins by an old backyard fence and suddenly the tiny patch of herbs felt like a secret. Each can reflected morning light differently, the curved surfaces catching dew droplets and the soil dark against the metal.
The slight clatter of a basil stem brushing the rim became an oddly comforting sound. This arrangement felt organic and charming, a gritty kind of green corner that made snipping a sprig for dinner feel immediate and pleasing.
Steps
- Clean and dry each tin thoroughly, peeling away any remaining labels.
- Smooth the top edge with a file to remove sharpness.
- Punch two small holes near the can rim on opposite sides to form a hanger.
- Thread twine through the holes and knot securely to create a loop for hanging.
- Fill with potting soil and seedlings once the can is placed in its hanging spot.
Magnetic spice tins arranged on the fridge

These small tins felt like tiny moons magnetized to the refrigerator door, each label handwritten and slightly slanted. I liked peeking at the colorful powders through clear lids, and the tins sang softly when the door closed.
The arrangement made the kitchen feel more playful, with the magnets keeping everything within reach during a woozy weeknight stir-fry. The cool metal contrasted pleasantly with spices’ warm hues, turning a routine reach for cumin into a small sensory lift.
Steps
- Wash and dry the tins carefully, ensuring lids fit snugly.
- Attach small strong magnets to the back of each tin by pressing them into place.
- Label each lid with a permanent marker or small printed labels.
- Arrange the tins on the fridge door in an order that suits cooking habits.
- Refill each tin with the chosen spice and gently close lids.
Tiered can chandelier for soft ambient light

The chandelier cast a warm, playful pattern across the ceiling each evening, with little halos of light where tiny holes traced simple constellations. I remember sitting underneath it during a storm, watching the light sway and feeling oddly calm.
The cans hummed faintly when a breeze passed through the open windows, and the patina on their exteriors added a layered glow. It turned a spare corner into a cozy nook and made ordinary nights feel leaning-toward-special.
Steps
- Prepare several tins by cleaning them and removing labels, leaving their tops intact if a lid effect is desired.
- Puncture small decorative holes around each can to allow patterned light through.
- Thread electrical cord and bulb sockets through the can stack or attach sockets inside each can.
- Connect wiring in accordance with safety guidelines and secure each can along the cord.
- Hang the assembled chandelier from a sturdy ceiling hook and test the lights.
Bathroom organizer with pastel painted tins

A row of softly colored cans brought a little zen to the bathroom shelf, their pastel faces reflecting tiny sparkles from the tile. Cotton swabs and small lotions fit neatly, and the overall effect felt like a thrifted find turned gentle and neat.
I remember the small satisfaction of aligning lids so their labels faced out, turning a routine morning into a moment that felt tidy and pleasant. The muted paint tones made the metals feel less utilitarian and more quietly decorative.
Steps
- Rinse and dry tins thoroughly, then sand any rough spots on the surface.
- Apply a base coat in a neutral tone and allow it to dry completely.
- Add a second coat in a chosen pastel hue for an even finish.
- Once dry, place a thin felt pad inside the base to protect small items.
- Arrange toiletries inside and position the cans on a shelf for easy access.
Wall-mounted mail sorter with staggered cans

Mounted along the hallway, the staggered cans functioned as an unpretentious mail sorter, catching envelopes and small packages with an agreeable thud. I appreciated the irregular rhythm of their arrangement, a little like a metronome for the day’s incoming notes.
The slight scratch of paper against metal became part of daily life, and the whole installation offered a small ritual of sliding a bill into its nook. It felt practical and unexpectedly sculptural, a utilitarian display with character.
Steps
- Clean and dry several tins, then flatten the inner rim edges for safe handling.
- Position the tins on a backing board in a staggered layout and mark mounting points.
- Secure each can to the board with screws driven through the back of the board into the can base.
- Mount the finished board to the wall at a comfortable height for reaching mail.
- Slide incoming envelopes into the cans and rotate as needed.
Pegboard pockets made from halved tins
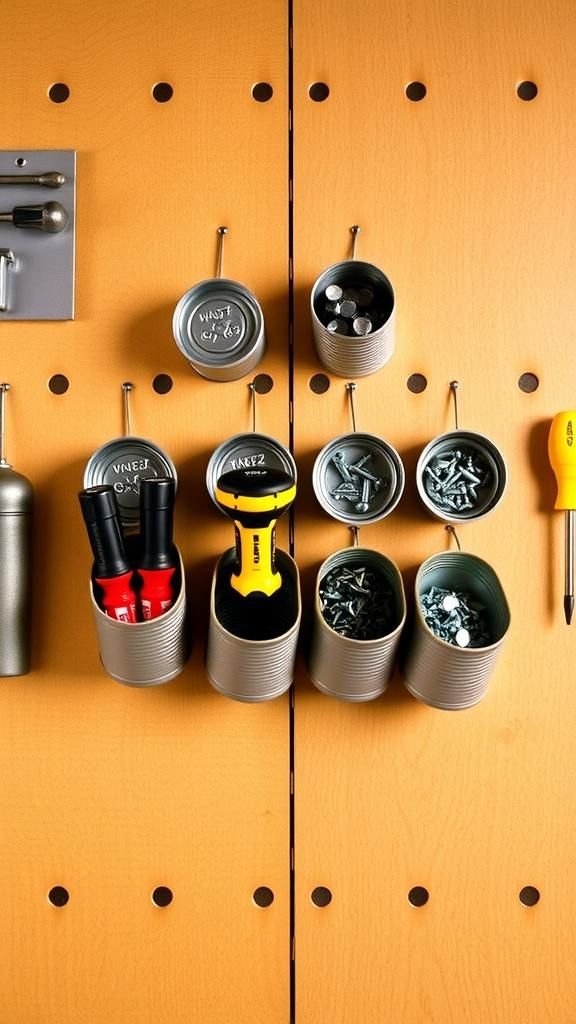
Half cans clipped to a pegboard created an orderly landscape for tools and bits, each pocket holding an odd screw or a paintbrush handle. The cut edges sat flush against the board, and the arrangement had a satisfying industrial rhythm.
When I ran a hand along the row, the metals hummed softly under fingertips and the array of hardware made the workspace feel more deliberate. It was a tidy solution that turned leftover cans into little homes for small, essential pieces.
Steps
- Slice tins lengthwise to create open-front pockets, then file the cut edges smooth.
- Paint or leave the metal finish as desired and allow any paint to dry.
- Attach small hooks or brackets to the back of each half can for pegboard hanging.
- Hang the pockets on a pegboard in a layout that groups similar items together.
- Populate with tools, brushes, and loose hardware for organized access.
Paintbrush holder with vertical slotted dividers

This organizer felt like a small gallery for brushes, each one standing upright and waiting for the next smear of color. The cans had slotted dividers that gave each brush its own space and the brush hairs peeked over the rim like tiny flags.
Damp bristles dried more evenly thanks to the air between slots, and the whole piece sat beside the easel as a quiet companion. There was a pleasing balance between the soft, colored tips and the cool metallic cylinders that held them.
Steps
- Prepare a large tin by cleaning and ensuring it is free of debris.
- Fashion internal dividers from thin strips of wood or stiff cardboard, fitting them vertically within the can.
- Create slotted openings in the dividers so brush handles can rest upright without touching each other.
- Insert dividers into the can and adjust spacing to accommodate various brush sizes.
- Place brushes bristle-up for drying and easy selection.
Stacked modular cans with removable compartments

Staggered into a small tower, the modular cans created a compact storage system for sewing scraps and buttons. Each tier could be lifted away like a little treasure chest, and the colors of the threads glinting through the openings made repair work feel less like a task and more like a quiet pleasure.
When the sunlight hit the metal, the tower threw subtle highlights across the sewing table. It felt like a small ritual to lift a layer and scan the contents for the right button or thread.
Steps
- Clean a set of tins and ensure lids fit firmly where needed.
- Drill small alignment holes in the base and top of each can for dowel placement.
- Stack tins by sliding dowels through the alignment holes to secure tiers while allowing removal.
- Decorate or label each tier to indicate its contents.
- Separate tiers when accessing supplies and re-stack afterward.
Chalkboard-labeled cans for rotating supplies

The matte chalkboard labels transformed ordinary tins into adaptable organizers, inviting scribbled notes about contents that could change with the seasons. I loved the slightly dusty feel of erased chalk and the tiny smudges that made the whole thing feel lived-in.
When friends visited, they read the labels with a small smile and guessed at the odd items within. It was economical and flexible, and the tactile contrast between rough chalk and smooth metal added a small sensory pleasure to tidying.
Steps
- Clean tin surfaces thoroughly and allow them to dry.
- Paint a rectangular area on each can with chalkboard paint and permit drying.
- Write labels with chalk or a chalk marker to indicate contents.
- Reassign items to cans as needs change, erasing labels when necessary.
- Store the labeled cans on a shelf or in a drawer for quick access.
Leather-wrapped tins for a warm, tactile feel

Wrapping a tin in a strip of leather gave it a weightier, more finished presence, the grain offering small ridges to run a thumb across. I remember testing different leathers, amazed at how a dark mahogany strip turned a humble can into something that felt suited to a study.
The aroma of leather blended with the faint metallic scent in a pleasant way, and the contrast between soft hide and hard metal created a pleasing tension. It sat well on a bookshelf, quietly practical and a touch refined.
Steps
- Measure a leather strip to wrap around the can and cut to length with sharp shears.
- Edge the leather with a burnishing tool for a neat finish if desired.
- Adhere the leather to the can using a clear-bond adhesive applied along the seam.
- Trim any excess and press the seam until it bonds securely.
- Allow the piece to rest undisturbed until the adhesive sets fully.
Peg-and-can jewelry organizer with soft liners
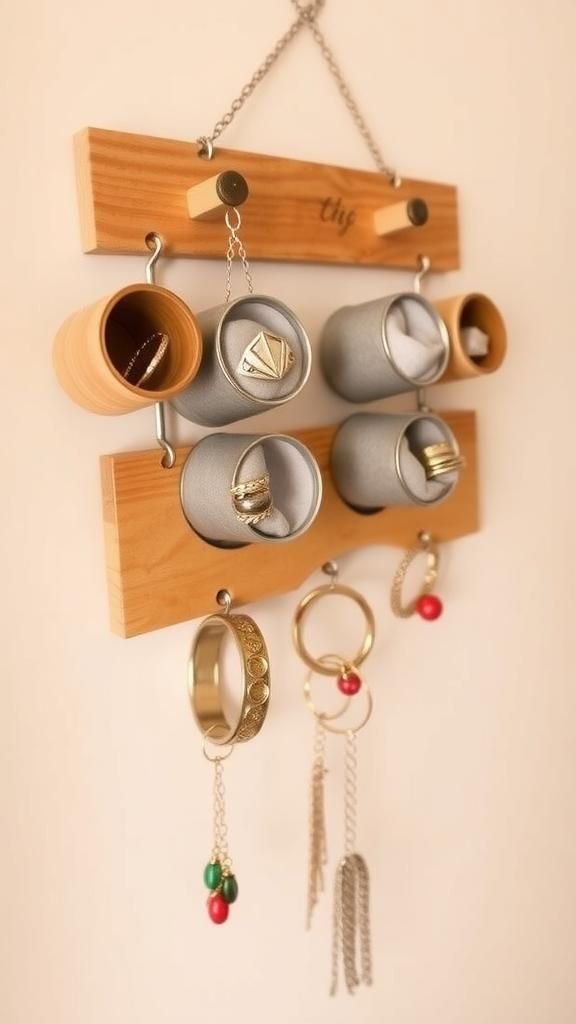
A ring of cans mounted on pegs made for an approachable jewelry station, each lined with soft felt to cradle baubles and avoid scratches. Earrings clustered quietly in one can while bracelets draped over another’s rim.
The felt introduced a muted color palette that complemented metal finishes, and the sound of a bracelet settling into felt always felt calming. It became a small morning routine to scan the array and pick a piece, a compact display that made accessorizing feel a touch more intentional.
Steps
- Clean a cluster of cans and cut felt circles to fit inside each base.
- Place the felt liners gently into each can to protect jewelry from scratches.
- Mount pegs onto a wooden board spaced to accommodate each can.
- Hang the cans by their bases or secure with screws through the board into the can bottom.
- Sort jewelry into the lined cans and mount the board in a dressing area.
Sewing caddy with thread spool pegs on base

The can’s base, repurposed into a pegboard for spools, made small colors hum together. Spools perched upright like tiny skyscrapers, their threads offering a miniature skyline of hues.
I liked the tactile pattern of threads winding around pegs and the quiet order of colors grouped by tone. Needles and pins found a home in a tiny pincushion set into the center, making the whole setup feel compact and companionable during mending.
It made odd sewing jobs feel friendlier.
Steps
- Clean a sturdy tin and create a central anchor area inside the base for a pincushion.
- Insert small dowels or peg rods into the base around the pincushion for spool placement.
- Secure the pegs in place with adhesive or by friction so they stand upright.
- Place thread spools onto the pegs and set a pincushion in the center.
- Keep needles and small notions nearby for quick repairs.
Rustic planter tray with grouped cans and pebbles

A shallow wooden tray lined with three small tins felt like a mini landscape, pebbles catching sunlight and creating little islands for succulents. The rough wood against smooth metal made the arrangement feel pleasantly textural, and the light bounce off tiny leaves brought a lively contrast.
I enjoyed arranging the plants to make varied heights and felt it brightened the windowsill without dominating the room. The whole setup had a quiet balance between rugged and delicate elements.
Steps
- Select a shallow tray and place a layer of pebbles along the base for drainage.
- Position three cleaned tins in the tray and fill each with potting mix suitable for succulents.
- Plant small succulents into the tins and nestle them into the pebble bed.
- Tuck additional decorative pebbles around the cans to stabilize them and add texture.
- Place the tray in bright indirect light and water sparingly.
Bathroom toothbrush carousel for shared sinks

This little carousel turned a cluttered sink into an organized, almost playful spot. Each toothbrush had its niche, and the can’s metal caught the morning steam and mist like a small mirror.
The rotation made it easy to glance and pick the right brush without fumbling, and the way light skimmed over the chrome finish felt brightening against tile. It made shared bathrooms feel a bit calmer and added a small ritual of twirling the carousel between rinses.
Steps
- Clean a shallow tin and ensure the interior is rust-free and dry.
- Drill evenly spaced holes in the tin lid sized for toothbrush handles to rest upright.
- Fasten the lid onto the tin and place a circular lazy-susan base beneath.
- Insert toothbrushes into the holes so they stand upright and secure lightly if needed.
- Rotate the carousel to select a brush and rinse after each use.
Scented candle holders with patterned cut-outs

Tiny cut-out patterns turned a row of tins into mood lighting that felt celebratory in small doses. Flames danced through star or leaf shapes and cast delicate shadows on nearby walls.
I enjoyed the muffled crackle of a wick and the soft scent wafting through the living room on cool evenings. The metal warmed near the light and carried a faint toasty aroma that made the space feel anchored and gentle.
It was the sort of low-key ambiance that invited quiet conversation.
Steps
- Choose tins with secure bases and clean them thoroughly.
- Punch decorative patterns through the sides to allow light to escape in shapes.
- Place a small votive or LED candle inside each tin on a heat-resistant base.
- Light or switch on candles and observe the patterned shadows they cast.
- Extinguish flames carefully and cool tins before handling.
Mini succulent terrarium with glass lid accents
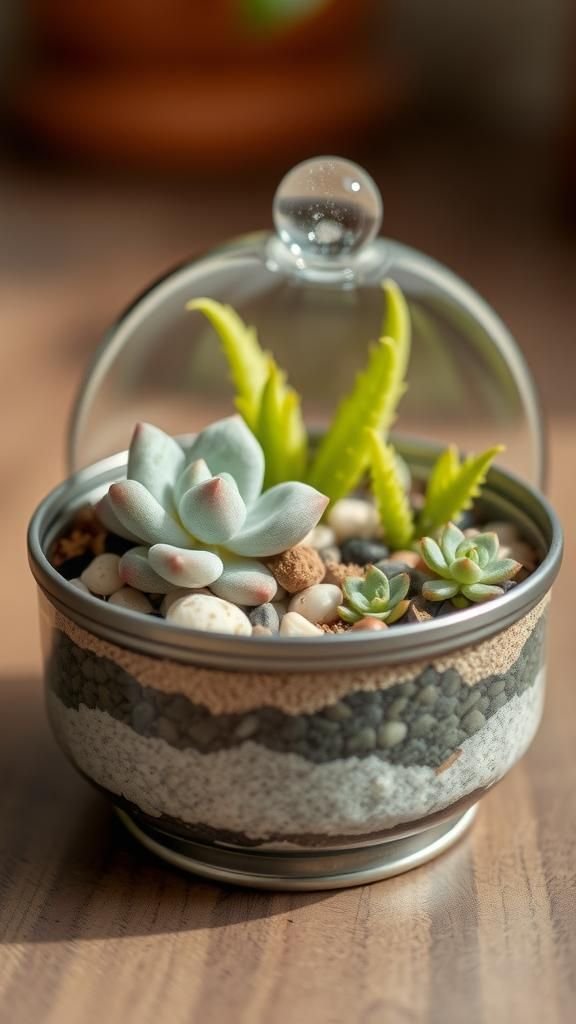
A shallow tin paired with a small glass lid became an intimate terrarium that required minimal tending. Tiny green rosettes and sand layers contrasted with the metal’s cool sheen, and the glass lid trapped a soft, humid microclimate that made watching growth feel tiny and private.
I liked tending the light rather than frequent watering, and the whole piece felt like a little green secret on a shelf. It sat quietly, an accessible bit of living decor that prompted small smiles.
Steps
- Select a shallow tin and clean it thoroughly before plant placement.
- Layer small stones and a thin layer of sand for drainage inside the tin.
- Position small succulents carefully, leaving space between plants for airflow.
- Place a glass lid loosely over the tin to create humidity while monitoring moisture.
- Provide bright indirect light and water sparingly when soil feels dry.
Desktop cable tidy with slotted tin rim

A can with a notched rim made a quiet difference to my desk, corralling chargers and earbuds into tidy loops. Each cable sat in its little channel and the daily ritual of plugging in felt cleaner for it.
The metal edges had a faint coolness when touched and the assortment of cords created a small, oddly decorative cluster. It reduced the visual noise of tangled wires and made reaching for a cable a faster, less distracted movement.
Steps
- Prepare a wide-mouthed tin by cleaning and drying it thoroughly.
- Create evenly spaced notches around the rim to form channels for cables.
- Smooth any rough areas with a file to prevent fraying of cords.
- Place the tin near charging spots and thread cables through the notches.
- Coil excess cable length inside the can for a tidy appearance.
Gift wrap station with ribbon spools inside cans
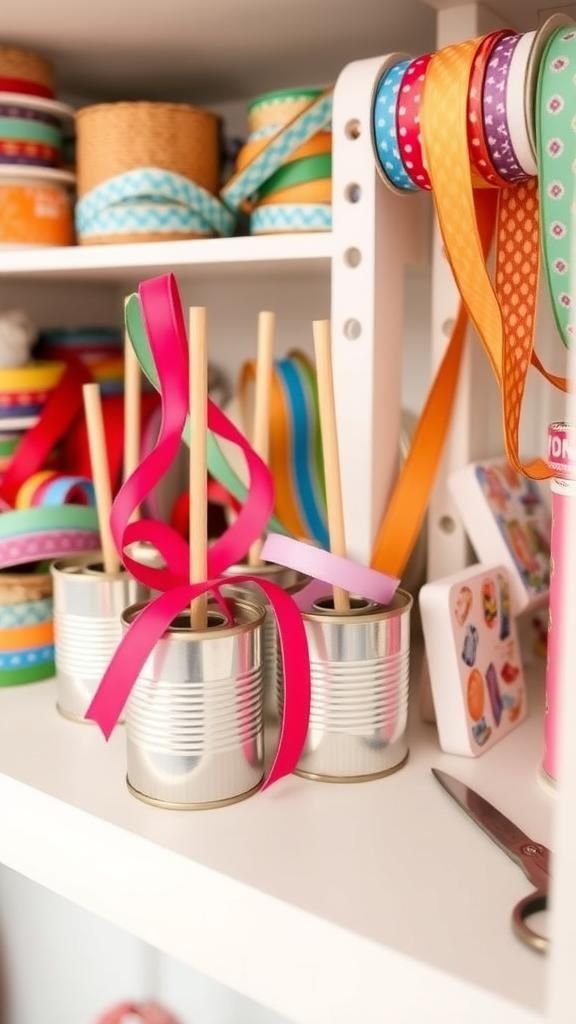
A line of cans on a low shelf became a ribbon station where rolls spun easily as a pair of scissors hovered nearby. The tactile snap of ribbon and the smell of paper created a little wrapping ritual that felt celebratory each time a gift was needed.
Colors peeked through the open tops and the overall effect was both playful and practical. I liked pulling a ribbon and watching it glide smoothly from its spool with an old, contented smile.
Steps
- Clean several cans and insert wooden dowels horizontally through their centers as spool axles.
- Slide ribbon spools onto the dowels so they rotate freely within each can.
- Secure dowels at the can sides to prevent slipping.
- Arrange the cans on a low shelf near wrapping paper and scissors.
- Pull ribbon ends from each spool as needed and trim carefully.
Magnetic board brush caddy for quick cleanup

A tin fitted with a magnetic strip made a tidy caddy that clung to a metal surface, holding brushes and small tools upright. The magnet’s pull felt dependable and the brushes’ bristles feathered slightly when the can moved, adding a soft contrast to the metal.
This arrangement simplified quick cleanups after a project and the visual order made the workspace feel less chaotic. It had a practical calmness to it and became one of those little helpers I reached for without thinking.
Steps
- Affix a strong adhesive magnetic strip to the back of a cleaned tin.
- Attach the tin to a nearby metal surface such as a tool cabinet or workbench.
- Place brushes and small metal tools inside so they stand upright.
- Reposition the tin as needs shift around the workspace.
- Remove and empty the caddy periodically to clean bristles and tool heads.
Geometric mosaic cans with glass shard accents
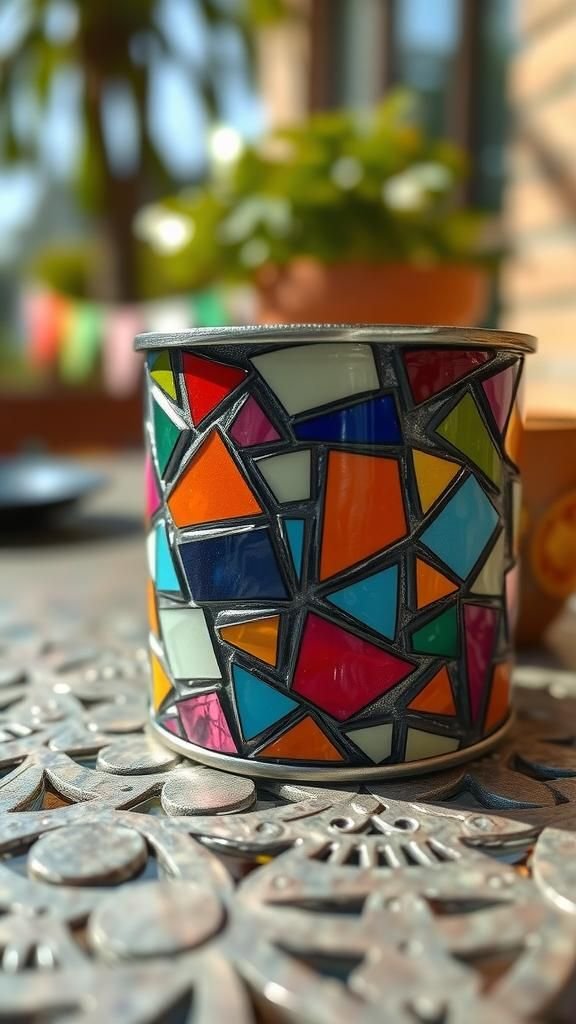
Adding thin glass pieces created a shimmering mosaic that made each can feel jewel-like. Sunlight fractured through the shards and cast tiny prisms across a tabletop, and the tactile pattern of edges against grout added a handcrafted quality.
I remember tracing a fingertip along a smoothed shard and feeling a satisfying coolness. The cans took on an ornamental role on a porch table, their surfaces catching breezes and turning a daily moment into something quietly decorative.
Steps
- Clean tins and prepare small glass or tile shards for mosaic placement.
- Arrange shard patterns on the can surface to test composition.
- Adhere shards to the metal with a clear all-purpose adhesive and allow to set.
- Grout around the shards if desired and wipe away excess once it firms.
- Rinse and dry the finished piece before placing it on display.
Table of Contents