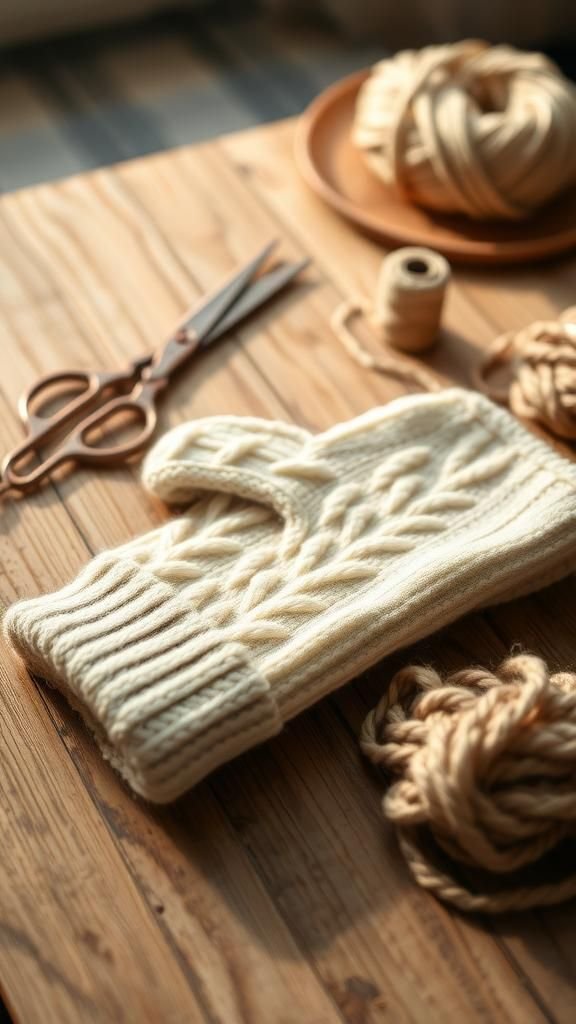
I have a soft spot for rescuing well-loved sweaters and turning them into cozy accessories. Over the years I’ve been drawn to the textures and tiny stories held in thrifted knits, and mitten making became a favorite quiet hobby.
Upcycled Sweater Mitten Projects have felt like a gentle way to give fabric a second life while keeping hands warm and a little nostalgic.
These mitten ideas grew out of afternoons wrapped in wool and tea, testing seams and pairing buttons with sleeves. Each idea is a small experiment in color, texture, and memory, and I enjoy how simple scraps can become comforting pockets for cold mornings.
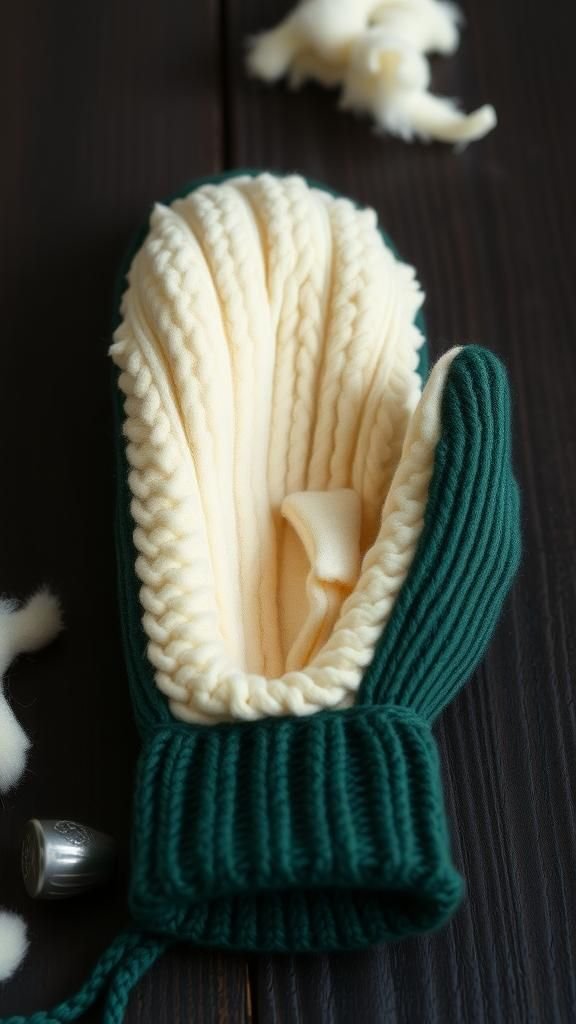
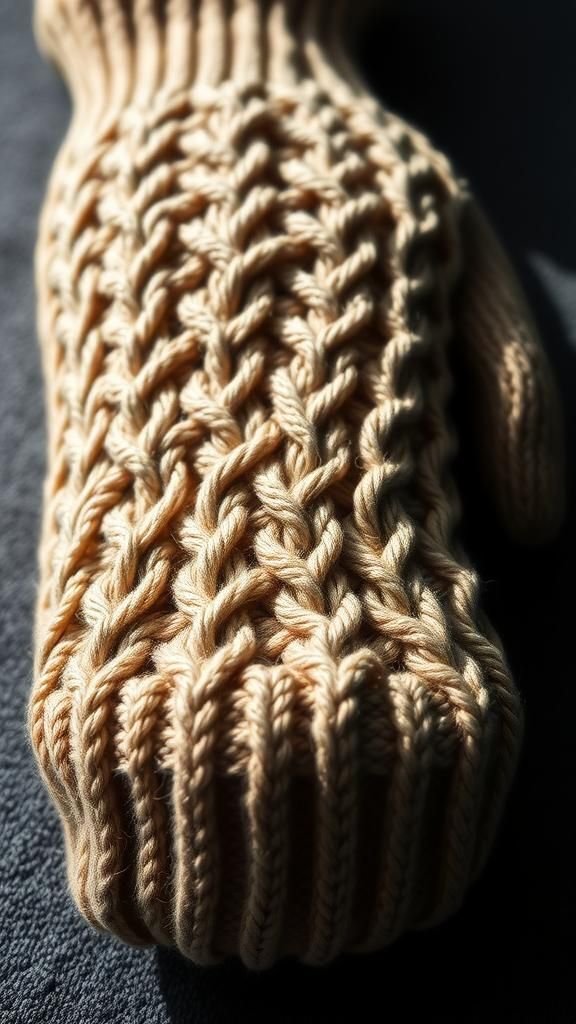
Cozy cable-knit mitten from sweater sleeve
I love the way a heavy cable stitch feels under my palm, thick and ridged like a tiny landscape. This mitten came together from the cuff and forearm of a thrifted sweater that smelled faintly of cedar.
The wool has a pleasant weight and a faint fuzz that kisses the skin. When I handle the finished mitten, the cables make little shadows and highlights, and the cuff edge provides an instant cozy cuff that hugs the wrist.
It feels like wearing a small, snug blanket.
Steps
- Cut a sleeve section to form the mitten body, keeping the cuff intact for the wrist.
- Fold the fabric with right sides facing and sew along the side seam to create a tube.
- Pinch and sew the top closed following the natural curve of the sleeve for a rounded mitten top.
- Turn the mitten right side out through the cuff and finish edges by sewing around the cuff seam.
Thumb-friendly mitten with a patched palm panel
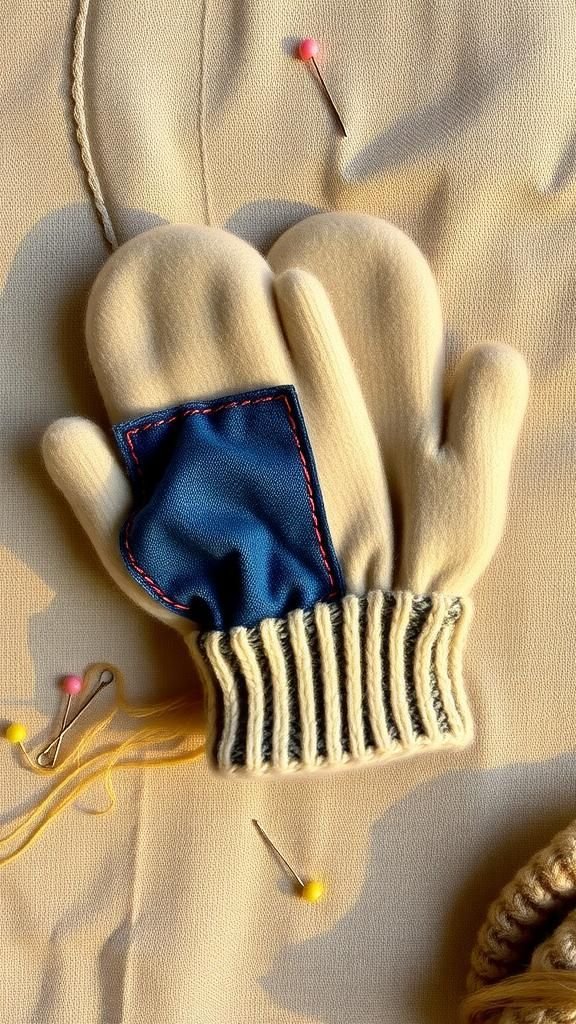
There’s a homey patch on the palm that always draws compliments, a contrast of wool and old denim that feels pleasantly rugged against the skin. The palm patch keeps the mitten feeling lived-in and adds a bit of visual storytelling, as if the mitten carried a small repair history.
When fingers flex inside, the patch moves smoothly and gives a different tactile note from the rest of the sleeve. I like the tiny irregularities where the denim and wool meet, a meeting of hard and soft.
Steps
- Trace the hand shape onto sweater fabric and cut two mirrored mitten pieces, reserving a small oval patch for the palm.
- Position the patch on the palm area and sew around its edge with a small running stitch for reinforcement.
- With right sides together, sew the mitten outer edges leaving space for the thumb.
- Create a thumb piece from leftover sleeve and attach it securely, finishing all seams neatly.
Faux-fur lined mitten using sweater and plush trim
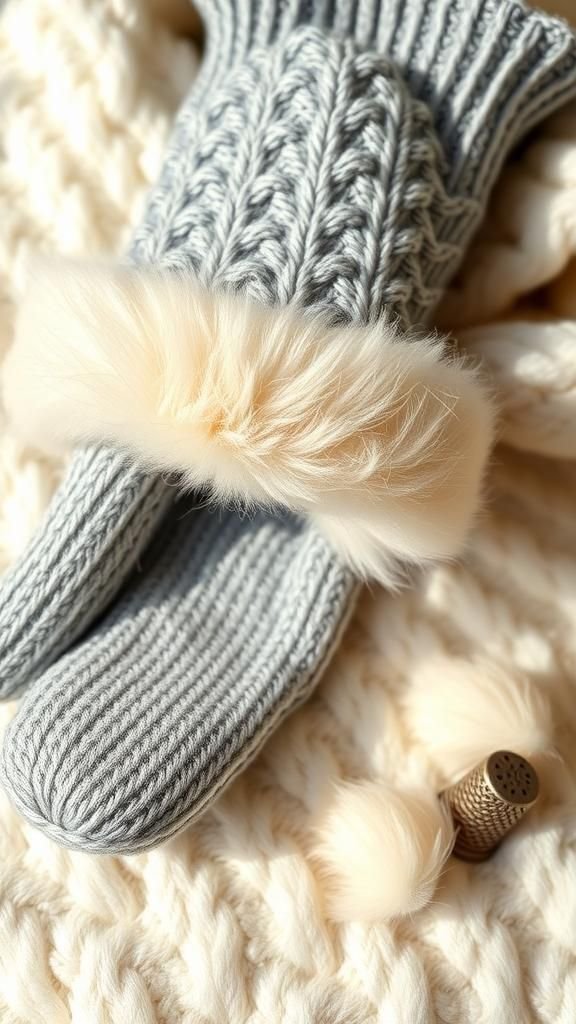
The first time I tried a plush lining, it felt like slipping my hands into clouds. The outer sweater holds a gentle texture while the inner trim whispers warmth, a soft contrast that makes cold mornings bearable.
The plush peeps out at the cuff in a subtle, luxurious halo and gives the mitten a small, indulgent look. When I rub my thumb along the edge, the fur fibers respond with a pleasing fluff.
There’s a little indulgent pleasure in feeling that cozy softness on my palms.
Steps
- Cut two mitten shapes from sweater fabric and matching inner lining pieces slightly smaller than the outer ones.
- Place lining pieces inside the sweater outer pieces with wrong sides facing and sew around the edges, leaving the cuff open.
- Attach plush trim at the cuff edge, sewing it securely so the fur peeks out.
- Turn the mitten right side out through the cuff and stitch the cuff edge for a finished look.
Fingerless wrist warmers crafted from sweater cuffs
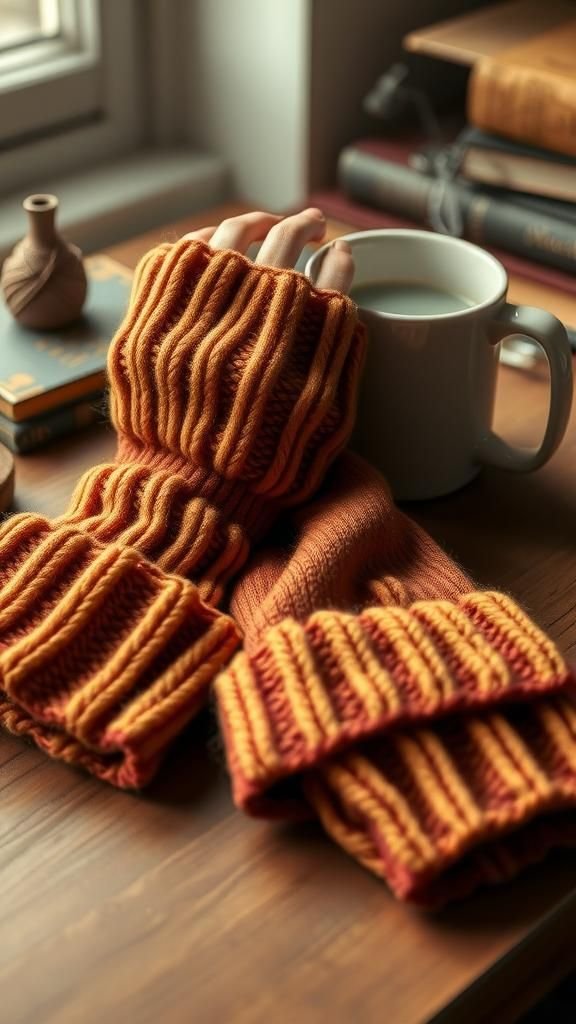
These evolved from wanting warmth without losing hand dexterity, so the cuff edge stays and the fingers are free to tap screens or grab mugs. The ribbed cuff holds the wrist snugly, and the interior is pleasantly warm without bulk.
When wearing them I often appreciate the slight compression around the wrist that feels supportive rather than constricting. The top edge is often soft and rolled, catching tiny bits of sunlight and making the knit glow with warmth against bare fingers.
Steps
- Cut sections from sweater cuffs to desired wrist length, keeping the cuff rib intact.
- Fold each piece with right sides facing and sew the side seam to form a tube.
- Hem the open end by sewing a narrow seam or leaving the raw edge for a rolled finish.
- Optionally create a thumb hole by cutting a small slit and reinforcing its edge with stitches.
Decorative buttoned mitten with reclaimed buttons

A scatter of mismatched buttons along the back brings playful character to the mitten. Each button carries a tiny memory, some mother-of-pearl glinting faintly, others matte and worn.
I like how fingers tuck under the buttoned flap, a small ritual when slipping hands inside. The sound of a button sliding through a loop is reassuring, almost like a little pause.
Texturally, buttons interrupt the smooth knit and create contrast: cool hard surface against soft wool, a small meeting of opposites that delights my fingers.
Steps
- Cut two mitten pieces from sweater fabric and mark a flap area on the back of one piece.
- Sew a narrow strip to form a button loop row along the flap edge and attach reclaimed buttons opposite the loops.
- Place right sides together and sew the mitten perimeter, leaving the cuff open.
- Turn right side out and test button closure, reinforcing stitches around buttons as needed.
Striped mittens from mixed sweater panels
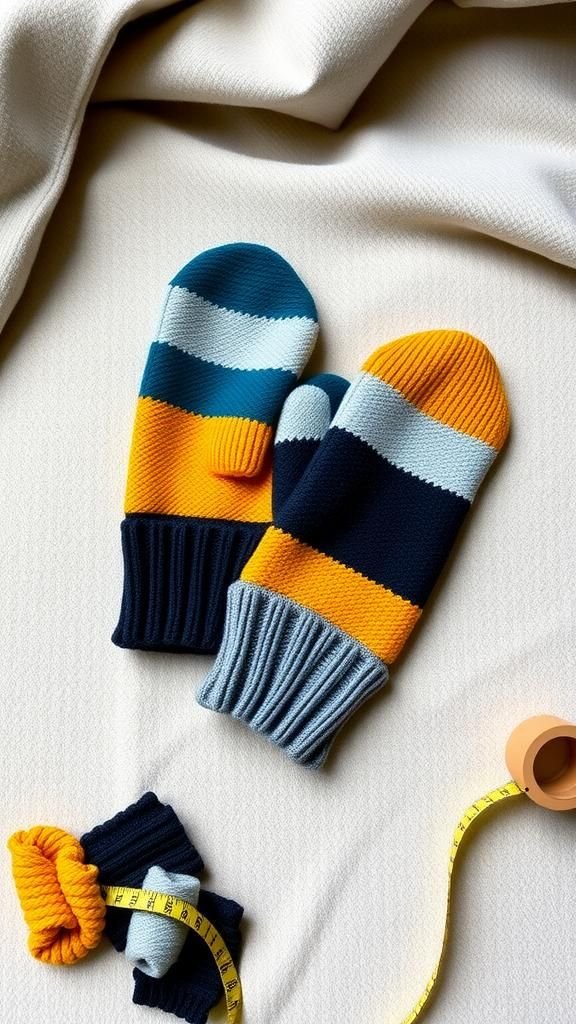
I remember sorting through a pile of thrifted sweaters and being struck by unexpected color matches that begged to be paired. Stripes formed naturally where two different sweater scraps met, giving each mitten a little banded personality.
The tactile shift between yarns is subtle and interesting under the hand, like a landscape of narrow ridges. When worn, the stripes wrap the hand in color rhythm, and I find myself noticing how the bands catch light differently, lending the mitten a lively, quilted look.
Steps
- Select sweater scraps with complementary colors and cut matching mitten-shaped panels from each.
- Sew the panels together along their long edges to form striped mitten fronts and backs.
- Place right sides together and sew around the mitten outline, leaving the cuff open.
- Turn the mitten right side out and finish cuff edge by sewing or folding under a narrow seam.
Embroidered floral mitten with colorful stitching
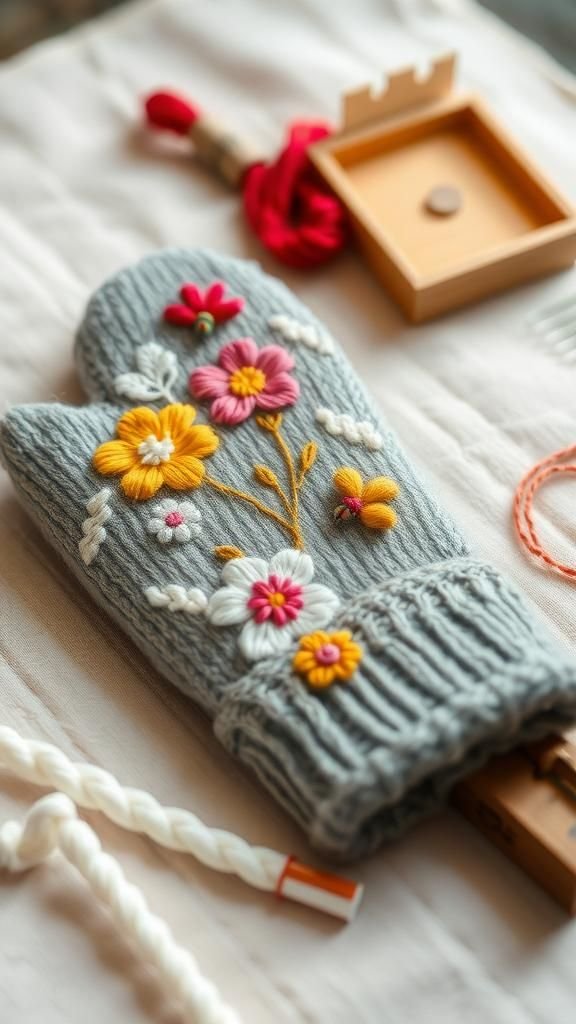
I often find that a tiny embroidered bloom changes the whole mood of a mitten, a handstitched surprise that feels intimate. The bright threads sit atop wool like dew, and running a fingertip across the stitched petals is quietly satisfying.
The embroidered motif gives a mitten a handmade signature, a whisper of someone’s time and care. Color choices add personality, whether soft pastels or bold primaries; the contrast between smooth embroidery thread and the wool nap is a small tactile joy every time I slip the mitten on.
Steps
- Cut mitten pieces from sweater fabric and transfer a simple floral motif onto the outer piece.
- Embroider the design with embroidery floss using satin and backstitches for texture.
- Place right sides together and sew the mitten perimeter, leaving the cuff open.
- Turn right side out and secure the cuff edge with a neat seam or decorative topstitch.
Two-tone mitten with turned cuff detail
A turned cuff reveals a hidden color that feels like a secret when wrists bend, a little flash of contrast that brightens mornings. The outer color is calm while the inner cuff sings with a complementary hue, and the effect is both playful and tidy.
When I turn the cuff up or down, the mitten changes personality, which is pleasingly versatile. The turned edge creates a thicker band at the wrist that feels protective and gentle, almost like a soft bracelet hugging the arm.
Steps
- Cut a mitten outer piece and a slightly shorter inner cuff piece from contrasting sweater fabrics.
- Sew the inner cuff to the outer mitten at the cuff edge with right sides together.
- Fold the cuff outward to reveal the inner color and sew a finishing seam to hold it in place.
- Close the mitten top by sewing the rounded edge and turn right side out for the final shape.
Playful pom-pom mitten with sweater scraps
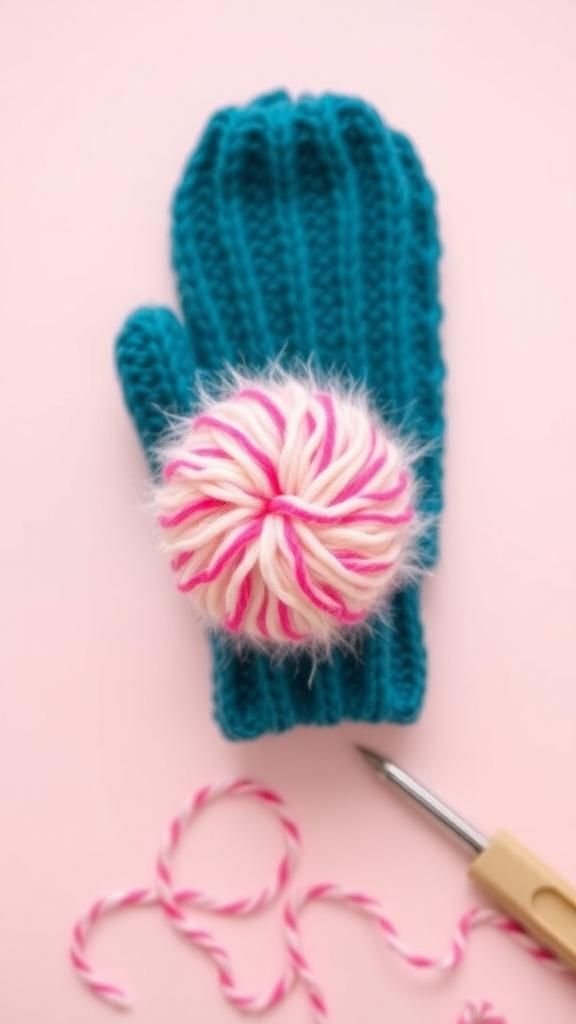
A pom-pom perched at the mitten tip feels delightfully whimsical, bouncing slightly with movement. It brings a playful note to an otherwise cozy accessory and makes people smile when they see it.
The pom is soft, round, and slightly fuzzy, offering a fun tactile counterpoint to the snug knit. I enjoy pairing rich, dense yarn for the mitten body with a lighter fluffy pom, the contrast making the pom pop.
The finished mitten has a hint of levity, like a little hat on each hand.
Steps
- Create mitten pieces from sweater fabric and sew sides together leaving the cuff open.
- Make a small pom-pom from leftover yarn by wrapping, tying, and trimming to shape.
- Attach the pom-pom securely to the mitten tip with sturdy stitches.
- Turn the mitten right side out and finish the cuff edge for a neat appearance.
Lined mitten with fleece interior for extra warmth
The fleece lining creates a gentle microclimate for the hand, almost like a private pocket of warmth. The contrast between the sweater’s coarse knit and the fleece’s velvet softness is pleasing; slipping my hand in feels smooth and insulated.
The mitten sits comfortably without bulk, and the lining reduces drafts in chilly weather. I often notice the muffled sound of fabric when moving hands, a kind of cozy quiet that feels nice on cold mornings.
The inner fleece also makes putting the mitten on feel instant and snug.
Steps
- Cut mitten shapes from the sweater outer and matching shapes from fleece slightly smaller for the lining.
- Sew the fleece pieces together along the mitten outline, leaving the cuff open.
- Insert the fleece lining into the sweater outer with wrong sides facing and hand-stitch or machine-sew the cuff edge.
- Turn the mitten right side out if needed and smooth the lining for an even fit.
Lace-trimmed mitten with delicate sweater edge
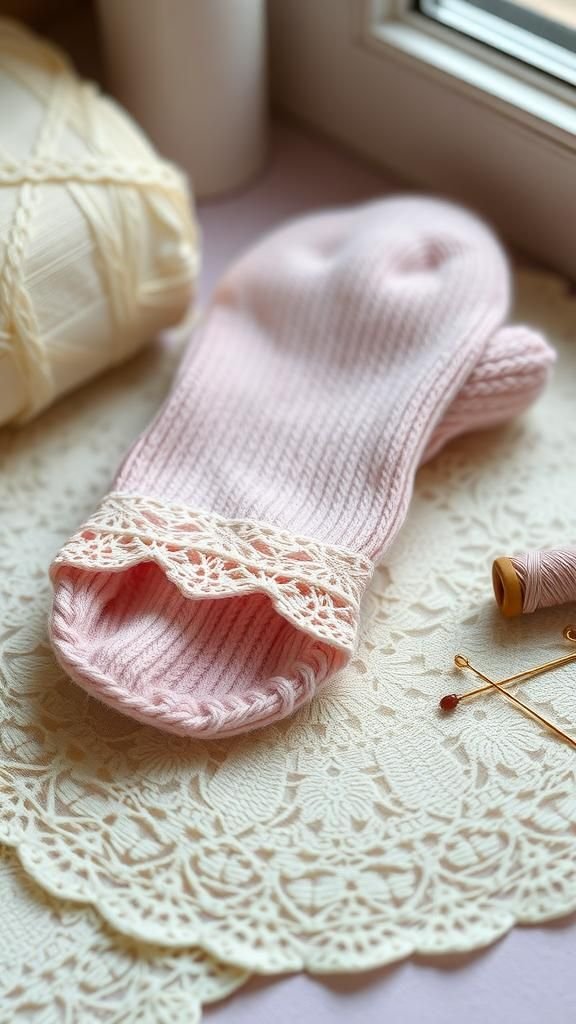
A narrow lace trim at the wrist adds a hint of vintage charm, softening the ruggedness of an old wool sweater. The lace peeks out like a small secret, and the delicate pattern plays against the sweater’s more rustic stitch.
When I brush my fingers along the trim, it tickles gently and brings a feminine flutter to the mitten. The overall balance between sturdy knit and fragile lace feels thoughtfully mismatched, like two old friends making an unexpected pairing that somehow fits perfectly together.
Steps
- Cut mitten shapes from sweater fabric and select a length of lace trim for the cuff.
- Position the lace along the inside or outside cuff edge and baste it in place.
- Sew the mitten seams with right sides together, leaving the cuff opening for turning.
- Turn right side out and secure the lace with a neat topstitch along the cuff.
Minimalist mitten with clean, modern lines
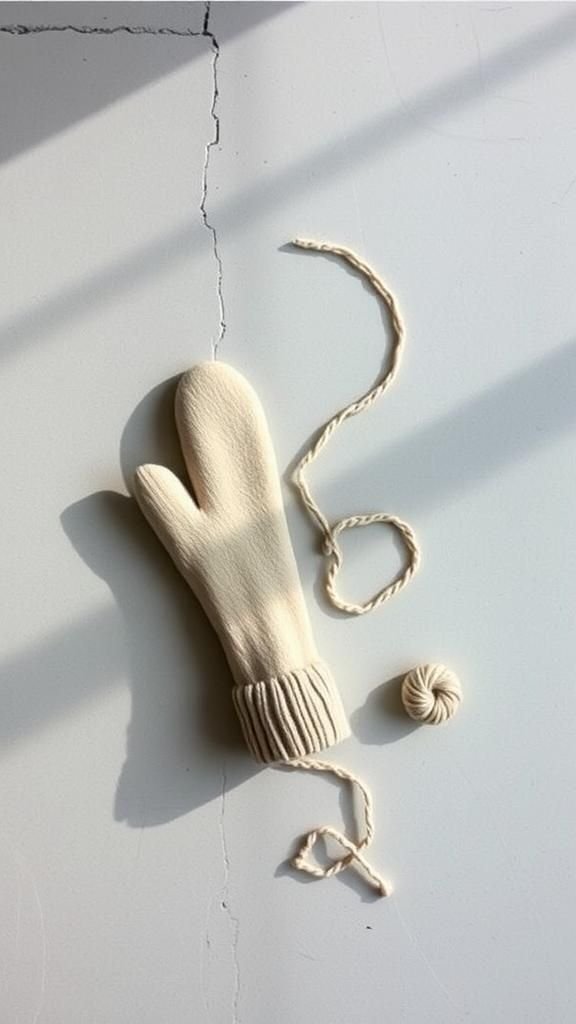
Simplicity can feel quite refined, and a mitten with clean lines speaks to that quiet aesthetic. The silhouette is neat, with a smooth curve and no extra embellishments, allowing the sweater’s texture to be the main voice.
When running my hand along it, the even surface and tidy cuff give a pleasant sense of order. The muted color palette adds to the calm feel, and the mitten fits into a pared-back wardrobe in a way that feels unpretentious and quietly elegant.
Steps
- Trace a simple mitten outline on the sweater fabric and cut two matching pieces.
- Place right sides together and sew around the outer edge, leaving the cuff open.
- Trim seam allowances and clip curves before turning the mitten right side out.
- Finish the cuff with a clean seam or fold for a minimalist edge.
Colorblock mittens with bold contrasting panels
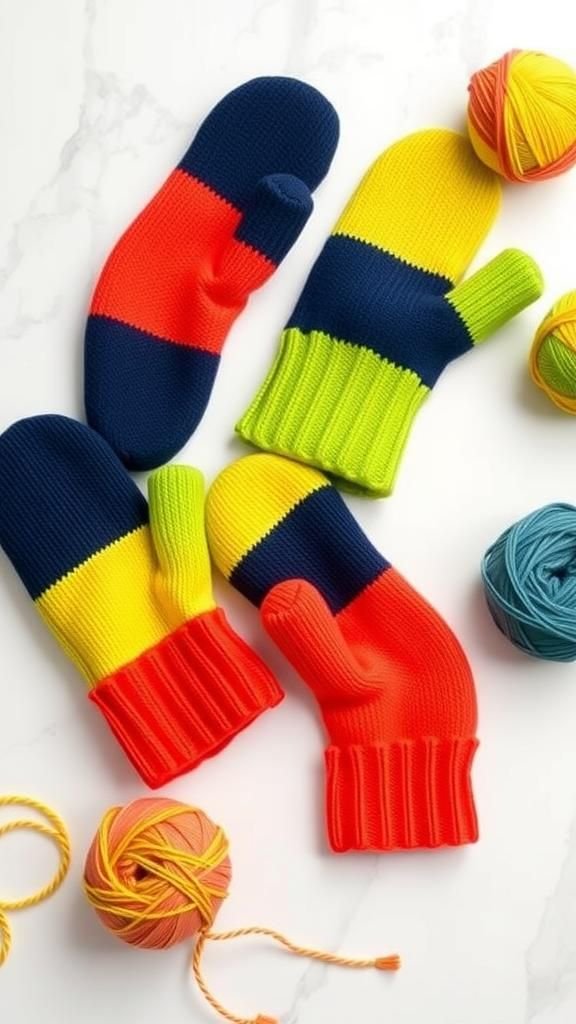
Colorblocking has a cheerful impact; bold panels catch the eye and make each mitten feel lively. The junctions between colors create neat graphic lines that are pleasing to behold and touch.
Wearing them brings a small pop of personality to an otherwise neutral outfit, and I often smile when hands move and different panels catch the light. The color choices can be playful or restrained, but either way the overall effect is energetic, like a small modern painting for the hands.
Steps
- Choose two or three sweater scraps in contrasting colors and cut mitten-shaped panels from each.
- Sew the panels together edge-to-edge to form a colorblock front and back.
- Place right sides together and sew around the mitten outline, leaving the cuff open.
- Turn the mitten right side out and finish the cuff edge neatly.
Reversible mitten with contrasting inner pattern

A reversible mitten feels like getting two accessories for one, and flipping it reveals an alternate mood. The inside often has a playful pattern or unexpected color that surprises me when I turn the cuff.
The double-layered fabric gives a comforting heft, and switching sides is a tiny act of whimsy on chilly days. I notice how the stitches read differently on the inner pattern, and the reversal offers a fresh look without adding extra pieces to my wardrobe, a small flexible pleasure during cold commutes.
Steps
- Cut two identical mitten shapes from two different sweater fabrics for outer and inner layers.
- Place the layers right sides together and sew around most of the perimeter, leaving a small opening.
- Turn the mitten right side out through the opening, press edges, and close the opening with a neat seam.
- Fold or finish the cuff so either side can be worn outward for a reversible effect.
Playful animal-face mitten with simple appliqué

Adding a small animal face to a mitten brings a sense of play, a tiny companion for cold walks. The appliqué sits slightly raised against the knit and invites a smile when spotted.
The little ears or nose give a three-dimensional quality that catches light differently. I remember gifting a pair with tiny felt eyes that made the recipient chuckle; the mittens felt instantly personal.
There’s a softness to the expression and an approachable charm in the uneven, hand-stitched edges that adds character.
Steps
- Cut mitten shapes from sweater fabric and prepare small felt pieces for the animal face.
- Arrange appliqué pieces on the mitten front and baste them in place with small stitches.
- Secure the appliqué by stitching around edges and adding embroidery for eyes or whiskers.
- Sew mitten sides together with right sides facing and finish the cuff edge.
Lattice-knit mitten using sweater rib detail
A lattice effect formed by reworking rib details gives a delicate scaffolding across the hand, a subtle architectural feel. The pattern creates tiny negative spaces that let air breathe while still offering warmth.
When light filters through the ribs, it casts soft linear shadows that dance across the palm. The texture feels dynamic under touch, a mix of raised and recessed stitches that invite exploration with the fingertips.
Wearing them feels like wearing a little knitted sculpture, both structural and cozy.
Steps
- Select a sweater section with pronounced ribbing and cut mitten panels that showcase the ribs.
- Arrange ribs to create a lattice pattern and sew joins where ribs meet for stability.
- Sew the mitten perimeter with right sides together, leaving the cuff open.
- Turn right side out and reinforce any lattice intersections to keep pattern crisp.
Mitten with leather palm reinforcement patch

A leather patch on the palm lends a rugged, utilitarian edge that I appreciate for outdoor errands. The leather is smooth and slightly cool against the wool, creating an interesting tactile contrast.
The patch looks like something salvaged from an old jacket, and that mix of materials makes the mitten feel well-traveled. When gripping handles or a hot mug, the leather provides extra grip and a reassuring firmness beneath the wool.
The aesthetic reads both practical and crafted, a small hybrid of function and nostalgia.
Steps
- Cut mitten shapes from sweater fabric and prepare a palm reinforcement piece from leather or faux leather.
- Position the leather patch on the palm area and sew around its perimeter with durable thread.
- Place mitten pieces right sides together and sew around the edges, leaving the cuff open.
- Turn right side out and finish cuff edge neatly, ensuring leather patch sits flat.
Quilted mitten with padded interior for cold days
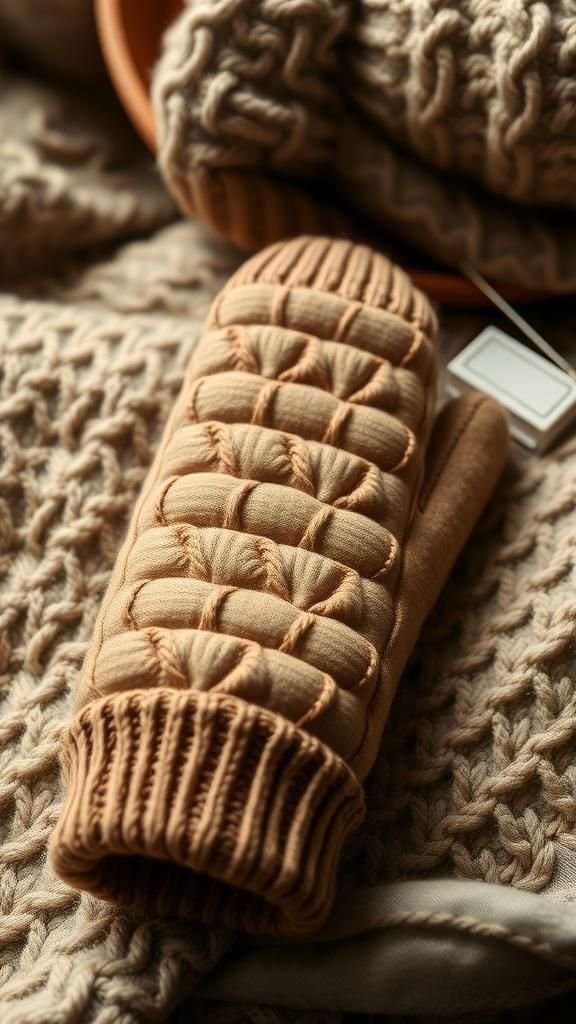
A quilted interior creates a plush, insulated space for the hand that feels reassuring on frosty walks. The tiny stitched channels hold a light padding that muffles wind, producing a gentle, cushioned sensation when flexing fingers.
The exterior knit looks slightly puffed where the quilting lines run, adding a cozy dimensionality. I enjoy the muffled, quiet quality when wearing them, like hands softened by a warm blanket.
The padded feel adds a comforting weight without feeling bulky, making them a favorite for truly cold mornings.
Steps
- Cut mitten outer pieces from sweater fabric and matching inner pieces from a soft lining material.
- Sandwich a thin batting between outer and lining layers and baste along the mitten shape.
- Quilt through all layers with parallel or diagonal lines to secure the batting evenly.
- Sew the mitten edges together, leaving the cuff open, then turn right side out and finish.
Mitten with reclaimed sweater pocket for small items
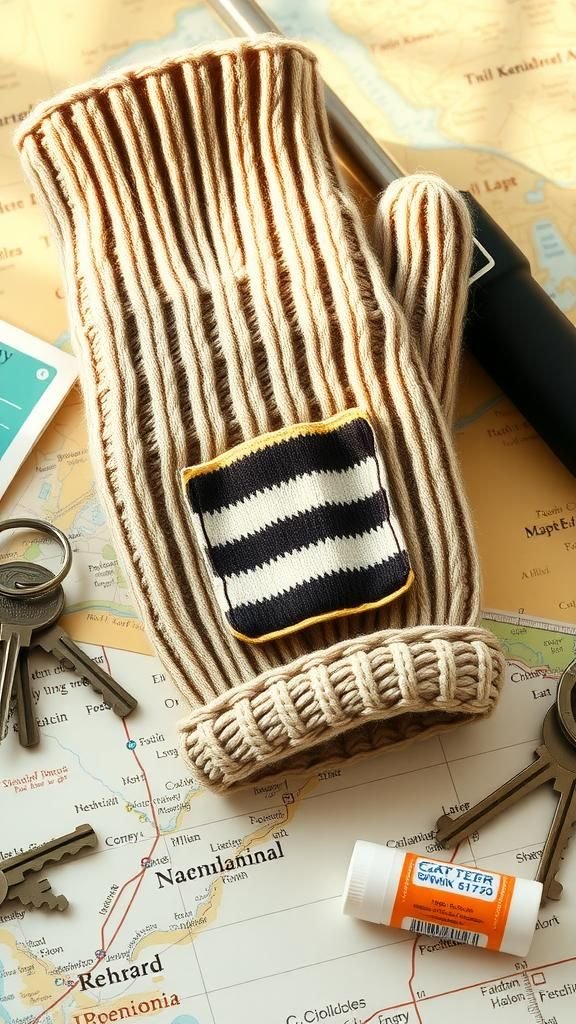
A tiny pocket on the back of the mitten is unexpectedly handy for a lip balm or a train ticket, adding a small functional detail that feels clever. The pocket is often the original sweater pocket repurposed, complete with faded wear marks that tell a story.
Reaching back and brushing fingers over the pocket is a comforting habit—the fabric of the pocket is usually softer and thinner there, which contrasts nicely with the thicker mitten body. The pocket becomes a private nook where small things can nestle safely.
Steps
- Cut mitten pieces from sweater fabric and select a small pocket piece from another garment.
- Position the pocket on the mitten back and sew around three edges, leaving the top open.
- Place right sides together of the mitten body pieces and sew around the perimeter, leaving the cuff open.
- Turn right side out and test the pocket for secure attachment and accessibility.
Festival-ready mitten with bright tassels
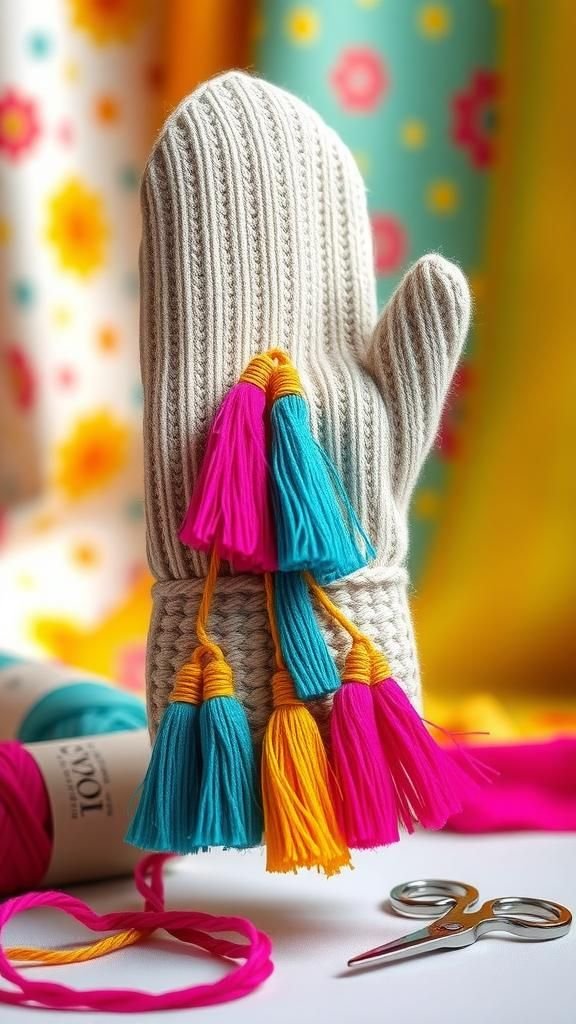
Tassels give the mitten a lively, festive air that makes grey days feel celebratory. They sway with motion and add a whimsical flourish that catches the eye.
The tassels are soft and colorful, a small explosion of movement at the wrist or cuff. I enjoy how they jostle gently when hands are in motion, creating a playful sound and visual rhythm.
The mitten becomes an accessory that announces itself, light and cheerful, and I often choose a tassel color that lifts my mood on particularly overcast afternoons.
Steps
- Cut mitten shapes from sweater fabric and decide on tassel placement at the cuff or wrist.
- Make several small tassels from yarn by wrapping and tying, then trim to even length.
- Attach tassels securely along the chosen cuff edge with sturdy stitches.
- Sew the mitten pieces together with right sides facing, finish cuff edge, and turn right side out.
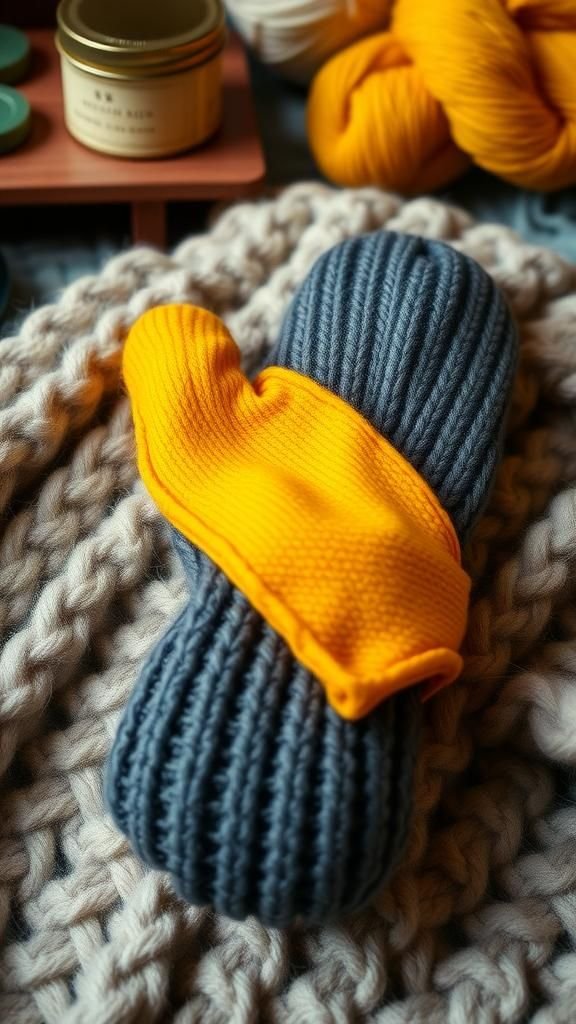
Mitten with contrasting thumb for playful accent

A thumb in a different color or texture reads like a small signature, a wink that stands out when hands grip something. The contrast draws attention to movement and can act as a tiny design focal point.
I often pick a thumb color that ties into other wardrobe elements, turning the mitten into a subtle coordinating piece. The thumb often feels slightly different under touch, sometimes smoother or rougher depending on the yarn, and that textural change is a small surprise that delights when fingers flex inside.
Steps
- Cut mitten body pieces from a main sweater fabric and a separate thumb piece from contrasting material.
- Sew the thumb piece to the mitten body at the thumb opening with secure stitches.
- Place right sides together and sew the rest of the mitten perimeter, leaving cuff open.
- Turn the mitten right side out and finish the cuff edge to complete the look.
Table of Contents