I have a pile of old bits and bric-a-brac that somehow keeps turning into planters. Over the years I learned that a cracked teacup or a retired boot can cheer up a corner of the yard in a way plastic pots never do.
Upcycled Garden Planter Crafts feel like tidy little acts of rescue, where texture and memory meet soil and green growth.
When I tinker with Upcycled Garden Planter Crafts I love how familiar objects gain a new life. There is a soft thrill watching rust, chipped glaze, or faded paint become a backdrop for tiny leaves and blooms, and I often find myself lingering by the pots with a mug of tea just to enjoy the small scene.
Vintage Teacup Planter With Trailing Herbs
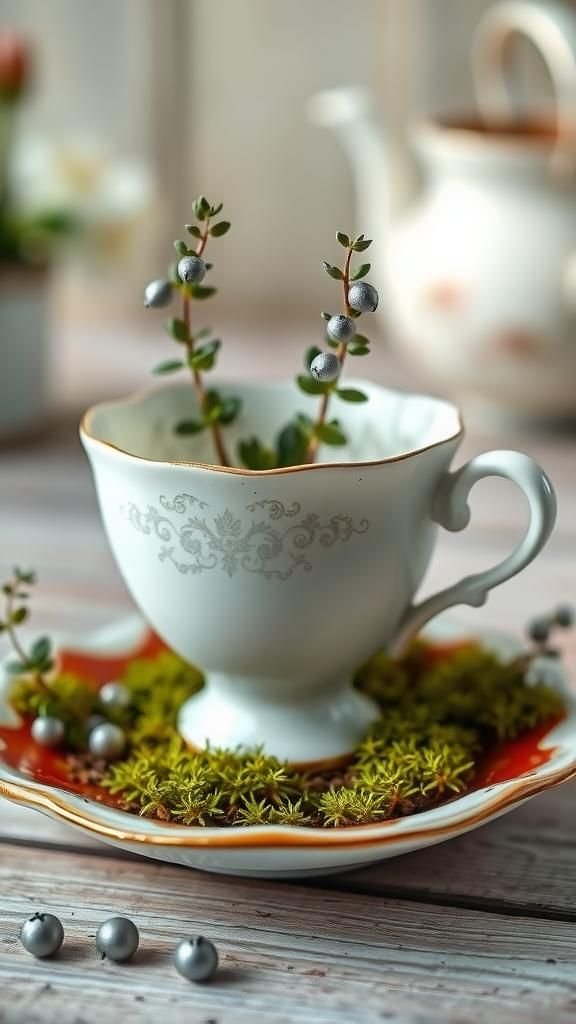
I found a chipped blue teacup at a street fair and it instantly felt like a small stage for thyme. The glaze still had that faint metallic ring when tapped, and the saucer caught morning dew in a way a plastic pot never did.
I like the contrast of delicate porcelain against rough potting soil and the way tiny herb leaves spill over the rim. There was a moment when I could almost smell the lemony brightness of mint before I actually walked to the kitchen.
Steps
- Select a sturdy teacup and saucer with no loose cracks and create a small drainage hole in the base using a ceramic drill bit and steady support.
- Add a layer of gravel or broken pottery pieces to the bottom of the cup to aid drainage and then fill with a well-draining potting mix suitable for herbs.
- Plant small herbs like thyme, chives, or oregano and gently firm the soil around roots until the plants sit snugly at the cup’s rim.
- Position the teacup on the saucer outdoors in bright indirect light and water sparingly to avoid soggy soil.
Can old boots brighten a shaded corner?

Those worn leather boots in the back of the shed seemed destined for the trash until I propped them against a fence and placed plants inside. The scuffed toes and frayed laces told stories of long walks, while the earth that settled inside smelled faintly of rain.
I enjoy the way ferns and ivy echo the boot’s rugged lines, leaves spilling out like hair. Sitting on a wet morning bench, I often catch myself smiling at how a humble boot can become a little green companion.
Steps
- Select a pair of old boots with solid soles and clean out any loose debris from the interior.
- Create drainage by making small holes in the sole area with a heated nail or awl, then add a coarse layer such as gravel or broken pottery.
- Fill boots with a light potting mix and plant shade-tolerant plants like ferns, ivy, or hosta seedlings so foliage drapes naturally.
- Arrange boots leaning against a wall or tucked into a shaded bed and water gently to settle soil around roots.
Mason jar wall pocket herb station

I love the tidy row of glass jars mounted along a kitchen fence, each one a single herb calling from its glass home. The sunlight makes the jar rims gleam and highlights tiny root threads pressed against glass.
There is a comforting domestic hum in seeing basil, parsley, and mint lined up like little green soldiers. On windy afternoons the jars clink softly against their mountings, a gentle reminder of small living things thriving from discarded pantry staples.
Steps
- Gather clean mason jars and select a narrow wooden plank or reclaimed board to act as the mounting base.
- Secure metal jar clamps or hose clamps to the board at even intervals and fasten jars into the clamps so each sits upright and stable.
- Add a thin drainage layer in each jar followed by a light potting mix and plant small herbs or cuttings with roots in contact with soil.
- Mount the board to a sunny wall or fence where jars receive morning light and water lightly to keep soil slightly moist.
Rustic pallet trough for perennial friends

An old pallet became a long trough along the back fence and suddenly the yard felt more intentional. The worn wood smelled faintly of rain and sun, its grain catching flecks of soil after a rainstorm.
I recall pressing my palms to the rough edges and imagining spring bulbs peeking out. Low perennials settled into the shallow soil and the whole arrangement reads like a living fence.
There is a subtle rhythm watching the seasonal leaves move, a slow, peaceful companion to the day’s chores.
Steps
- Lay a reclaimed pallet horizontally and line its slats with landscape fabric to retain soil while allowing excess water to escape.
- Add a layer of coarse material at the bottom for drainage followed by a mix of loamy topsoil and compost to fill the trough space.
- Plant shallow-rooted perennials or bulbs spaced along the length so crowns sit comfortably under the slats’ edge.
- Position the pallet trough against a fence or raised area and water thoroughly until soil settles.
Teapot cascade for sweet little succulents
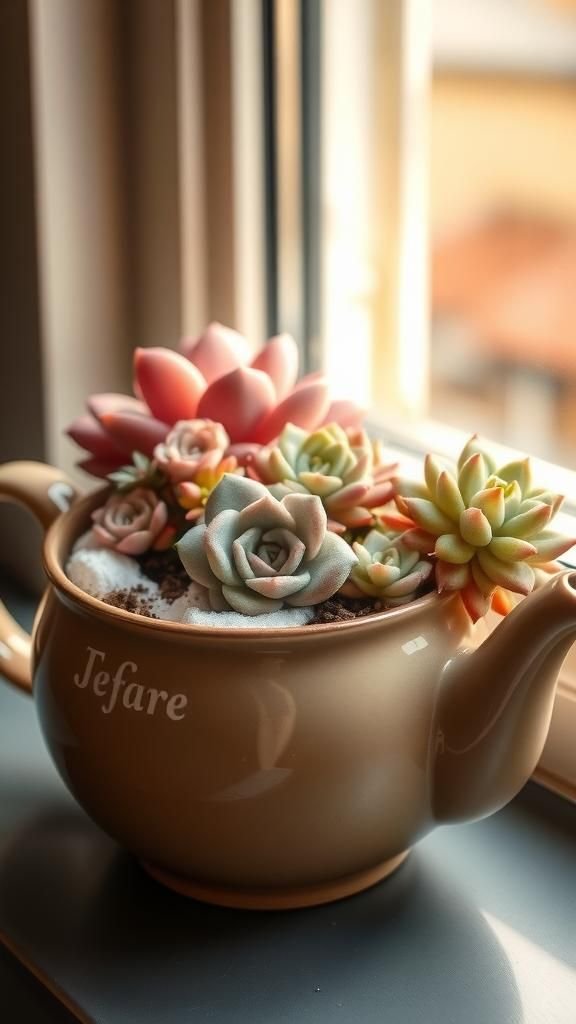
I once rescued a mismatched teapot with a missing lid and it became a tiny succulent tableau. The glossy spout and curved handle framed tiny rosettes and spiny sedums, and the play of light on the ceramic made the plants look jewel-like.
Each morning the arrangement caught a slant of sun and the succulents’ colors deepened—sage, rose, and dusty blue. I enjoy how the teapot’s gentle silhouette turns a cluster of resilient plants into an intimate focal point on a sunny windowsill.
Steps
- Choose a teapot with a stable base and without interior damage; add a small drainage layer using pumice or broken pottery in the bottom.
- Fill the teapot with a gritty succulent mix that drains well and is light in texture to prevent standing moisture.
- Arrange a selection of compact succulents and press them gently into the mix so leaves sit evenly around the spout and handle frame.
- Place the teapot in bright light with some direct sun and water sparingly to keep the soil just barely damp between waterings.
Window box from reclaimed fence slats
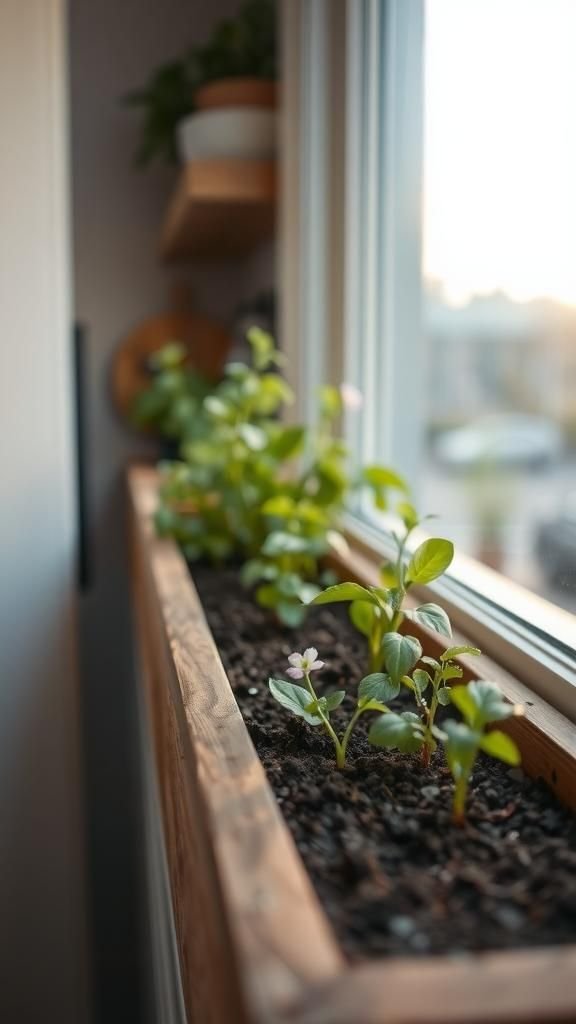
I love a long window packed with herbs and small flowers, and reclaimed fence slats make a box that feels like it belongs. The wood had tiny nail holes and a faded paint ghost that made the planter read as lived-in.
From inside, leaves leaned toward the glass and gave the kitchen a garden glow. The smell of soil after a watering instantly brightened the room.
On cool mornings condensation beaded on the window and made the whole arrangement feel cozy and a touch secret.
Steps
- Measure the window width and cut reclaimed fence slats to create the front, back, and end panels for a shallow box.
- Assemble the slats into a rectangular frame using exterior-grade screws and reinforce the bottom with a sturdy scrap board or lattice.
- Line the interior with landscape fabric, add drainage material and a quality potting mix suitable for the chosen plants.
- Plant a mix of herbs and compact flowers, place the box on the windowsill, and water until soil is evenly moist.
Brightly painted gourd planters in summer light

A basket of dried gourds looked like a handful of tiny sculptures, and painting a few brought out their curves and skins. The paint sat matte against the veined surface and reflected afternoon sun in lively patches.
I remember the smell of acrylic drying and a warm breeze that made the painted patterns ripple in the light. When filled with little trailing plants, the gourds added an organic punctuation to a patio table.
There was a soft pleasure in arranging them so colors bumped into one another without fuss.
Steps
- Choose dried gourds with stable bases and hollow interiors; clean them thoroughly and sand any rough spots to prepare the surface.
- Apply a coat of outdoor primer followed by acrylic or outdoor paint in chosen patterns and allow ample drying time between coats.
- Create drainage holes in the base if necessary, add a small drainage layer, and fill with a well-draining soil mix for the selected plants.
- Plant trailing or small foliage plants and place gourds in a sunny spot where their colors can catch warm light.
Upcycled tire raised bed — bold and cozy
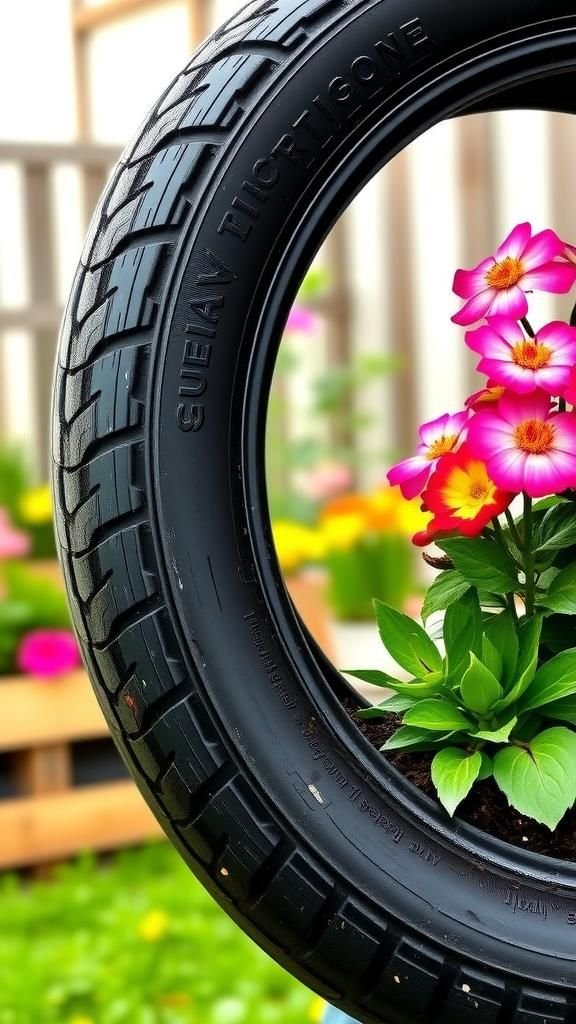
A stack of old tires takes on a new personality when filled with soil and layered with plants. The rubber edge holds heat differently, giving a cozy microclimate where marigolds and lettuces settled in surprisingly well.
I liked the way the black rubber contrasted with bright blossoms and how the round forms created a playful rhythm in the garden. When rain hit the tires there was a muted thump and a faint scent that reminded me of roadside trips, which oddly felt comforting in a backyard setting.
Steps
- Select clean tires free of oils or residues and stack them to create a raised bed height that fits the planting scheme.
- Line the inner sides with landscape fabric to prevent soil loss and add a drainage layer at the bottom before filling with rich planting mix.
- Plant a combination of flowers, herbs, or vegetables with attention to root depth and sunlight needs, spacing plants to allow growth.
- Place the tire bed in a prepared location and water well to help soil settle around roots.
Hanging colander full of airy herbs?
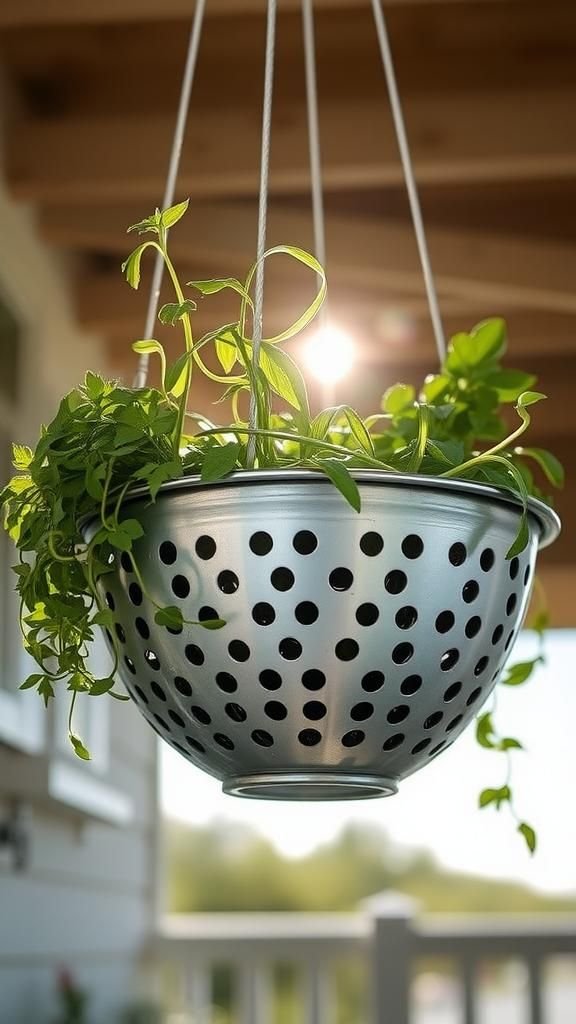
A perforated metal colander makes a charming hanging vessel, and it always amused me how the holes let roots peek through like tiny windows. Rainwater singed through the holes in a pleasant pattern and the metal gleamed after a shower.
I remember tucking thyme and oregano into the bowl and watching them sway with evening breezes, leaves brushing the colander rim. The scent after a light rain was bright and green, and the whole setup felt like a little mobile kitchen garden within arm’s reach.
Steps
- Select a metal colander in good condition and attach durable hooks or braided wire to create a secure hanging system.
- Line the colander with coconut coir or landscape fabric to hold soil while still allowing drainage through the perforations.
- Fill with a well-draining potting mix and plant compact herbs or small trailing plants that thrive in bright, airy conditions.
- Hang in a sheltered spot with good light exposure and water carefully to keep soil moist but not waterlogged.
Teacup chandelier for tiny trailing plants
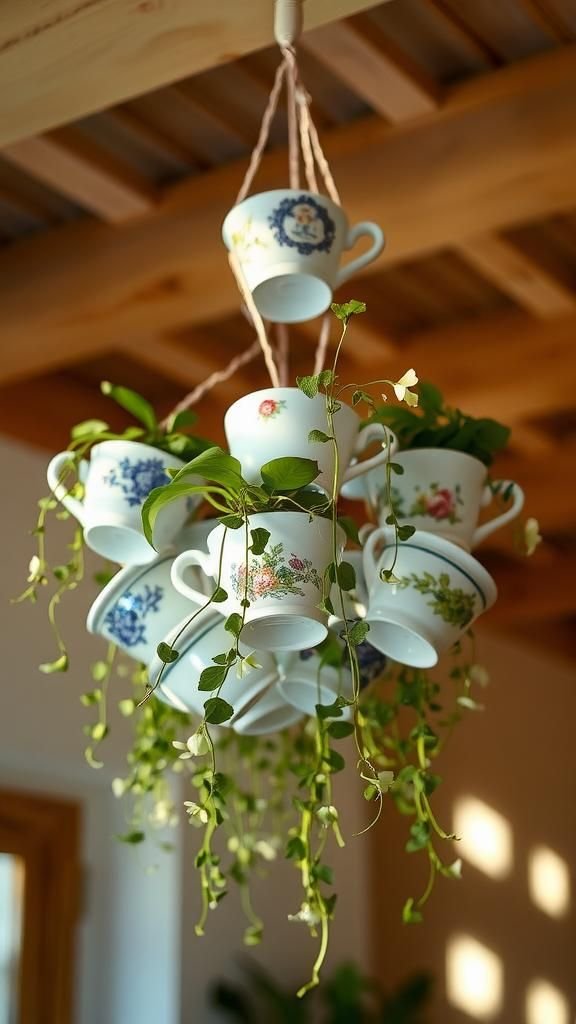
I assembled a cluster of mismatched cups into a suspended display and the result felt whimsical without being fussy. The cups chimed lightly when the breeze passed and each held a tiny trailing plant like a miniature garden.
From below the colors and patterns created a patchwork skylight that made me look up more often. There was a gentle domestic magic seeing small leaves make graceful arcs against tea-stained interiors, and the whole piece seemed to invite quiet pauses under its soft canopy.
Steps
- Collect assorted teacups and matching saucers, checking for stable rims and secure handles for hanging support.
- Attach sturdy wire or chain to each saucer using eye screws, then fasten cups to the saucers and ensure each hangs level.
- Add a drainage layer inside each cup, fill with a light potting mix, and plant compact trailing plants that will drape elegantly.
- Suspend the chandelier from a beam or overhead hook in a sheltered spot with bright, indirect light.
Repurposed drawer succulent shelf with charm
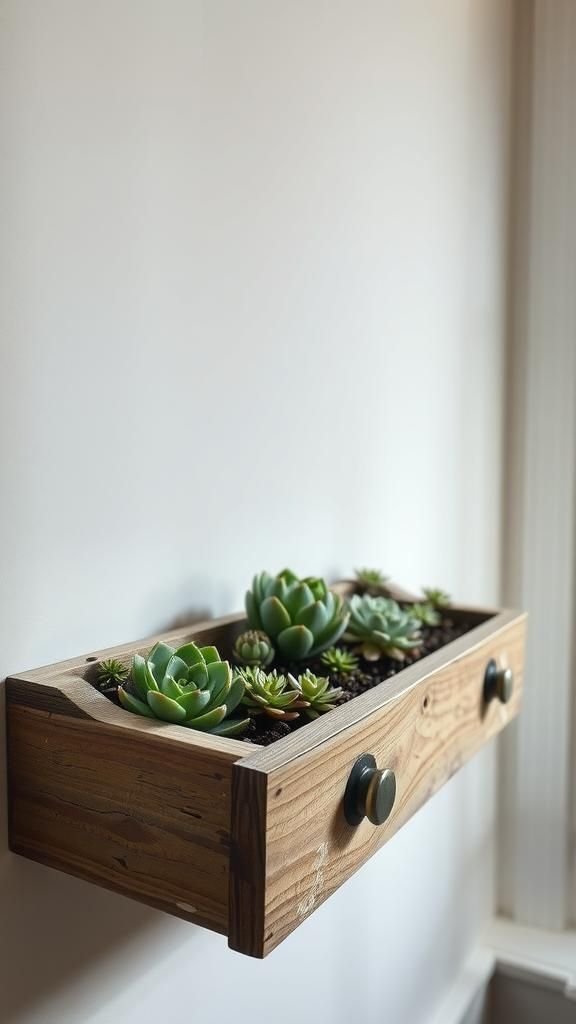
An old dresser drawer turned shelf felt like a sweet little scene when I tucked succulents into its worn interior. The wood had a faint perfume of polish from years ago, and thumb-sized chips along the edge added character.
Succulents nested among crumpled paper and specks of soil, a miniature dry garden that begged to be touched. I enjoyed arranging plants of different heights so their silhouettes played against the drawer back, and the whole piece found a gentle home leaning on a sunlit wall.
Steps
- Find a sturdy drawer with an intact back and sand any rough edges to prevent splinters while preserving its aged character.
- Position the drawer horizontally or mount it on a wall, then line the interior with a breathable fabric to hold soil.
- Add a layer of drainage material and a gritty succulent soil mix before planting an assortment of small succulents and cacti.
- Place the drawer in bright light and water sparingly to keep the soil just slightly moist between waterings.
Metal bucket herb cluster for kitchen windowsill

A galvanised bucket with a little rust patina felt at home on my kitchen ledge, holding basil and parsley in its cool metal curve. The bucket had a faint metallic tang that blended with the fresh herb aroma after watering.
I often reached past steaming mugs to pinch fragrant leaves for dinner, noticing how the plants brightened both the room and the mood. The contrast between cold metal and warm green made the arrangement visually satisfying, like a small island of freshness amid daily routines.
Steps
- Choose a metal bucket without sharp rust holes and punch small drainage holes in the bottom to prevent standing water.
- Add a layer of gravel or broken pottery to the base for drainage, then fill with a quality potting mix tailored for herbs.
- Plant culinary herbs such as basil, parsley, or cilantro, spacing them to allow airflow and healthy root growth.
- Place the bucket on a sunny windowsill and water enough to moisten the soil without creating soggy conditions.
Old ladder vertical planter with personality

Leaning an old ladder against a sunny wall turned it into a layered stage for potted plants. The rungs held an assortment of containers, and the faded paint along the rails felt poetically patient.
Morning light slid across leaf edges and the whole display shifted with each breeze. I liked how different containers—clay, tin, glass—created an informal rhythm and how the ladder’s lean suggested a casual hospitality.
At dusk the silhouette of leaves against the sky made the ladder feel like part sculpture, part living wall.
Steps
- Find a sturdy ladder with stable feet and check that rungs can support the weight of potted plants and soil.
- Arrange pots and repurposed containers along the rungs, balancing heavier items lower and lighter ones higher for stability.
- Use liners or trays under pots to catch stray soil and water, and select plants suited to the ladder’s sun exposure.
- Position the ladder securely against a wall or fence to prevent slipping and water plants carefully to avoid runoff.
Coloured glass bottle border for whimsical beds

A line of recycled glass bottles makes a playful edge that catches the light in a way a plain border never does. When afternoon sun passes through green, amber, and blue glass the soil beneath takes on a jewel-tone glow.
I remember arranging bottles at slightly different heights so each color could sing, and the tinkling when a breeze moved the row made me laugh. The border felt like a little party for the garden, where reflections and plant shadows mingled into a lively, ever-changing frame.
Steps
- Collect glass bottles of similar neck size and clean them thoroughly, removing labels and residue for a clear finish.
- Bury each bottle neck-first along the bed edge, adjusting depth so bottles sit firmly and at varying heights for visual interest.
- Space the bottles evenly to create a continuous border that catches light, and press soil around each base to secure them.
- Stand back and adjust spacing or heights to refine the look before settling into regular garden care.
Tin can herb lanterns that catch evening glow
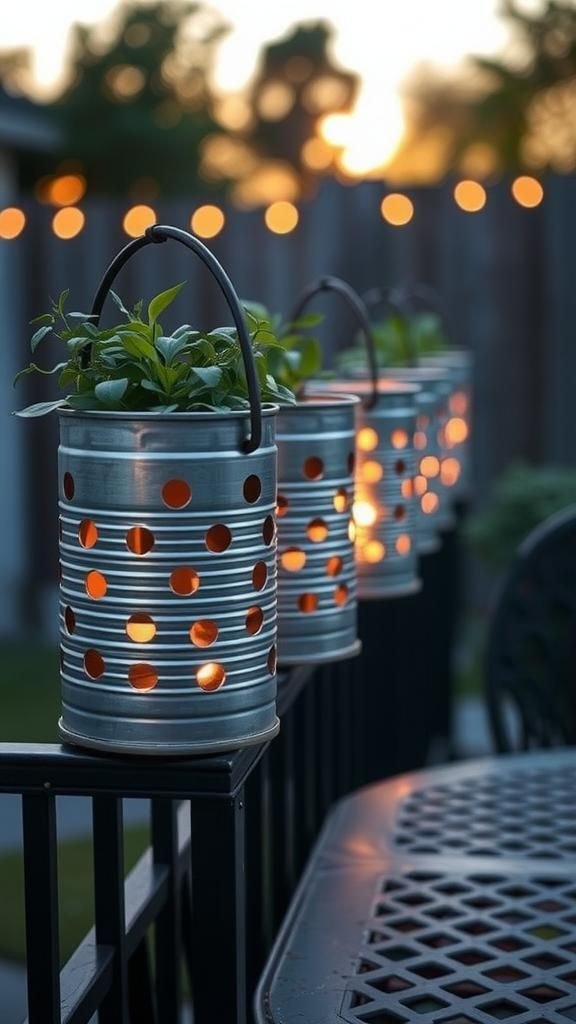
Empty tin cans with punched patterns become lantern planters when set along a patio rail. When a candle or small solar light is placed inside the can’s pattern it casts a constellation of dots across leaves and table.
I enjoy the quiet ritual of arranging the cans and watching light skim through holes onto soil and foliage. The metal’s cool touch contrasts with the warm halo of light, and on a quiet evening the tiny dots feel like a private sky hung low for close viewing.
Steps
- Clean cans and remove sharp edges, then plan a decorative pattern and punch holes using a nail and hammer on a firm surface.
- Paint cans with rust-resistant paint if desired and allow thorough drying before adding any plants or lighting elements.
- Add a layer of gravel for drainage, fill with potting mix, and plant herbs or small flowers suited to the light conditions.
- Place a small candle or solar light nearby to create evening glow through the punched patterns without placing the flame directly in soil.
Concrete block pocket garden, quiet and sturdy
Concrete blocks stacked at the edge of a path make little pockets that are oddly elegant when filled with succulents or low herbs. The cool gray of the blocks played nicely with the bright green of sedum, and rain left tiny beads that traced the block edges.
I enjoyed the geometric order and the way small plants softened the industrial lines. On a hot afternoon the blocks retained warmth and the plants looked content, a low-maintenance pocket garden that felt permanent without being uptight.
Steps
- Arrange concrete blocks in the desired configuration, ensuring stability and a level base for the stacked formation.
- Fill the hollow pockets with a mix of gritty soil appropriate for succulents or drought-tolerant plants for good drainage.
- Plant individual pockets with small succulents, herbs, or alpine plants and press soil gently around each root to secure them.
- Water lightly to settle soil and position the block garden where plants will receive suitable sun exposure.
Teacup bird bath turned into mini planter?
A shallow bird bath with a faint ring of mineral stains became a snug bowl for a mini fern colony. The shallow curve held soil like a tiny basin and the worn glaze caught light in a way that made leaves seem to glow.
I found myself checking it more often than a full birdbath, captivated by the tiny habitats that formed. When rain came the whole piece sang with tiny droplets and the smell of damp earth.
It felt like a private, low garden chosen for quiet observation.
Steps
- Select a shallow bird bath or saucer with a stable base and clean it thoroughly to remove mineral build-up.
- Add a thin layer of small stones for drainage followed by a lightweight potting mix suited for the chosen plants.
- Plant small ferns or moisture-loving plants that thrive in shallow soil and arrange them so foliage fans outward gracefully.
- Place the mini planter in a sheltered spot that receives indirect light and water to maintain consistent moisture.
Repurposed wine crate strawberry cube with warmth
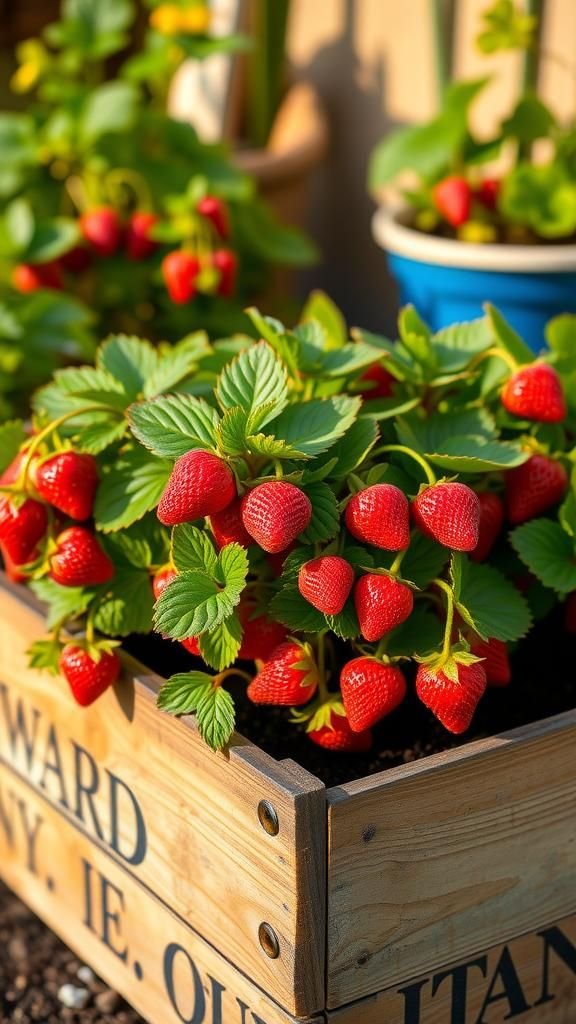
An old wine crate became a cheerful cube planter for strawberries that felt like a small harvest promise. The wood smelled faintly of tannin and wore stamped letters like a badge of history.
Little berry plants nestled into the crate, and the contrast of glossy leaves against the aged wood made each fruit stand out. Harvesting a single red berry felt ceremonious, a small reward pulled from a reclaimed box.
The crate’s edges warmed in afternoon sun, and the whole scene invited slow afternoons and sweet snacks.
Steps
- Select a sturdy wine crate and reinforce any weak joints with wood glue or small nails to ensure it holds soil safely.
- Line the interior with breathable fabric to keep soil contained while allowing excess water to drain away.
- Add nutrient-rich potting soil and plant strawberry crowns spaced to allow runners, pressing soil gently around roots.
- Place the crate in a sunny location, water consistently to keep soil slightly moist, and watch for ripening fruit.
Hose reel turned succulent spiral on patio

An old hose reel with its circular frame begged to be a spiral garden, and succulents fit the geometry perfectly. The round coils created a rhythmic bed where each plant had a little niche.
When sunlight hit the arrangement it produced rings of shadow and color, and the ceramic textures of rosettes contrasted with painted metal. I often paused with a cup of coffee to admire how the spiral drew the eye inward, turning leftover hardware into something playful and quietly deliberate.
Steps
- Clean and stabilize an unused hose reel, then position it on a flat surface where it will remain steady when filled.
- Line the circular sections with landscape fabric and add a drainage layer to each coil segment to manage moisture.
- Fill with a gritty succulent mix and plant a variety of low-growing succulents in the spiral niches for visual flow.
- Place the reel in bright light and water sparingly, allowing soil to dry between light watering sessions.
Egg carton seed starters for early green shoots
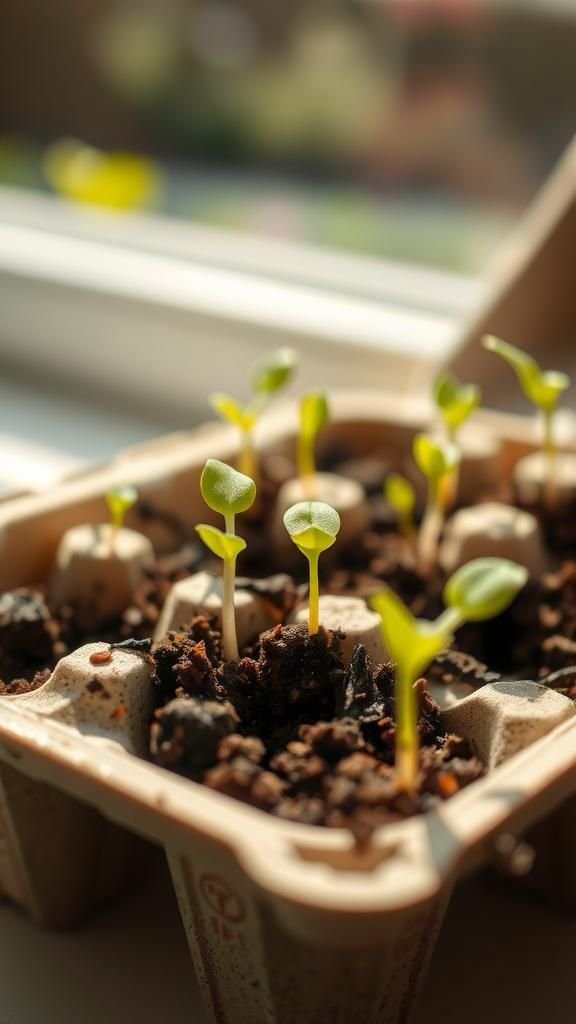
An egg carton is such an unassuming cradle for tiny seedlings, and I always smile at those first bright green threads pushing up. The cardboard’s warm fiber drank up the early watering, and the smell of damp earth mixed with paper felt like spring in a box.
I liked arranging the carton on a sunny sill and watching tender leaves unfurl, each cell a small promise. When the carton was crowded with little shoots, the whole kitchen seemed to hum with impatient energy, wanting to see what would come next.
Steps
- Fill each egg carton cell with a light seed starting mix, pressing lightly to create a small planting pocket for seeds.
- Sow seeds at the depth recommended for the plant type, mist the soil surface gently to avoid displacing tiny seeds, and cover loosely to retain humidity.
- Place the carton in a warm, bright location until germination, keeping soil moist with light misting as needed.
- Transplant seedlings into larger pots or garden beds once roots have developed and plants show strong initial leaves.
Painted terracotta mosaic from broken pottery pieces

Fragments of old pottery glued to a terracotta pot created a mosaic that felt like a tiny archaeology of meals and moments. The uneven shards caught light at different angles and the grout valleys held a faint scent of damp clay.
I enjoyed tracing the glossy glaze across broken edges and seeing how colors winked in sun or cloud. The mosaic made the pot feel like a personal collage, and when a plant unfurled beside a bright shard it looked as if it had always belonged to that vessel.
Steps
- Arrange broken pottery shards on a terracotta pot surface to test patterns and color balance before adhering them permanently.
- Adhere pieces using an exterior-grade adhesive suitable for ceramics and press shards firmly to the terracotta until set.
- Fill gaps with grout, smoothing into crevices and wiping away excess to reveal the mosaic pattern cleanly.
- Allow the grout to cure fully, then plant in the pot with appropriate soil and place in suitable light for the chosen plant.
Table of Contents