I still remember the first time I mixed clear resin and a handful of tiny blooms on my kitchen table, mesmerized by how light bent through the glossy surface. Resin jewelry craft ideas have a way of turning small keepsakes into wearable memories, and that curious sparkle keeps pulling me back to the workbench.
Over time I collected little rituals and surprises that make each piece feel personal.
These resin jewelry craft ideas are a mix of experiments, happy accidents, and thoughtful touches that often feel like chatting with a friend about what worked and what delighted me.
Pressed flower pendants with glossy depth

I have a soft spot for pressed petals trapped under glossy resin; they look like tiny windows into an afternoon spent outside. The surface catches the light so that veins and color gradations come alive, while the edges keep a satisfying glassy shine.
Holding a pendant against sunlight feels like holding a miniature meadow. I often find that the scent of the workspace lingers in my memory when a pendant is finished, the faint sweet floral note paired with the resin’s subtle scent becoming part of the making story.
Steps
- Measure resin and hardener according to the product directions, stirring slowly until the blend looks clear and streak-free.
- Place pressed petals inside a silicone pendant mold and gently pour resin to fully cover the botanical elements, watching for trapped air.
- Remove bubbles with a heat source held at a safe distance, allow the piece to cure undisturbed until hard to the touch, then demold carefully.
- Lightly file any rough edges and polish the surface with a soft cloth until the pendant gleams, then add metal findings for wearing.
Ocean-inspired wave charms with beach sand

Making charms that feel like a pocket of shoreline is a small ritual I return to when I want a calming project. Tiny grains of sand sit underneath translucent blue layers, and flecks of iridescent mica suggest sun glinting on water.
The finished pieces have a wet, luminous quality that makes me think of the ocean after a storm, all fresh and a little wild. When a charm catches light at the right angle, it seems to move, like a miniature tide held in glassy resin.
Steps
- Combine resin components until the mixture becomes clear, then divide some into separate cups to tint with blue pigment and add a touch of mica for shimmer.
- Layer a thin puddle of clear resin in a silicone charm mold, sprinkle a small amount of fine sand, then pour a blue-tinted layer to create depth.
- Use a gentle heat source to remove any surface bubbles and allow layers to cure fully before adding final clear gloss.
- Demold the charm, refine edges with a fine file, and finish with a polish cloth to enhance the glossy, watery look.
Geode slice pendants with metallic veins
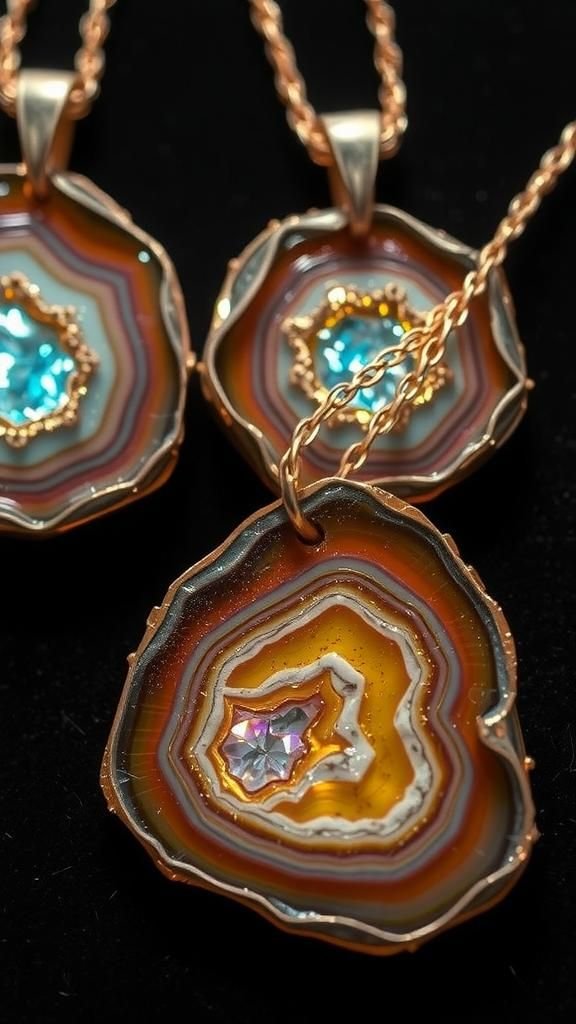
I love how a geode-style pendant can feel geological and jewel-like at once, like holding a tiny cave of color. Thin metallic veins catch light in unexpected ways, while translucent layers around the center create a sense of depth and cavernous sparkle.
The texture contrast between glossy surfaces and sparkling inclusions makes each piece feel earned. There’s a quiet satisfaction in seeing a rough idea translate into a pendant that looks like a cross-section of some mysterious mineral, warm tones glowing against cooler silvery streaks.
Steps
- Mix resin thoroughly until streaks disappear, and tint small portions with complementary pigments for inner and outer layers.
- Pour a darker core color into a mold, add mica flakes and metallic powder to create reflective veins, then surround with lighter translucent layers.
- Gently coax pigments to bloom inward for a natural geode appearance, remove surface bubbles, and let cure fully.
- Demold once hardened and smooth edges with a fine file, finishing with a buffing cloth to highlight metallic shimmer.
Tiny terrariums: moss and micro foliage in resin
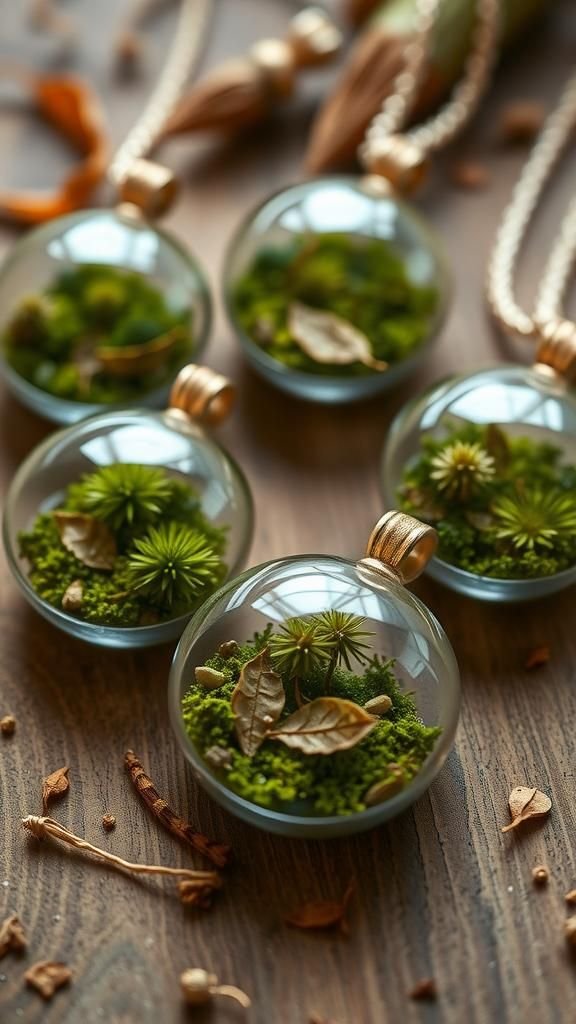
Encasing a sliver of moss feels like bottling a breath of forest. The green textures hold surprising life under a glossy surface, and tiny bits of lichen create miniature landscapes that invite a slow look.
Some pieces carry the earthy, faintly sweet smell of dried botanicals, which brings me back to woodland walks. When light moves across these pendants, the moss shadows give a sense of depth and distance, as if a whole tiny grove is watching from within the resin.
Steps
- Prepare clear resin and let it reach a workable clarity, placing delicate moss and micro foliage into a shallow pendant mold.
- Pour resin gently to cover the botanical pieces, taking care to avoid trapping excess air around the textures.
- Use a heat source sparingly to lift remaining bubbles and allow the resin to harden completely in a stable environment.
- Demold the miniature terrarium, refine edges with a fine file, and buff the surface until a soft gleam appears.
Photo lockets sealed in crystal-clear resin
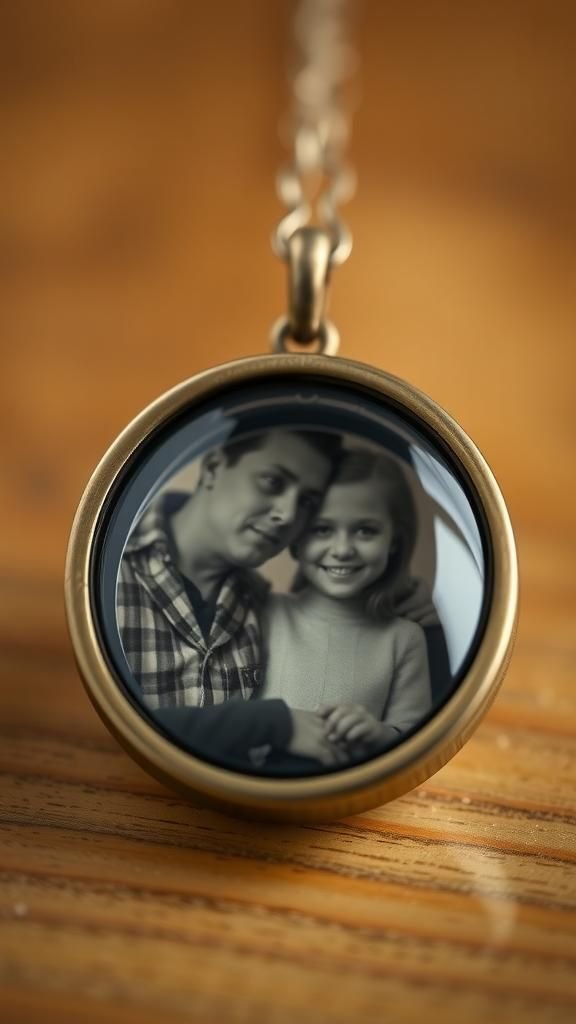
Keeping a tiny photograph safe under a glossy resin layer feels like preserving a whisper of time. The image takes on a luminous quality, colors deepening and becoming almost three-dimensional.
I often find myself peeking at the tiny face or scene held inside, the shine around the edges framing the memory. The surface reflects light softly, and the cool smoothness gives the locket a weight that makes it feel like a meaningful keepsake rather than a trinket.
Steps
- Trim a small printed photo to fit the pendant space and seal the image surface with a compatible varnish to prevent bleed when encased.
- Mix resin until clear, pour a thin base layer into a bezel, place the sealed photo gently, then add resin to cover and level the surface.
- Eliminate bubbles with gentle heat and let the piece cure until fully hardened, then demold with care.
- Touch up edges using a fine file and polish to reveal a high-gloss finish that enhances the photograph beneath.
Iridescent shimmer drops using mica powder

There is something playful about watching mica swirl into resin and shift color as the angle changes. These shimmer drops catch ambient light and throw a subtle rainbow across the surrounding area, creating a lively dance of color.
The surfaces feel silky and mirror-like, while the interior plays host to pearly clouds and hints of metallic gleam. I like pairing these with matte metal settings to let the shimmer stand out, and they always draw comments when they flip in the light during conversation.
Steps
- Stir mica powder into measured resin until a smooth iridescent sheen appears and small clumps are fully incorporated.
- Pour the shimmering mixture into teardrop or round molds evenly, watching the color shift as it settles.
- Remove surface bubbles using a brief application of heat, then allow a complete cure away from dust and vibration.
- Demold the pieces, refine any edges with a fine file, and polish to enhance the pearlescent effect.
Resin terrazzo studs with colorful chip flecks
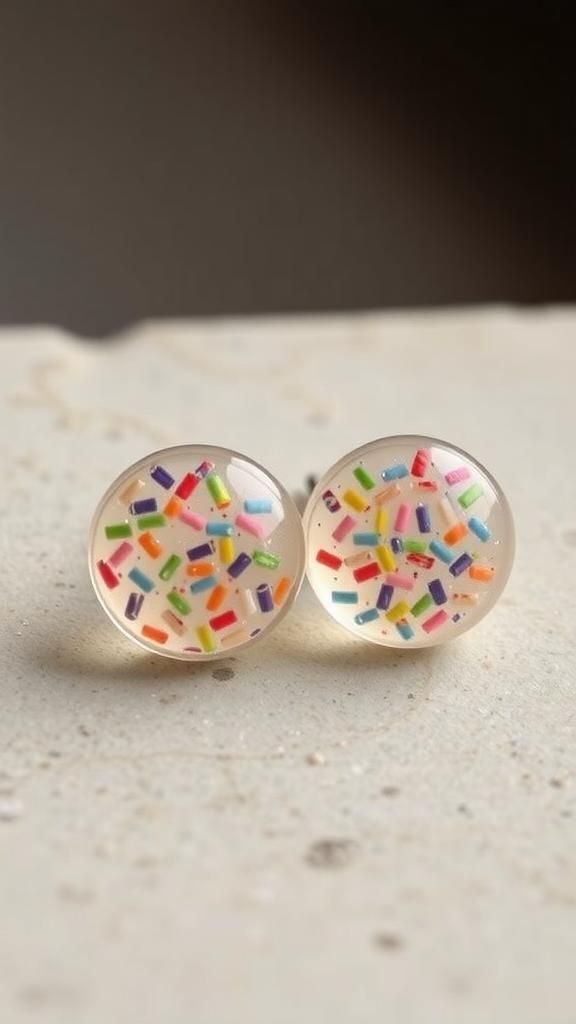
Terrazzo-style studs feel so cheerful, each tiny fleck suspended like confetti under gloss. The tactile contrast between the smooth resin surface and the illusion of fragmented chips inside gives a playful, modern vibe.
I often mix unexpected color combos, which leads to happy accidents when random flecks settle into pleasing patterns. Wearing a pair brings a sense of casual creativity; the little speckles catch light without shouting, and the compact shape makes them a comforting everyday accessory.
Steps
- Chop small pieces of colored polymer clay or pre-made chip confetti into tiny flecks and scatter them into a shallow mold.
- Mix resin until clear, pour gently to cover the chip flecks, and coax the elements to sit where they look balanced.
- Use a burst of heat to lift trapped bubbles and let the piece cure fully in a clean area.
- Demold the studs, smooth edges lightly with a fine file, and buff the tops for a glossy terrazzo finish.
Stained-glass effect pendants with alcohol inks

Watching alcohol inks bloom in resin is like painting with light. The colors bleed and interact in ways that feel partly planned and partly alive, producing luminous pools and veined transitions that mimic stained glass.
The glossy surface enhances the saturation, making hues pop against a dark bezel. I enjoy the unpredictability, the moment when the inks settle into patterns that surprise me.
Wearing one of these feels like carrying a tiny jewel that holds a contained storm of color and fluid motion.
Steps
- Mix resin to a clear consistency and pour a thin base into a bezel to provide support for the colors.
- Drop diluted alcohol inks onto the resin surface and nudge them with a gentle airflow until appealing patterns form.
- Seal the design with an overlayer of clear resin to lock the inks in place, removing bubbles with a quick pass of heat.
- Allow a full cure, then demold and gently smooth edges before polishing to reveal the stained-glass brilliance.
Glow-in-the-dark galaxy cabochons for night

There is a small delight in seeing jewelry change from daytime sparkle to nocturnal glow. Galaxy cabochons hold a depth of midnight blues and scattered glitter, and when the lights go down a soft green or blue luminescence blooms from the center.
The effect feels dreamy, like wearing a tiny constellation. I often charge a piece against a bright lamp and then watch as it releases that stored light, which is oddly calming.
The tactile smoothness combined with the gentle glow makes these pieces a favorite for evening wear.
Steps
- Mix resin and glow pigment thoroughly until the glow particles are evenly distributed throughout the mixture.
- Pour the mixture into dome-shaped cabochon molds, adding a hint of dark pigment and sprinkle of microglitter for starry effect.
- Remove bubbles with a gentle heat source, then allow the cabochons to cure completely in a dust-free area.
- Demold carefully, refine edges with a fine file, and polish to a glassy finish so the daytime shimmer complements the night glow.
Vintage lace silhouettes sealed in resin

Encasing a scrap of vintage lace creates a look that feels both delicate and strong, as if textile and glass made a pact. The fine patterns cast intriguing shadows beneath the clear surface, and the lace texture reads like a soft relief against the smooth gloss.
I often select pieces with faded threads because the worn edges tell a story and respond beautifully to light. The finished pieces turn slow glances into moments of appreciation for the tactile history tucked inside a small, wearable frame.
Steps
- Arrange a trimmed bit of lace inside a shallow pendant bezel and mixed clear resin to a streak-free clarity.
- Pour a thin layer of resin to anchor the lace, then add another layer to fully encapsulate the textile without trapping air.
- Use a gentle heat pass to remove bubbles and allow the pendant to cure undisturbed until hard.
- Demold, tidy any rough edges with a fine file, and buff the surface to emphasize the lace pattern beneath.
Mixed-metal inlays with resin accents

Combining metal shavings or thin foil with resin creates a contrast that feels modern and artisanal. The metal flashes and settles in ways that feel almost painterly against the clear gloss, and cool metallic gleams play against warmer resin tones.
I enjoy the tactile weight of metals paired with the smooth resin skin, and how light skates across the different elements. Each piece becomes a little study in contrast, where reflective fragments peek through transparent layers like notes in a visual song.
Steps
- Scatter small metal flakes or foil fragments into a bezel or mold, arranging them until the visual balance feels right.
- Mix resin until clear, pour gently to encapsulate the metal elements, and watch the metallic pieces find natural orientation.
- Remove surface bubbles with a brief heat application and allow the piece to cure fully in a stable environment.
- Demold, refine edges with a fine file, and polish to enhance the interplay between metal gleam and resin clarity.
Minimalist clear resin rings with suspended inclusions

Minimal rings that hold a single seed or tiny bead feel quietly intentional. The clear band looks like a sliver of glass hugging the finger, and the suspended object becomes a focal point as if floating in air.
Wearing one of these feels light and modern, and I often appreciate the little pause people take when they notice what’s trapped inside. The interplay between skin tones and the resin’s transparency adds a subtle organic quality that makes the piece feel integrated with the person wearing it.
Steps
- Prepare ring molds and place a tiny inclusion such as a seed or bead inside the cavity to create a focal point.
- Mix resin until clear and pour slowly to encase the inclusion, ensuring the object remains centered as the resin settles.
- Remove bubbles with gentle heat and allow the ring to cure until fully hardened in a dust-free space.
- Demold and finish the band edges with a fine file, then buff with a polishing cloth for a smooth, glass-like feel.
Layered skyline bangles with translucent horizons
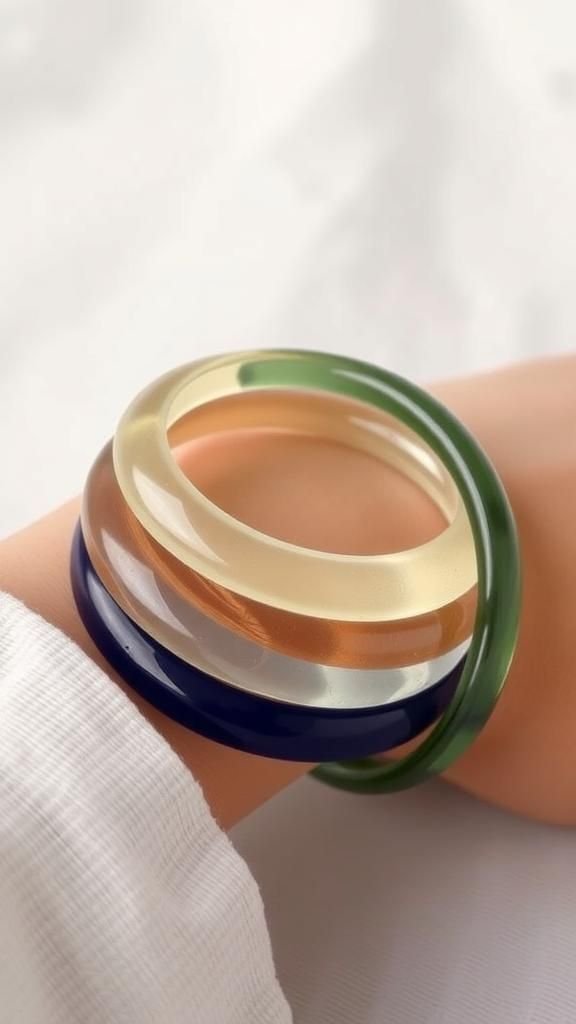
A bangle that holds layers of tinted resin can feel like a tiny geography lesson wrapped around the wrist. Each translucent band hints at horizon lines and distant colors, and gentle movement makes the layers shift and catch light differently.
The finish has a smooth, glassy touch that plays well against warm skin. I like watching how ambient light amplifies certain bands while others fade into suggestion, creating an effect that feels both sculptural and quietly narrative.
Steps
- Tint measured resin into a few harmonious hues, pouring thin layers into a circular bangle mold to establish the layered horizon effect.
- Allow each layer to reach initial set before adding the next to maintain distinct bands and minimize blending.
- Use careful heat to remove bubbles and let the entire bangle cure fully until hard throughout.
- Demold the bangle, smooth any rough areas with a fine file, and buff until the outer surface gleams.
Resin and wood hybrids with natural warmth
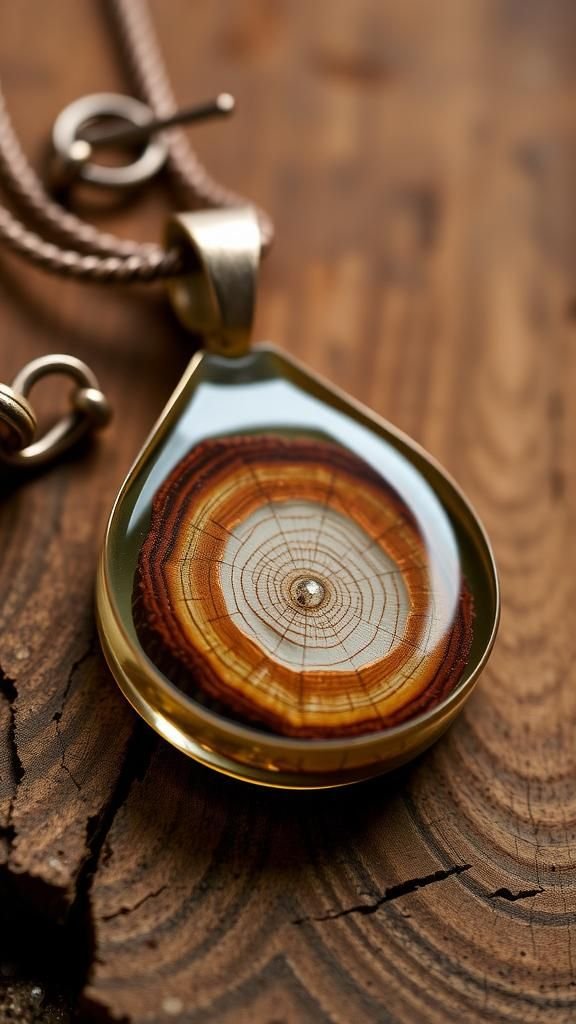
Combining a slice of warm wood with clear resin creates a balance between organic grain and glossy glass-like surfaces. The wood grain peeks through like a landscape, while clear resin amplifies the texture and depth.
Touching these pieces feels comforting, a contrast between cool gloss and the idea of warmth from the wood. I often imagine the tree’s history captured in a tiny wearable fragment, and it gives the jewelry an earthy presence that pairs well with casual, tactile outfits.
Steps
- Place a thin slice of stabilized wood inside a resin bezel, ensuring the grain faces upward for visual impact.
- Mix clear resin and pour gently to cover the wood, watching how the liquid magnifies the grain patterns.
- Lift any surface bubbles with brief heat and allow the piece to cure until completely hardened.
- Demold, refine edges with a fine file, and finish with a soft polish to harmonize the wood and resin surfaces.
Encased shells and sea glass for coastal charm
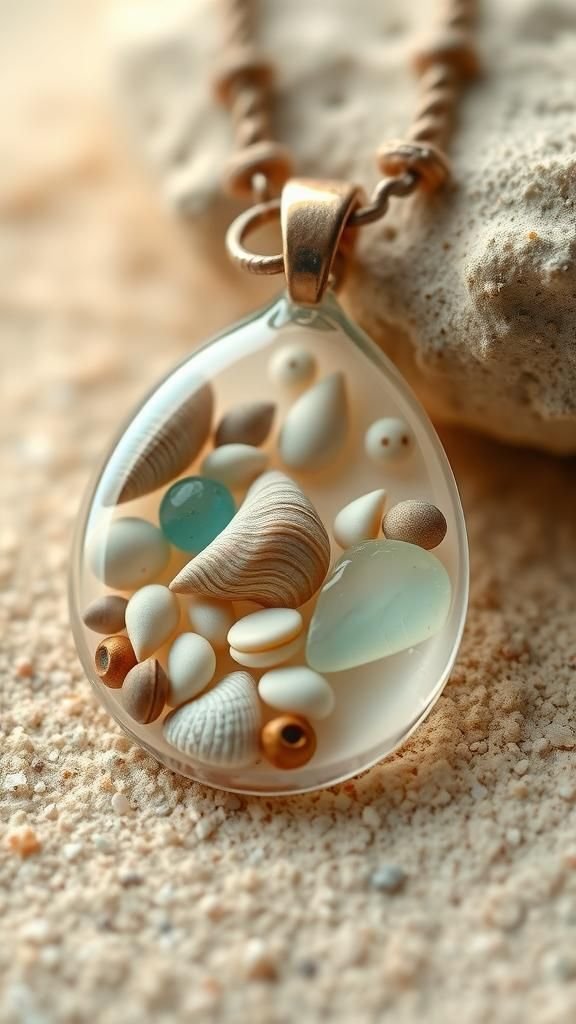
Small shells and smoothed sea glass carry the smell of salt in memory even when dry, and sealing them under resin feels like tucking away a seaside afternoon. The smooth frosted quality of beach glass contrasts pleasantly with the resin’s gloss, creating a tactile duet.
I enjoy how each piece has a backstory of tides and pockets of shoreline, and the finished jewelry evokes that calm coastal feeling without needing to be ostentatious. Light interacting with translucent glass or pearled shell can be quietly mesmerizing.
Steps
- Arrange small shells and pieces of sea glass inside a shallow pendant mold, placing elements for pleasing balance.
- Mix resin to clarity and pour slowly to encapsulate the found objects, watching for tiny air pockets near irregular surfaces.
- Use a gentle heat pass to remove bubbles and let the piece cure fully until hard to the touch.
- Demold carefully, tidy edges with a fine file, and buff the top surface to enhance the glossy contrast with frosted elements.
Resin-filled bezel cuffs with embedded textiles

A cuff that carries a strip of fabric beneath resin becomes a wearable keepsake of texture and color. The textile pattern feels preserved and magnified, and the smooth resin surface invites touch.
I sometimes tuck a tiny piece of a beloved garment into a cuff, and wearing it feels like keeping a memory close. The interplay between fabric weave and resin gloss creates a tactile contrast that often starts conversations.
The finished piece sits comfortably on the wrist, the embedded textile visible like a band of private story.
Steps
- Cut a narrow strip of textile sized to the bezel area and position it inside the cuff frame so the pattern reads attractively.
- Mix resin until clear and pour carefully to fill the bezel, ensuring the fabric lies flat and air pockets are minimized.
- Use brief heat to clear surface bubbles and allow the cuff to cure thoroughly until fully hardened.
- Demold, neaten edges with a fine file, and polish the resin top for a smooth, protective finish over the textile.
Kaleidoscope mosaic pendants with tiny fragments
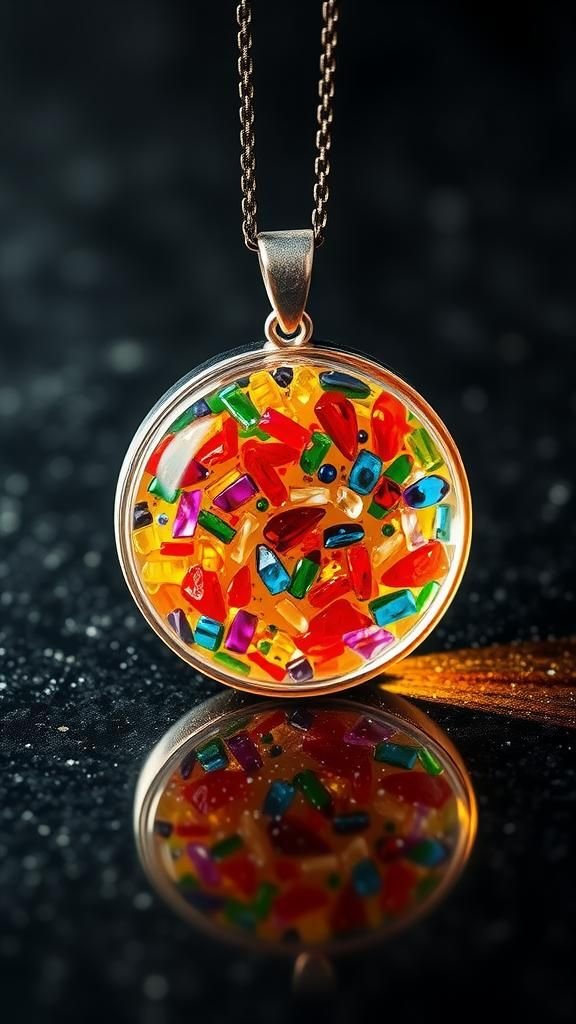
Tiny slivers of colored glass or ceramic set inside resin create a playful kaleidoscope of color. When light hits the mosaic, facets catch and scatter it into lively flashes, and the random arrangement often yields unexpected harmony.
I enjoy the collage aspect, collecting mismatched bits and letting them find a home in a small pendant. The surface stays smooth while the interior looks textured and dynamic, like a microscopic party beneath a calm, glossy surface that makes each pendant feel jubilant and handcrafted.
Steps
- Arrange small fragments of colored glass, ceramic, or found materials inside a pendant mold to form an appealing mosaic layout.
- Mix resin to clear consistency and pour over the fragments, ensuring all pieces are covered and positioned as desired.
- Remove any trapped bubbles with a gentle heat pass and allow the pendant to cure completely.
- Demold gently, refine edges with a fine file, and polish the top to reveal a smooth mosaic under bright gloss.
Botanical silhouette earrings with shadow play

Silhouettes of leaves and stems cast intriguing shadows when sealed under resin, creating a layered effect that changes with the light. The contrast between dark shapes and clear resin gives the pieces a graphic elegance, and the glossy finish makes the silhouettes appear suspended.
I enjoy how these feel both modern and intimately natural, like sketching with plant matter. When worn, the earrings translate stillness into motion as shadows deepen and soften depending on angle, making them quietly expressive accessories.
Steps
- Position thin botanical silhouettes in an earring mold so the negative space reads well once encapsulated.
- Mix resin until clear, pour gently to enclose the silhouettes, and check for air pockets near delicate edges.
- Use a light heat pass to lift bubbles and allow the resin earrings to cure fully before handling.
- Demold carefully, smooth any roughness with a fine file, and polish the surfaces until they gleam.
Resin inlay charms with colorful polymer bits

Small bits of brightly colored polymer clay embedded in resin feel playful and tactile. Each fragment becomes a tiny abstract shape that floats beneath the gloss, and the combination often reads like confetti frozen mid-air.
I like experimenting with color palettes that sing together unexpectedly, and the smooth finish keeps the surface friendly to touch. These inlay charms wear light and fun, carrying a handcrafted look that often sparks compliments for their joyful, collage-like appearance.
Steps
- Crumble or chip colored polymer clay into tiny pieces and arrange them inside a charm mold for an appealing composition.
- Mix resin thoroughly and pour to cover the colored bits, checking that the fragments remain dispersed and visible.
- Lift surface bubbles with a brief heat pass and allow the charm to cure completely in a dust-free spot.
- Demold, refine edges with a fine file, and buff the surface for a glossy, playful finish.
Fossil-look pendants with embedded textures
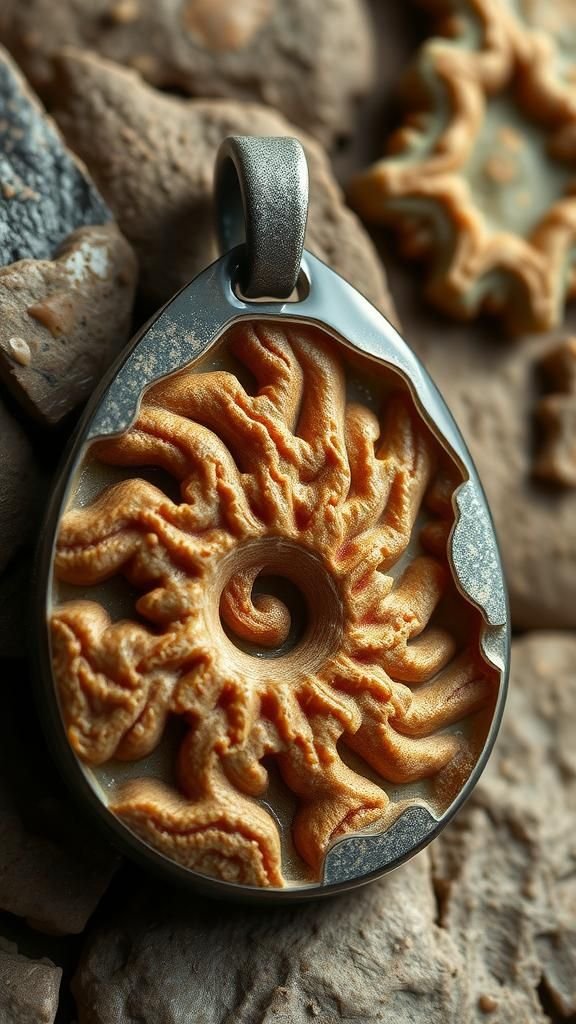
Creating a fossil-like impression in resin gives pieces an ancient, tactile feel. Textured inclusions mimic etched surfaces and create shadowed relief beneath a smooth gloss.
The result reads like a relic worn close to the body, and touching it brings to mind museums and shoreline finds. I often choose muted, earthy tones to enhance the timeworn vibe, and the glossy top layer makes the textures read as if preserved under glass.
These pendants have a contemplative quality that I find quietly satisfying.
Steps
- Arrange textured elements such as thin clay impressions or pressed shell fragments inside a bezel to create fossil-like relief.
- Mix resin to a clear state and pour over the textures, letting the liquid magnify the surface details.
- Remove bubbles with a gentle heat pass and allow the resin to cure thoroughly before handling.
- Demold and use a fine file to tidy edges, finishing with a soft polish to reveal preserved texture beneath the gloss.
Color-block geometric pieces with crisp lines

Color-blocked geometric jewelry in resin feels modern and bright, with clean planes and bold contrast. The glossy finish makes the hues pop, and edges that catch the light create a crisp visual rhythm.
I enjoy arranging blocks of color that feel balanced yet unexpected, and wearing these pieces is a way to carry a small architectural statement. The tactile smoothness invites a second look, and the bold shapes often pair well with simple outfits that let the geometry speak.
Steps
- Pour separate tinted resin colors into a segmented mold or mask areas within a bezel to create geometric color blocks.
- Allow partial curing between pours when needed to keep crisp boundaries, watching the surfaces for trapped bubbles.
- Use a quick heat pass to lift remaining bubbles and let the entire piece cure until fully hardened.
- Demold, neaten edges with a fine file, and polish to enhance the clean, glossy color divisions.
Table of Contents