I still remember sitting at my kitchen table, fingers stained with ink and tiny paper scraps everywhere, working on Paper Flower Rose Bouquet Crafts for a friend’s birthday. There was something gentle about the rhythm of shaping petals and arranging them into a small cluster that felt both calming and oddly social when I narrated the process out loud.
Those afternoons taught me that paper roses have personality: some look soft and weathered, others pop with glossy magazine colors.
Paper Flower Rose Bouquet Crafts can be playful, quiet, or dramatic depending on material and mood.
Crepe paper roses with realistic petal texture

I remember the first time crepe paper landed in my hands: the grainy ridges caught the light and made each petal behave like a tiny fabric remnant. Petals curved with a subtle springiness that invites gentle coaxing, and the edges sometimes fray into a soft fuzz that feels cozy under the fingertips.
Colors are rich and slightly muted, which gives the bouquet a lived-in warmth. When held close, the paper carries a faint papery scent that somehow complements the floral illusion, making the whole bunch feel alive and handcrafted.
Steps
- Gather crepe paper strips and floral wire, then tear the strips into petal-sized sections.
- Stretch each petal gently along the grain to create natural curves, arranging them around a wired center.
- Wrap the base with floral tape to form a stem and group several stems into a bouquet shape.
- Adjust petal positions for fullness and optional leaf additions to complete the look.
Origami rose cluster with elegant folded geometry

Folding paper into roses felt like learning a secret language of creases that reward patience. The origami petals form crisp planes that catch light differently across a single bloom, creating an almost sculptural feel.
There’s a pleasant stillness to these flowers; they read quieter than frilly petals but offer a satisfying symmetry when several are grouped. The paper often makes a tiny whisper as folds settle, and color choices change the personality from serene pastels to bold, graphical accents.
A bouquet of these feels like a small, refined exhibition.
Steps
- Select square sheets of paper with moderate stiffness and fold according to a spiral rose origami sequence.
- Shape each folded unit into a rose by coaxing inner spirals and tucking ends neatly to hold form.
- Mount each rose on a thin wire or stem substitute and wrap the base for stability.
- Gather multiple roses into a compact cluster and secure stems together for a polished bouquet.
Quilled spiral roses with delicate filament detail

Quilling always felt like papier-mâché’s quieter cousin, tiny strips rolling into tight, luminous centers that unfurl into filigree. Each spiral holds a delicate shadow within its core, and the thin paper edges glint slightly under a lamp.
When several quilled roses are clustered, the effect resembles a miniature garden full of fine stems and airy gaps. The tactile lightness makes the bouquet feel fragile but surprisingly resilient, and the repetitive rolling brings a calm, almost meditative rhythm to the making experience.
Steps
- Prepare long narrow paper strips and wind them around a quilling tool to form tight spirals.
- Allow spirals to loosen slightly for petal effect, then shape outer edges into rounded petal forms.
- Secure the base of each quilled rose and attach to short stems or a backing for stability.
- Assemble a small grouping of quilled blooms, balancing sizes and colors for visual interest.
Tissue paper ruffled roses for a soft, airy look

Tissue paper brings a fragile whisper to floral work, producing petals that flutter at the slightest breeze. Layers create an almost cloudlike profile where light filters through thin sheets, casting gentle colored hues on nearby surfaces.
When a handful are gathered, the bouquet reads playful and buoyant, making it a favorite for casual celebrations. Hands often find themselves smoothing and teasing layers to coax fuller silhouettes, and the resulting arrangement feels light enough to float if not for the stems holding it grounded.
Steps
- Stack several tissue paper sheets, then bunch and gather them into a dense center for a bloom.
- Separate and fluff individual layers to create a voluminous ruffled appearance.
- Anchor the gathered base onto a stem or holder with a wrap for support.
- Cluster multiple tissue roses into a carefree bouquet with varied heights for texture.
Coffee filter roses with translucent, delicate cups

Coffee filters translate into petals that read almost like dried blooms, translucent and softly mottled when stained. There’s an unexpected charm in the way stains create gentle gradients and tiny irregularities, lending each flower a weathered personality.
The edges sometimes fray into feathered fringes that catch light in a soft halo. When assembled into a bouquet, the arrangement feels intimate, like pressed memories bundled together.
It’s the kind of craft that invites quiet observation, as the paper seems to hold stories in its subtle stains and crinkles.
Steps
- Layer coffee filters and shape them into petal-like cups, manipulating each to achieve soft curves.
- Tint edges or centers with diluted color for gradient effects and allow to dry fully.
- Secure the layered filters around a core to form a bloom and create a supportive stem.
- Combine several blooms into a small, nostalgic bouquet with complementary tones.
Book page roses for an old-world, literary bouquet

Turning book pages into roses brings a whisper of stories into floral form. Printed words peek through petals, creating tiny typographic patterns that draw the eye closer.
The paper feels papery and slightly brittle at the edges, with sepia or cooler white tones depending on age. A bouquet made from book pages carries an intellectual charm, like a shelf of novels reshaped into blossoms.
When I hold these, the faint scent of ink and paper evokes afternoons spent reading, and the whole arrangement seems to hum with quiet narrative energy.
Steps
- Select pages with attractive text or illustrations and form them into spiraled petal shapes by rolling and curling edges.
- Layer several page spirals to build each rose, securing the base to keep petals in place.
- Attach a stem or backing for stability and wrap the base to finish.
- Arrange multiple book page roses into a clustered bouquet with mixed heights for visual rhythm.
Sheet music roses with lyrical, tonal patterns

Sheet music transforms into roses that seem to hum even when still. Musical notes and clefs appear as tiny decorations on petal edges, lending a rhythmic visual cadence to the bouquet.
The paper has a crispness that makes folds and curls sit cleanly, and monochrome contrasts give a slightly graphic drama. In small groupings, the floral cluster feels playful and cultured at once, like a quiet encore after a concert.
There’s a tactile satisfaction in running fingers along printed lines that were once meant for performance.
Steps
- Choose sheet music pages with clear notation and form petals by curling and shaping each paper section.
- Construct each rose by layering shaped petals around a tight center and securing the base.
- Mount each bloom on a thin stem and wrap for stability.
- Combine multiple sheet music roses into a bouquet that balances black-and-white patterns with neutral stems.
Magazine paper roses with bold, unexpected color pops

Magazines create roses that burst with saturated inks and glossy highlights, producing petals that seem to shimmer under light. Tiny photographic fragments create texture and color shifts within each bloom, making every petal feel like a collage.
The glossy finish offers a slight resistance to bending, which produces firm, sculpted petals with crisp edges. When several of these are gathered, the bouquet reads contemporary and playful, like a patchwork of visual moments held together.
There’s a fast-paced, urban energy to them that contrasts nicely with softer paper varieties.
Steps
- Harvest glossy pages with striking imagery and tear them into petal shapes, forming a curled center first.
- Layer larger petals around the core and secure bases to form each rose.
- Affix stems or supports and wrap at the bottom for a tidy finish.
- Cluster multiple magazine roses by color families to create a dynamic bouquet.
Watercolor-painted paper roses with soft color washes

Painting paper before forming roses introduces watercolor blooms that carry subtle gradients and soft edges. The wash soaks into the fibers, leaving unpredictable blooms of color that feel painterly and organic.
When dried, the paper shows subtle warps that give a natural curvature to petals, and faint brush strokes peek out along the edges. A bouquet composed of these feels handcrafted in both painting and forming senses, as if two creative acts merged into one object.
The overall impression is artistic and quietly joyful, with color transitions that reward close inspection.
Steps
- Lightly wet paper sheets and apply watercolor washes to create blended color gradients, then allow to dry completely.
- Shape painted sheets into petals and assemble them around a core to form roses.
- Secure bases to stems and reinforce for handling.
- Arrange several painted roses together, letting color variety create a soft gradient across the bouquet.
Mixed-media roses combining felt and paper petals

A mixed-media bouquet that pairs felt with paper introduces tactile contrast: felt offers plush warmth while paper brings crisp detail. Petals crafted from both materials sit differently in a cluster, creating depth and a pleasing interplay of matte and slightly reflective surfaces.
The felt provides a soft cushion that invites touch, while paper petals add delicate edges that catch light. Holding such a bouquet feels comforting, like a familiar sweater with a floral accent.
It’s a craft that blends textile warmth with paper’s visual expressiveness.
Steps
- Cut felt into soft petal shapes and prepare paper petals with complementary colors or patterns.
- Layer felt and paper elements around a central core to create textured blooms.
- Secure the base of each bloom and attach a supportive stem.
- Group a selection of mixed-media roses into a bouquet that balances plushness and crispness.
Paper cone bud bouquet with tight, charming blooms

Paper cones produce buds that read compact and youthful, each tiny bloom offering a concentrated swirl of color. The small size makes a bouquet feel playful and delicate, like a cluster of harbingers rather than full blossoms.
When gathered in numbers, the cone buds form a pleasing rhythm of repeating shapes and rounded tips. They also sit well in narrow vessels, creating a miniature arrangement that feels intimate.
I often find myself smiling at the miniature scale; there’s a sweetness in small things that seems to make an everyday corner feel fancier.
Steps
- Form small paper cones and add a curled center to each to simulate closed petals.
- Attach each cone to a thin stem or wire and reinforce the base for stability.
- Trim stem lengths for balanced bouquet height and bind stems together.
- Place the grouped cone buds in a narrow vase or holder for a compact display.
Rolled spiral roses on slender wire stems

Rolled spiral roses carry an understated elegance, the center forming a tiny vortex that releases into looser outer layers. The tightness at the core contrasts with airy outer petals, creating a pleasing visual tension.
Wire stems add a linear element that helps the bouquet feel architectural and poised. When several of these are clustered, the slender stems create an interplay of vertical lines and rounded blossoms.
I often enjoy arranging them at slightly different heights so the eyes can travel across the bouquet like reading a short, compact poem.
Steps
- Roll rectangular strips of paper into spiral centers and allow outer layers to loosen for petal effect.
- Secure the base and mount each spiral onto a slender wire stem, wrapping the joint.
- Trim stem lengths to create staggered heights for a natural look.
- Bind stems together and adjust petals for balance and fullness.
Layered cardstock geometric roses with bold edges

Cardstock produces roses with a structural, almost architectural character; layers stack confidently and edges hold crisp silhouettes. Geometric petals create a graphic bouquet that reads modern and sculptural.
There’s a satisfying heft when holding these blooms, as the thicker paper resists water and bends less, lending a highly intentional posture. Color blocking and sharp shadows become part of the design language, and the bouquet can stand on its own as a sculptural piece.
It’s the sort of project that delights lovers of clean lines and bold shapes.
Steps
- Cut or die-cut cardstock petals in graduated sizes and arrange them into layered formations.
- Stack and secure layers around a central core to build each rose’s geometric profile.
- Attach a sturdy stem or support and finish the base for handling.
- Combine multiple geometric roses, balancing color and scale for visual impact.
Paper rose bouquet with tiny LED glow centers

Adding tiny lights to paper roses gives a gentle inner glow that changes the bouquet’s character after dusk. The light diffuses through thin petals, creating a lantern-like warmth that feels intimate and a touch theatrical.
The contrast between luminous centers and matte petal surfaces can be surprisingly poetic, turning a simple arrangement into a softly lit focal point. There’s a bit of wonder watching the bouquet in dim light, as petals seem to breathe around the haloed cores.
It makes the flowers feel like nighttime companions rather than daytime décor.
Steps
- Prepare paper roses with hollow centers sized to accept micro LED lights and battery modules.
- Insert or nest the LEDs within the blossom cores and secure wiring discreetly along stems.
- Tuck battery packs into a base or decorative holder to hide them from view.
- Light the LEDs to check glow distribution and adjust petal positions for even diffusion.
Scented sachet roses with hidden fragrant filling

Incorporating a scented filling turns paper roses into tiny perfumed objects that release a soft aroma when handled. The inner sachets provide a subtle olfactory layer that complements visual beauty, with dried botanicals or fragrance beads nestling inside.
The petals carry just a whisper of scent, never overwhelming, so the bouquet can linger on a bedside table or shelf without dominating the room. There’s a small domestic pleasure in brushing a finger across a petal and catching a gentle whiff, a private moment that ties a memory to an object.
Steps
- Create paper roses with slightly hollow centers to accommodate small sachets filled with dried botanicals or scent beads.
- Insert the sachet into the rose core and secure it to prevent movement.
- Finish the rose base and attach to stems, ensuring the sachet remains concealed.
- Group scented roses into a bouquet and place in a breathable container to allow aroma diffusion.
Miniature teacup bouquet of tiny paper roses
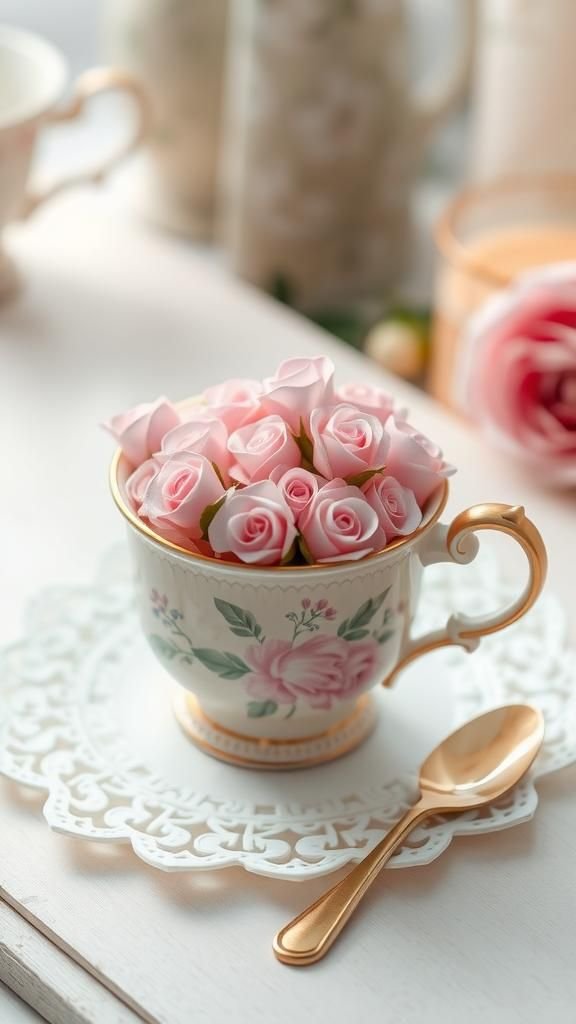
A teacup filled with miniature paper roses reads like a charming, scaled-down garden vignette. The small blooms fit snugly into the cup, creating a compact composition that feels like a quiet gift.
Porcelain and paper make a pleasant contrast: the smooth glazed surface of the cup against the matte or textured petals. It’s the kind of display that invites close, lingering looks and looks comfortable on windowsills or side tables.
The tea-scent memory lingers even without real tea, as the setting evokes domestic calm and thoughtful detail.
Steps
- Craft several small paper roses proportionate to the teacup size and prepare short stems or supports.
- Arrange a foam or filler inside the teacup to anchor stems and position roses snugly.
- Group the miniature blooms tightly for a full appearance and trim stems as needed.
- Add a few tiny leaves or accents to enhance realism and balance the display.
Giant oversized paper roses for dramatic focal pieces

Giant paper roses amplify every ripple and curl into theatrical gestures that dominate a room in the best way. Large petals cast pronounced shadows and create a sculptural presence that turns an ordinary corner into a statement.
The fold lines and edges become part of the visual language, and viewers often find themselves reaching out as if to touch something monumental yet soft. These oversized blooms feel celebratory and a little theatrical, the kind of piece that makes an entrance rather than quietly settling into a background role.
Steps
- Prepare large sheets of paper and form oversized petals with supportive internal layers to maintain shape.
- Construct each giant rose by layering massive petals around a reinforced center.
- Mount blooms on sturdy stems or supports that can bear the weight and allow display.
- Position the oversized roses as single focal points or grouped installations for maximum impact.
Glass dome preserved paper rose display centerpiece

Encasing a paper bouquet under glass lends it a museum-like elegance, as if preserving a delicate specimen. The dome amplifies light and reflections, giving the roses a jewel-like presence.
Viewing the arrangement through curved glass creates small distortions that add charm and a sense of reverence. It’s a format that invites slow appreciation; the flowers feel staged for contemplation rather than casual handling.
The overall effect hints at curiosity cabinets and keepsakes, the kind of display that gathers attention quietly and politely.
Steps
- Create a compact bouquet sized to fit beneath a glass dome and prepare a stable base for mounting.
- Secure the arrangement to the base and ensure all elements are neatly positioned for display.
- Lower the glass dome carefully over the bouquet and seal the base to protect the display.
- Place the domed centerpiece on a mantel or table where light enhances reflections and detail.
Boutonnière style paper rose for small, refined accents

A boutonnière-sized paper rose brings a neat, architectural bloom that sits comfortably in a pocket or on a lapel board. The scale makes every petal proportionally important, so edges are often neat and crisp.
The feel is compact and tidy, offering a hint of floral charm without overwhelming. When displayed in a small container or pinned to fabric, these tiny roses act like punctuation marks—short, precise, and expressive.
There’s a miniature poetry to them that makes simple occasions feel quietly considered.
Steps
- Form a small, tight paper rose scaled for wearable or small display use and create a short supportive stem.
- Add a tiny backing or pin attachment for secure placement if intended to be worn.
- Finish the base neatly and trim any excess to maintain compactness.
- Store or present the boutonnière in a small box or ribbon-tied bundle to protect its shape.
Paper silhouette garland of cascading rose shapes

A garland composed of paper rose silhouettes offers a rhythmic cadence of petal outlines that dances along a wall or mantel. The flat shapes catch light differently as they sway, creating subtle shadow play against the surface behind them.
The repetition of forms forms a visual melody that feels both decorative and intimate, like a hand-drawn border come to life. When I hang a garland, the room takes on an immediate celebratory air, as if the space has been lightly dressed for a small, joyful gathering.
Steps
- Cut rose silhouette shapes from sturdy paper in complementary colors to create a repeating motif.
- Space the silhouettes evenly along a length of cord or thin wire and secure each placement.
- Hang the garland across a mantel, doorway, or wall at a gentle curve.
- Adjust spacing and alignment so the cascading shapes create a balanced visual flow.
Pressed-paper rose shadow-box keepsake arrangement

Pressing paper roses into a shallow relief inside a shadow box creates a delicate keepsake that reads like a flattened memory. The petals lay slightly compressed, offering a different kind of charm from three-dimensional blooms.
The composition invites close inspection of tiny veins, printed patterns, or brush marks preserved in place. Presenting the arrangement behind glass gives a reverent quality, as if cataloguing a small, private moment.
I find these shadow boxes become tiny altars for a particular day or memory, where a bouquet is turned into a story framed on a wall.
Steps
- Prepare small paper rose elements suitable for pressing and arrange them in a layout sized for the shadow box.
- Mount the pressed pieces on a backing board with archival-safe adhesive or pins for long-term stability.
- Place the backing into the shadow box frame and ensure the arrangement is level and centered.
- Seal the frame and display the keepsake in a protected spot away from direct sunlight.
Table of Contents