I got hooked on No Sew Felt Craft Projects after an afternoon of poking through a tiny craft shop and coming home with a handful of colorful scraps. There is something quietly satisfying about the soft, slightly fuzzy surface of felt and the way a few simple pieces can become small, cheerful things without a sewing machine.
Over cups of tea I tried a few ideas and kept the ones that felt joyful to hold.
No Sew Felt Craft Projects have a friendly, low-fuss charm that makes them ideal for relaxed afternoons or last-minute handmade gifts.
Tiny Heart Ornaments for String Garlands

I remember the first set of tiny heart ornaments I made and how they filled a jar like little confetti. The felt felt plush between fingers, edges soft to the touch and slightly compressible under gentle pressure.
The color palette was a quiet mix of blush, cranberry, and cream, and the light through a nearby window caught the tiny stitches of contrasting thread. They introduced a cozy, hand-made mood to the mantel without demanding much space, and the subtle weight of each heart felt pleasantly comforting.
Steps
- Trace heart shapes onto felt using a template and pencil.
- Cut out pairs of hearts for each ornament and keep matching layers together.
- Apply a thin line of fabric glue along the edge of one heart and press the matching heart on top, leaving a gap for stuffing.
- Gently stuff with polyester fill and seal the gap with more glue, then loop a thin ribbon or twine for hanging.
Cozy Felt Coffee Cup Sleeves with Personality

There was a morning when a plain paper cup suddenly felt like an opportunity, and a felt sleeve brought a little warmth to that routine. The sleeve cushioned the hand with a dense, woolly feel and gave the cup a handmade presence.
I enjoyed the tactile contrast between the smooth cardboard rim and the woolly felt wrap, and small embellishments added whimsy without fuss. The final pieces had a soft, matte finish that invited touch and a neatness that sat well beside a steaming mug on a chilly morning.
Steps
- Measure the cup circumference and mark a felt rectangle slightly shorter than that length.
- Trim the felt to match the height of the cup and round the corners for a softer look.
- Add decorative felt shapes on one side and secure edges with fabric glue, overlapping slightly to create a snug wrap.
- Press firmly and allow glue to dry before sliding onto a warm cup.
Smiling Fruit Keychains That Brighten Bags
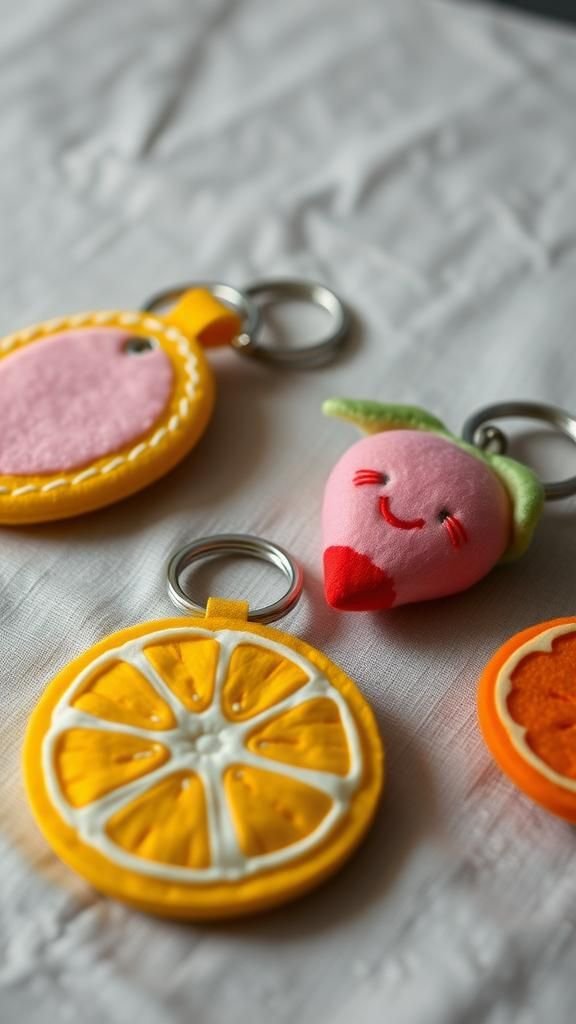
A little felt lemon with a tiny embroidered smile ended up on my keys and somehow made grocery runs feel sunnier. The felt had a slightly fibrous edge where it was snipped, and the stitched details added a pleasant tactile ridge.
Colors were vivid and slightly matte, the kind that pop against denim and canvas. Each fruit felt compact and plump in hand, and the key ring added a faint metallic counterpoint to the soft textures.
They were cheerful little companions that made utilitarian items feel personal.
Steps
- Trace basic fruit shapes onto two felt layers and cut them out with sharp scissors.
- Glue the facial features and small leaves onto one felt layer before joining the pair.
- Place glue around the edge of one piece, align the second piece on top, inserting a small loop for the key ring at the top.
- Allow the glued edges to dry fully before attaching the key ring and trimming any stray fibers.
Playful Animal Bookmarks for Cozy Reading
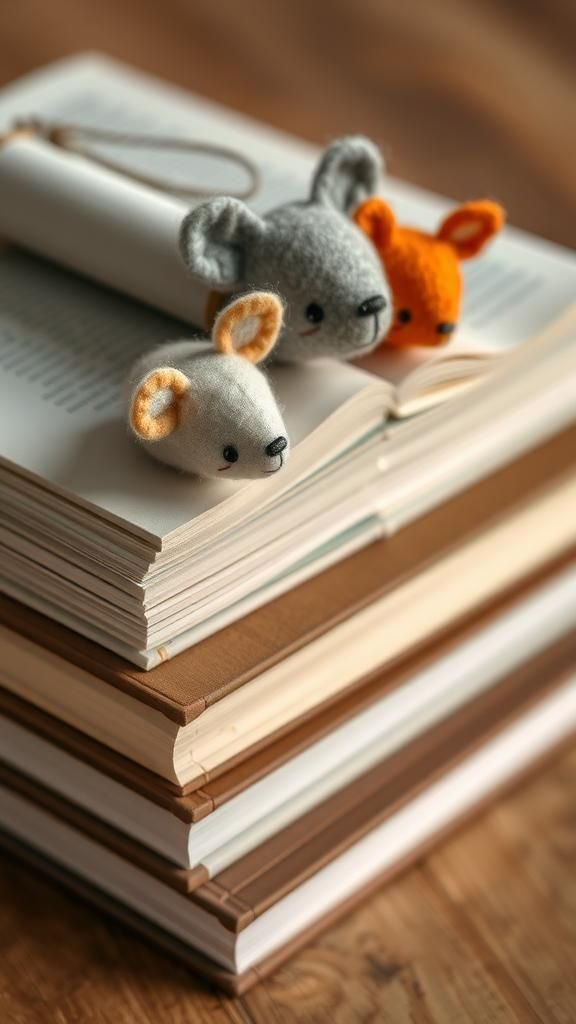
On slow evenings I like to leave a felt bookmark peeking from a well-loved paperback, its soft paw or ear a quiet promise of where I stopped. The felt felt springy and light, and edges kept a comforting fuzz that avoided harsh corners on pages.
Color contrasts gave each critter a little personality, and the felt offered a gentle grip against paper without causing any roughness. The tactile little faces often made me smile before I even opened the book, and they added an inviting, handmade note to reading time.
Steps
- Draw a slim bookmark shape with an animal head silhouette on felt and cut two matching pieces.
- Decorate the front piece with smaller felt shapes for eyes, nose, and ears, securing them with fabric glue.
- Glue the back piece to the decorated front around the edges, leaving the top open for a tassel if desired.
- When glue is set, add a short ribbon or felt tassel through the open top for a finished look.
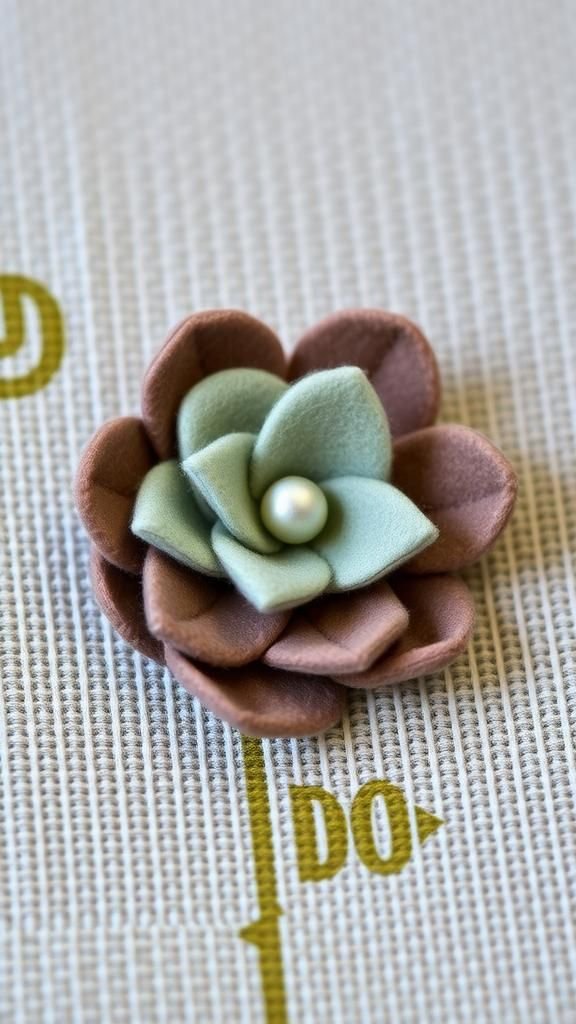
Layered Felt Flowers for Vases and Gifts

I once made a handful of layered felt flowers and left them in a mason jar on the kitchen counter; they became a small, ever-present bouquet that never wilted. The petals had a soft matte surface and layered like tiny clouds, each edge offering a slight bite against the fingertips.
Color combinations ranged from muted pastels to saturated jewel tones, creating depth without heaviness. The overall effect was sculptural but approachable, and those felt blooms kept brightening corners without the need for water or careful attention.
Steps
- Cut multiple petal shapes in descending sizes and arrange them to find a pleasing layered composition.
- Glue the smaller petals onto the center of larger ones, staggering edges for a natural look.
- Add a felt circle or button at the center and secure it with glue for a neat focal point.
- Attach a thin felt stem or wire wrapped with felt, then place in a vase or gift box.
Simple Felt Coasters with Bold Shapes
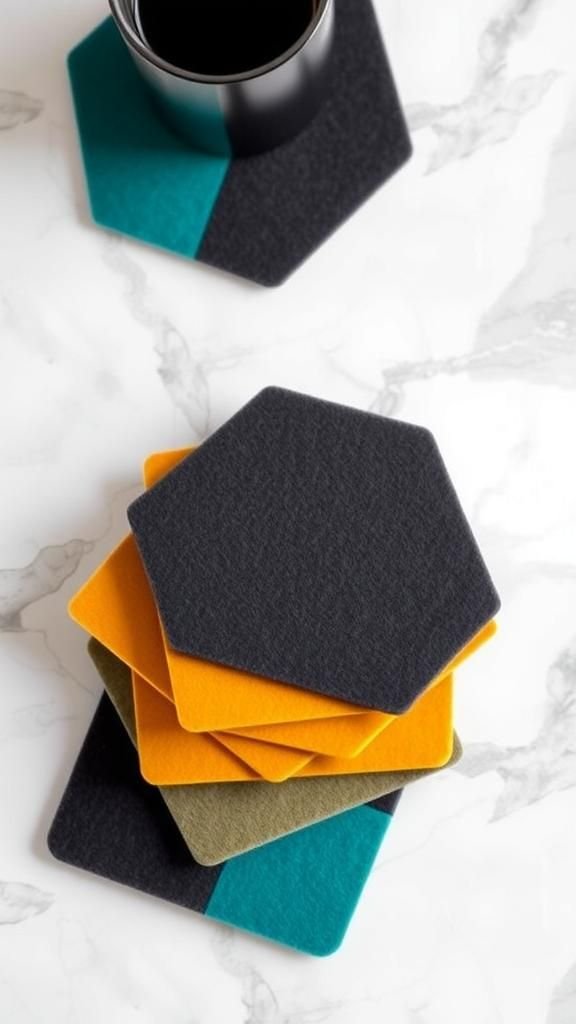
I remember setting a mug on a felt coaster and being pleased by how quiet the contact felt, a muffled thud that replaced a clatter. The felt had a dense, slightly springy texture that protected surfaces and warmed the aesthetic of the table.
Strong geometric shapes and high-contrast colors made each coaster feel modern and friendly at the same time. They absorbed the minor dampness of a mug rim without fuss and stacked neatly in a bowl when not in use, staying compact and happily silent between uses.
Steps
- Trace circles, hexagons, or other bold shapes onto felt and cut out pairs for extra thickness.
- Glue the pairs together for added cushion, aligning edges carefully.
- Optionally add a thin decorative felt layer on top and secure with glue.
- Let the glue cure fully and then arrange the coasters in a neat stack for storage.
Mini Felt Succulents That Never Need Water
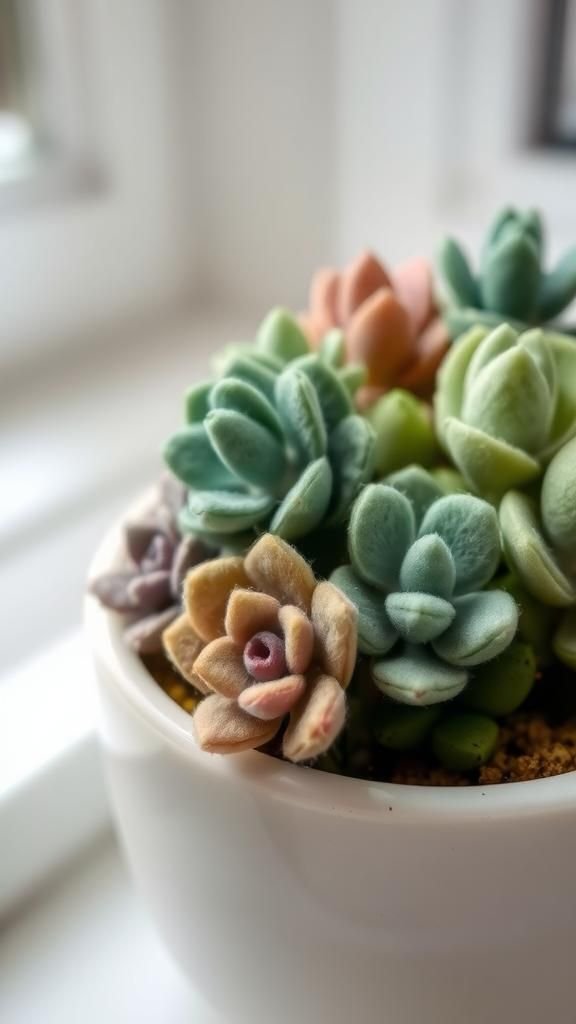
A tiny felt succulent sat on my windowsill and became a quiet companion that never demanded attention. The felt leaves had a slight stiffness that allowed them to hold shape and offered a matte, velvety texture under fingertips.
Color gradations from sage to deep forest green added a lifelike suggestion without fuss. The compact arrangement had weight and presence, and pressing the base released a soft, cushioned feel.
They brought that verdant calm of plants into small corners where real ones might struggle.
Steps
- Cut multiple teardrop or pointed leaf shapes in descending sizes from felt.
- Layer and glue the leaves around a small felt base, starting with larger pieces at the outside.
- Continue adding layers until the succulent feels full, then press gently to set glue.
- Place the finished piece into a shallow pot or decorative dish for display.
Festive Felt Pinecone Decorations for Mantels
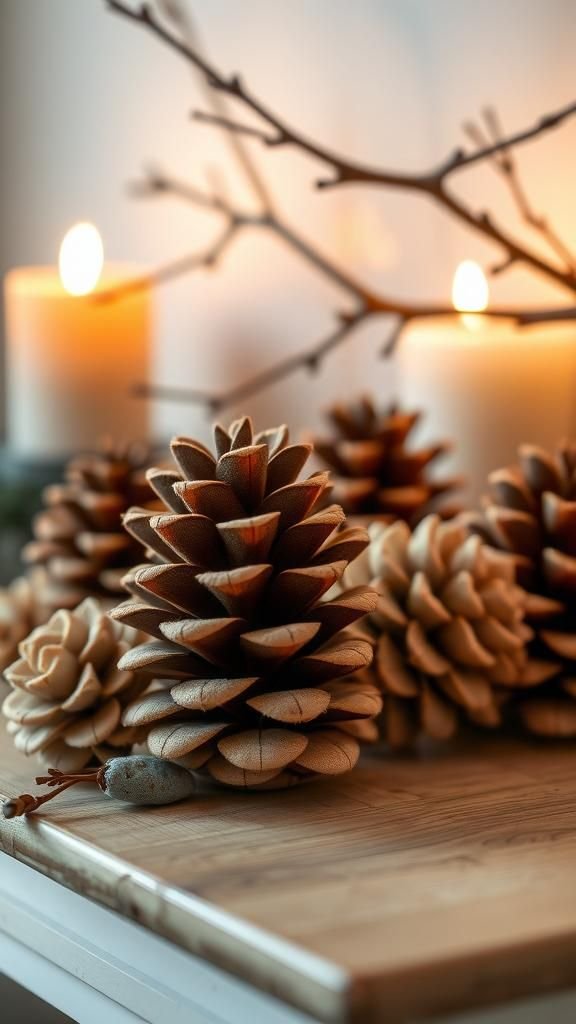
I assembled a few felt pinecones to tuck among candles on a mantel and liked how they softened the display with plush, layered scales. Each ‘scale’ had a slightly fuzzy edge and a tactile, layered rhythm when touched.
The warm browns and cream tones complemented flickering candlelight, creating a calm, cozy vignette. Their presence felt both seasonal and homespun, and they sat comfortably alongside dried branches, balancing natural textures with felt’s quiet matte finish.
They lent a humble charm without needing elaborate care.
Steps
- Cut teardrop-shaped scales in a few sizes and shades of brown felt.
- Glue the largest scales around a cone-shaped base, overlapping slightly as you move upward.
- Continue adding smaller scales toward the top until the cone looks naturally layered.
- Tuck the finished pinecone among mantel decor or place in a decorative bowl.
Soft Felt Baby Mobile for Nursery Charm

Hanging a felt mobile above a crib introduced a gentle motion and a palette of soft pastels to the room. The felt shapes swayed slowly and felt whisper-soft to the fingertips during quick checks at night.
Colors were muted and soothing, and each piece had a weight that balanced the mobile without being heavy. The overall effect was calming, with felt surfaces offering a soft matte that diffused the nursery light.
It added a quiet handmade note that felt balm-like during those sleepy hours.
Steps
- Cut a selection of light felt shapes such as stars, clouds, and moons in a harmonious palette.
- Attach thin ribbons to each shape using small dots of fabric glue and allow to dry.
- Tie the ribbons to a circular hoop, arranging lengths so the shapes hang at varied heights.
- Securely fasten the hoop to a ceiling hook or fixture at a safe height above the crib.
Pocket-Sized Felt Hand Warmers for Pockets

On brisk days I slipped a felt hand warmer into a coat pocket and appreciated the little burst of insulation it provided. The felt felt dense and pleasantly warm against my palm, absorbing the chill and offering a soft, compact cushion.
Small decorative stitches added a tactile ridge that invited thumb rubs, and bright color choices made them easy to find. They felt like tiny comforts that fit neatly into the rhythm of an outing, offering a modest, tactile pleasure without taking up space or attention.
Steps
- Cut two identical rounded shapes from thick felt and glue three edges together, leaving an opening.
- Fill the pocket with rice or flaxseed to your preferred level and add a few drops of essential oil if desired.
- Seal the opening with more glue and press firmly until set.
- Warm gently in a microwave for a short time before placing in a pocket.
Fuzzy Felt Hair Clips That Pop

A felt hair clip added a burst of color to a dull day, the soft patch perched against a strand like a tiny flag. The felt offered a plush contrast to sleek hair, and the edges kept a cozy fuzz that softened the silhouette.
Shapes ranged from simple circles to playful clouds, and the tactile little embellishments felt pleasantly light on the head. They were charming without fuss, and the matte colors resisted glare, making them a quiet but noticeable accessory on bright mornings.
Steps
- Cut small decorative shapes from felt and glue tiny embellishments onto the top piece.
- Apply fabric glue to the back of the felt piece and press a metal snap or alligator clip firmly into place.
- Allow glue to dry thoroughly before offering the clip for wear.
- Trim any excess glue strands and check for secure bonding.
Felted Word Magnets with Friendly Fonts

I started spelling out little words on the fridge with felt magnets and it became a small tactile ritual. The felt letters had plush edges and a quiet matte surface that contrasted with the cool sheen of the refrigerator.
Fonts with rounded strokes felt particularly approachable, and color combinations helped words stand out without feeling loud. Sliding a felt letter across the surface felt soft and muted, and arranging phrases became a playful, sensory way to leave notes or messages for others.
Steps
- Cut letter shapes from felt using a stencil or printed template for consistent sizing.
- Glue a small neodymium or flat magnet to the back of each letter and press until secure.
- Allow the glue to set completely before placing the magnets on metal surfaces.
- Arrange into words or short phrases on a refrigerator or magnetic board.
Tiny Felt Houses for Decorative Shelves
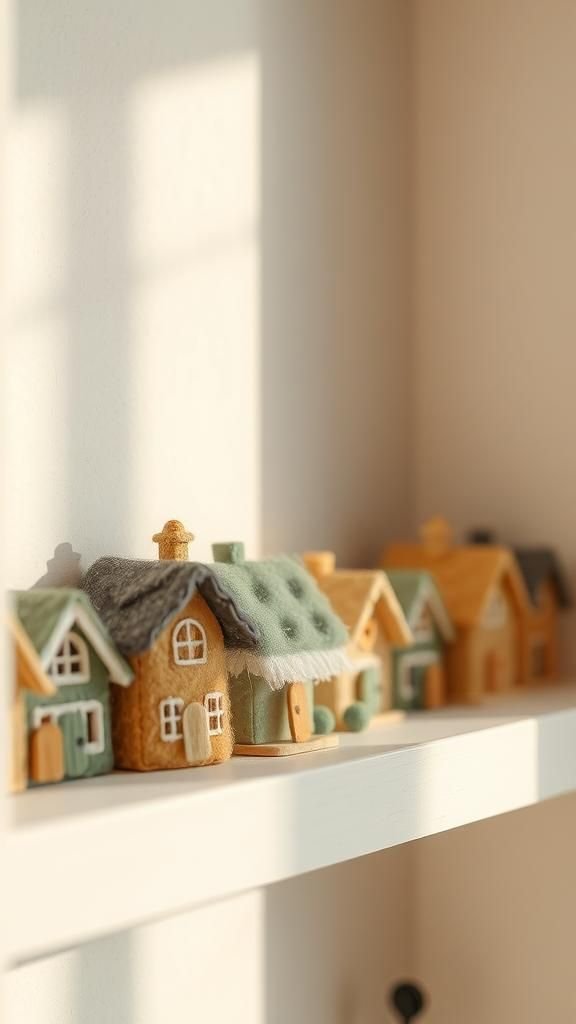
A row of tiny felt houses on a shelf made my living room feel like a miniature neighborhood. Each house had a soft, structured presence and a felt roof that held its angle without slumping.
The textures were quietly varied, with rooftops in ridged felt and walls in smoother pieces, creating a pleasing contrast. Color mixes suggested streets at dusk and morning, and the overall scene felt whimsical and steady at once.
They offered a small constructed landscape that was warm to look at and pleasant to touch.
Steps
- Cut simple house silhouettes for front, back, and side panels from stiff felt.
- Glue the side panels to the back and then attach the front panel, leaving the roof area accessible.
- Add a separate roof piece and secure it with glue, adjusting angles for a neat profile.
- Decorate windows and doors with smaller felt cutouts before the glue fully dries.
Felt Garland with Tassels and Shapes
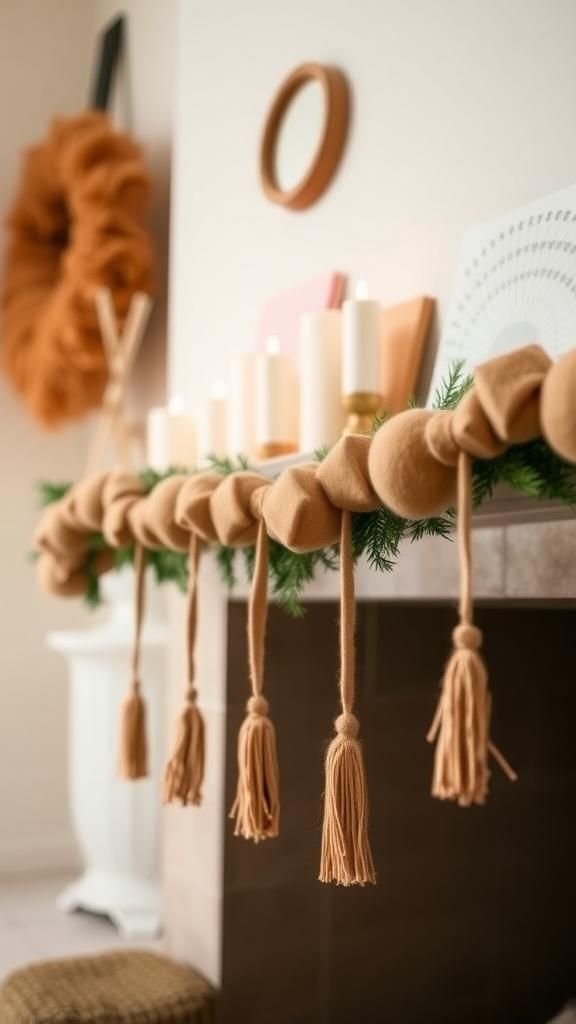
Strung across a mantel or doorway, a felt garland lends a soft, rhythmic punctuation to a room. The felt shapes swayed gently and made a quiet, almost whispering sound when they met.
Tassels added a fluttery, textural element and felt circles provided a steady counterpoint. Color combinations could be festive or subdued, depending on mood, and the materials kept the overall piece light and easygoing.
It settled into corners and softened angles, offering a handmade banner that felt low-key and welcoming.
Steps
- Cut a series of shapes and tassels from felt in a chosen color palette.
- Lay out the sequence and space the pieces along a length of twine or ribbon.
- Attach each shape with a dab of fabric glue or by wrapping a small loop of thread around the top.
- Hang the garland and adjust spacing for a balanced look.
Felt Ice Cream Cone Play Food Set
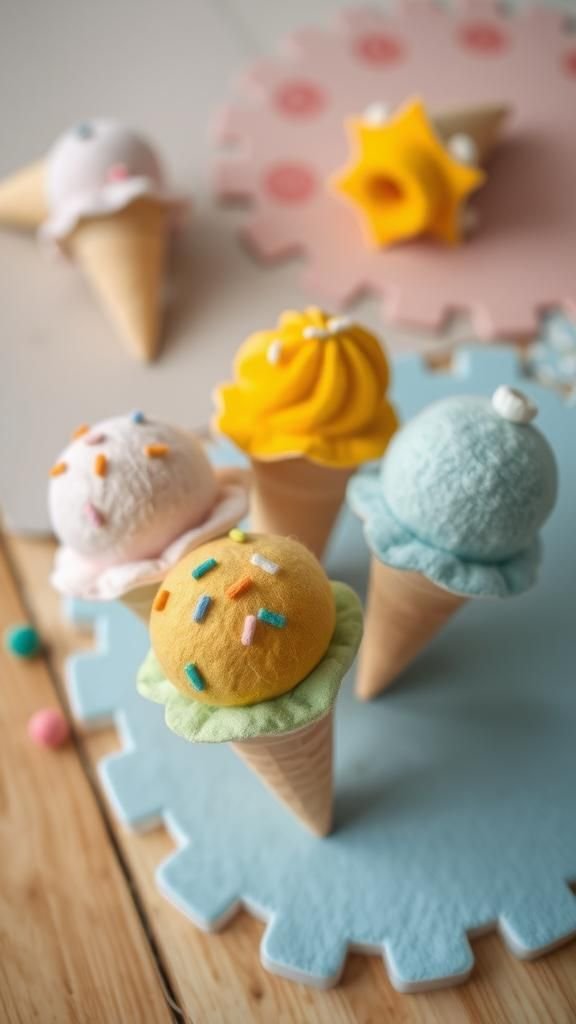
Making a play food set of felt ice cream cones felt delightfully nostalgic, each scoop soft and squishy like a tiny cloud. The felt surfaces had a velvety matte finish that invited little hands to explore, and contrasting cone textures added a tactile delight.
Colorful scoops stacked in playful mismatches, creating little compositions that stayed upright and kept their charm through imaginative play. Watching a child arrange them into colorful towers felt like a gentle, unhurried ritual that rewarded repeated handling without wear.
Steps
- Cut cone bases and rounded scoop shapes from felt in various colors.
- Glue two scoop pieces together for thickness and add decorative felt sprinkles or small stitched details.
- Secure the scoops onto cones with fabric glue, arranging stacks as desired.
- Allow all glued seams to cure fully before offering the set for play.
Felt Brooches with Vintage Vibes and Charm
A small felt brooch pinned to a lapel introduced a gentle vintage note to an outfit, the soft patch contrasting with woven fabrics. The felt’s matte surface and layered shapes suggested handcrafted finds from an old market.
Tiny seed beads or a felt rose became focal points that invited closer looks, while the brooch felt pleasantly light and unburdened on clothing. Colors leaned toward warm, muted tones that felt comfortable and familiar, and the overall effect was quietly nostalgic without feeling costume-like.
Steps
- Create a layered felt composition for the brooch front, experimenting with complementary shapes and colors.
- Secure small beads or accents with fabric glue to add texture and focal interest.
- Glue a brooch pin to the back piece and press firmly until set.
- Allow the entire piece to dry thoroughly before pinning to garments.
Felt Camera Strap Pads for Comfort

A felt strap pad softened the weight of a camera and felt gentle against the neck during long walks. The felt had a dense, supportive feel that distributed weight more pleasantly than a bare strap, and a slim profile kept the camera accessible.
Color and contrast stitching added a crafted detail that made the strap feel personal and intentional. The pad provided a tactile relief, the felt warming slightly against skin, and it introduced a quiet handcrafted element to otherwise technical gear.
Steps
- Cut an elongated pad shape from thick felt sized to the camera strap width.
- Add a thinner decorative layer on top and glue it in place for contrast.
- Wrap the ends around the strap and secure them with fabric glue or by stitching a small patch.
- Let the glue dry and test the pad for comfortable positioning before extended use.
Felt Nightlight Shades that Soften Glow
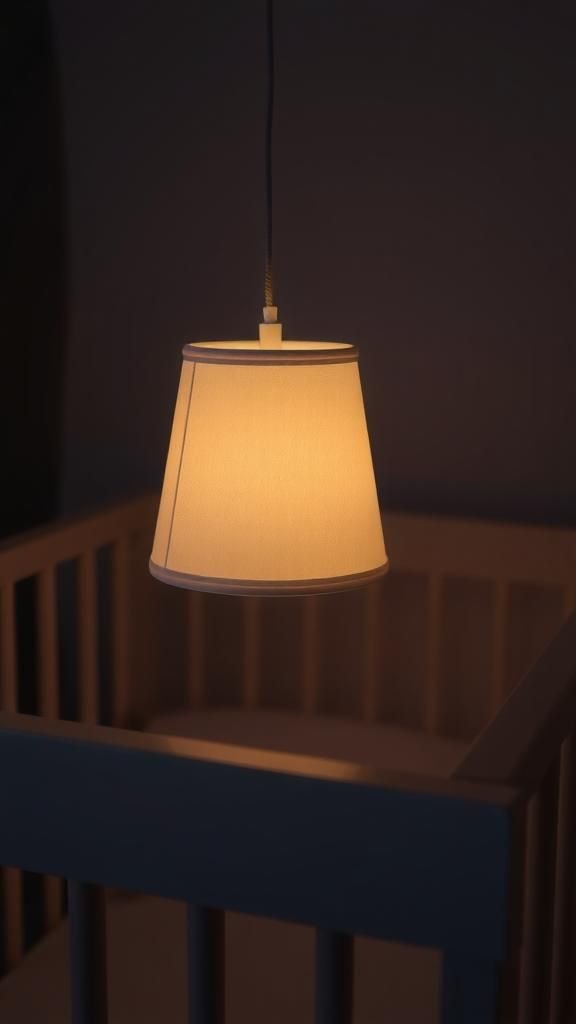
A felt shade over a small nightlight changed the quality of light into a softer, muted wash that felt gentle in a dim room. The felt diffused the bulb’s glare, offering a warm, felt-tinted glow that made late-night checks less harsh.
The surface had a comforting matte finish and small cutouts or layered shapes let patterns slip through without producing sharp shadows. It created a cozy atmosphere and a tactile focal point that felt more inviting than a bare bulb.
Steps
- Measure the nightlight face and cut a felt panel sized to wrap around it comfortably.
- Add decorative cutouts or layered shapes to the felt panel before attaching.
- Secure the felt around the nightlight with small dots of heat-resistant adhesive or by slipping it into a clip-on frame.
- Ensure proper ventilation and test the setup for safe warmth levels before regular use.
Felt Travel Jewelry Roll for Keepsakes
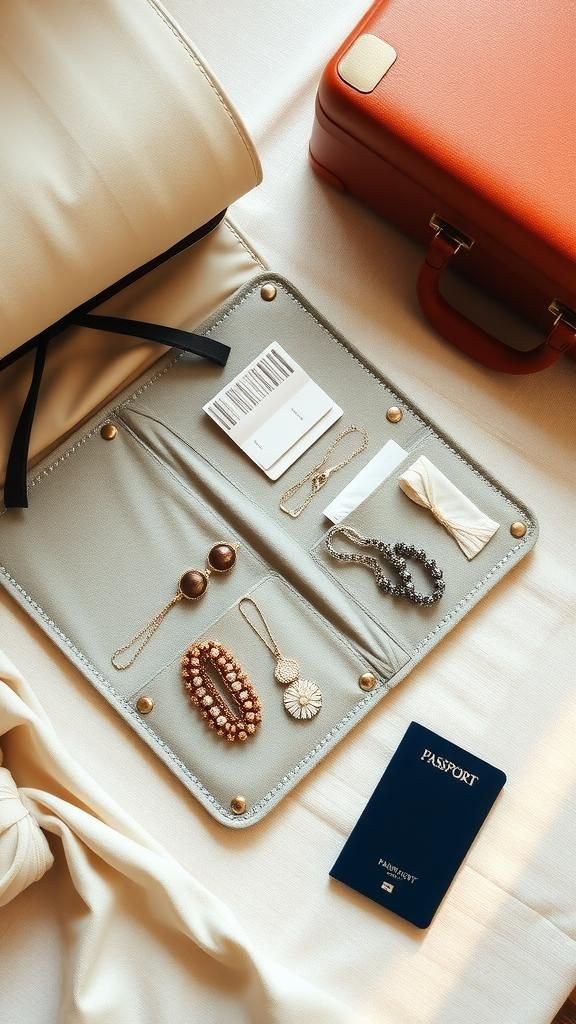
A felt jewelry roll fit neatly into a suitcase and felt soothingly lightweight while keeping pieces separated and soft. The felt provided a plush cradle for delicate items, and compartments offered quiet organization without the clink of hard compartments.
The roll closed into a tidy tube that felt pleasant to tuck away, and the soft edges prevented scratches. Colors and small appliqués made each roll feel personal and easy to find among other travel items, a small handmade comfort on the road.
Steps
- Cut a rectangular felt base and add small pocket pieces sized for rings, earrings, and necklaces.
- Glue or stitch the pockets onto the base in a layout that keeps items separated.
- Add a flap or felt strap to protect contents and roll the piece into a compact tube.
- Secure with a ribbon or snap and test that jewelry items sit snugly inside.
Felt Birthday Crown for Little Celebrations

A felt birthday crown carried a playful energy and felt soft on tiny heads during a small celebration. The felt had a gentle bounce and a warm matte look that suited bright ribbons and small embellishments.
Shapes cut into points and layered appliqués gave the crown a handcrafted story, while lightweight construction kept it comfortable through cake and songs. It sat proudly, slightly askew, and created a sense of ceremony that felt sweet and uncomplicated for everyone at the table.
Steps
- Measure the head circumference and cut a felt band long enough to wrap comfortably.
- Cut crown points and glue or layer them onto the felt band, arranging decorations as desired.
- Add a soft backing for comfort and secure the ends with snaps or a ribbon tie.
- Allow all glued pieces to dry before placing the crown on the celebrant’s head.
Felt Advent Calendar Pockets for Surprises

A felt advent calendar with tiny pockets turned mornings into small, tactile rituals. Each pocket had a soft opening and a felt flap that held tiny notes or tokens, and the felt felt gently cushioned when fingers reached in.
The palette could be muted and wintery or bright and playful, and the hanging format created a vertical tableau across the wall. The little surprises sat snugly in their soft homes, offering a slow reveal that felt intimate and undoctored by technology.
Steps
- Cut a backing panel from felt and arrange small pocket shapes in a grid layout.
- Glue or stitch the bottom and side edges of each pocket, leaving the top open.
- Number or decorate each pocket and tuck small treats or notes inside.
- Attach loops to the top of the backing and hang the calendar on a wall or door.
Table of Contents