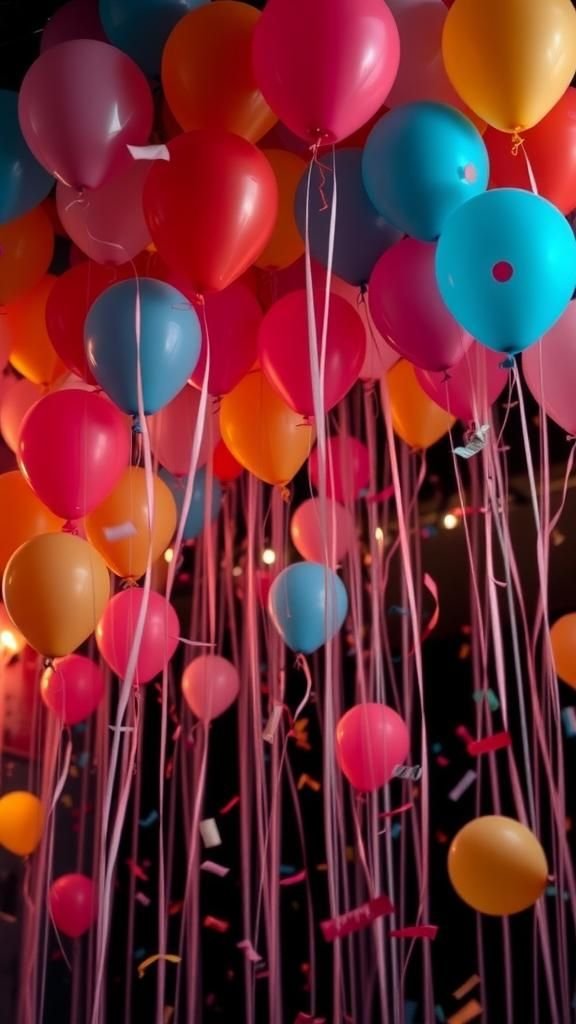
I love the hush that settles before midnight, when string lights warm the room and tiny handmade touches begin to sparkle. New Year’s Eve Party Crafts have become my cozy ritual, the kind of fiddly projects that leave glitter on my fingers and stories to tell over bubbly toasts.
These craft ideas grew from evenings spent with mismatched paper, leftover ribbon, and a playlist that somehow turns every cut into a small celebration.
New Year’s Eve Party Crafts make the night feel personal, tactile, and slightly mischievous in the best way.
Champagne flutes with scattered glitter rim

There is a small, guilty pleasure in watching light scatter across the edge of a glass. My favorite set catches the candle glow and throws tiny stars across the table when someone raises a toast.
The rim feels slightly rough beneath a fingertip, a contrast to the cool, smooth bowl. Glitter sits in pockets, some flakes larger and catchier than others, and every clink releases a faint shower of sparkle.
I remember how guests would lean closer, smiling that impatient grin, drawn to the shimmer and the little mess it made on napkins.
Steps
- Paint a thin line of clear adhesive around the top edge of each glass with a small brush.
- Pour fine glitter onto a shallow plate and gently press the adhesive rim into the glitter so it sticks evenly.
- Shake off excess glitter and let the glasses rest upright until the adhesive dries fully.
- Wipe any stray flakes from the glass surface with a soft cloth before serving.
Confetti poppers that surprise and delight
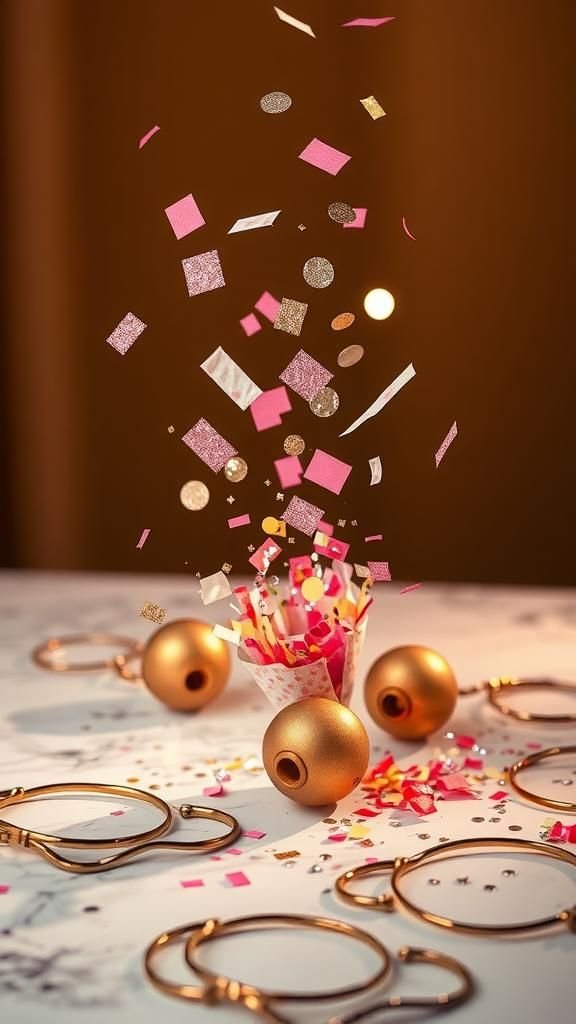
There is a particular delight in the moment before a pop, when everyone leans forward and breathes in sync. These hand-held tubes have a weight that feels promising in the palm, a little thrumming anticipation.
When released, confetti blossoms outward in a flurry of paper and metallic sheen, the sound sharp and playful. Paper edges whisper as they settle onto shoulders and tablecloths, creating a textured carpet of color.
I always find tiny shards of shiny paper in unlikely pockets the next morning, a souvenir of the night that makes me laugh.
Steps
- Slide a sheet of decorative paper around a cardboard tube and secure the overlap with adhesive tape near the edge.
- Fill the open end with a mix of tissue confetti and small metallic circles, keeping a small empty space at the top.
- Seal the filled end with a circle of tissue and an elastic band, then wrap the tube in ribbon for a festive look.
- Hold firmly and twist the sealed end away from the confetti before releasing to create the pop effect.
DIY sparkler holders for safe spark bursts
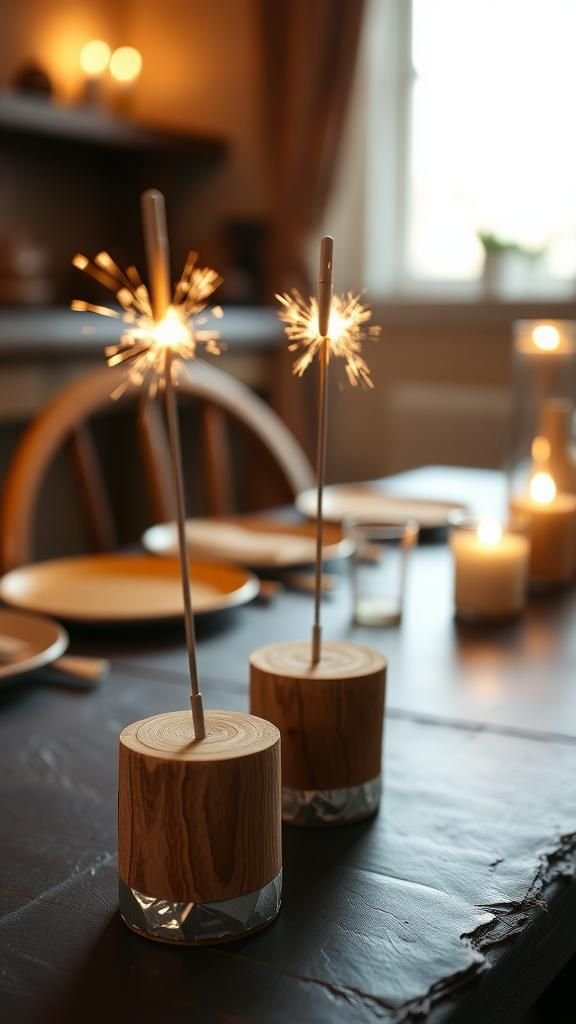
I remember the nervous thrill of sparklers the first time I tried them indoors; the sparks felt like miniature constellations. These little holders offer a reassuring grip and a decorative element so the sparklers feel integrated into the table setting.
The metal catches the brief heat and the holder base gives a satisfying weight when placed on a plate. Sparks send a faint metallic scent into the air, and the sound is a tiny crackle that punctuates laughter.
Guests gravitate to whichever holder looks the most whimsical, exchanging them like tiny trophies until the last flare dies out.
Steps
- Cut small discs from thick cork or wood to form stable bases for holders.
- Drill a narrow hole into each disc sized to hold a sparkler stem snugly upright.
- Paint or wrap the bases with metallic foil for a festive finish and allow any paint to dry completely.
- Insert sparklers into the holes when ready and light outdoors or in a well-ventilated area following safety guidance.
A metallic backdrop that catches every flash
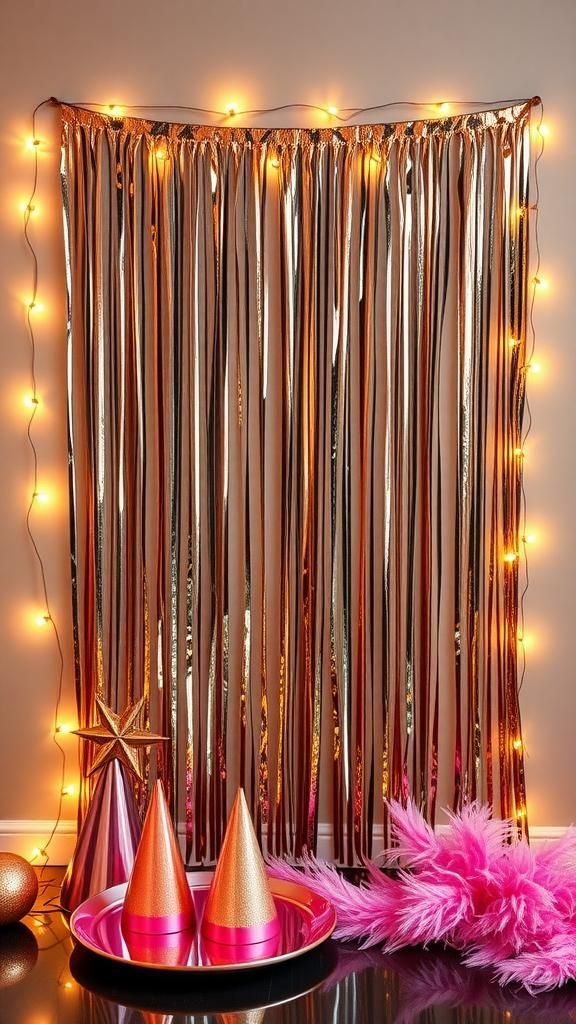
There is a small gasp when someone steps in front of a shimmering backdrop and the camera flash turns fabric into a waterfall of light. My makeshift wall, pinned between two bookshelves, creates an instant photo corner where laughter accumulates.
The metallic surface shivers as people move, reflecting colors in fragmented shards. Hands leave faint smudges that catch the light differently, and the sound of sequins brushing together adds a tactile soundtrack.
Guests gravitate toward that little patch of dazzle, posing with hats and silly faces until the fabric wrinkles with memories.
Steps
- Unroll a large sheet of metallic fringe or sequined fabric and lay it flat on the floor to smooth any creases.
- Fasten the top edge to a lightweight dowel or curtain rod with clips spaced evenly along the length.
- Hang the rod at a chosen height using command hooks or a freestanding frame so the fringe cascades freely.
- Add small fairy lights woven behind the fringe for twinkling depth and snap photos in front of the shimmering wall.
Handmade masquerade masks with metallic highlights

There is a playful secrecy in a mask that sits just right on the face, half hidden and half revealed. My collection has layers of brushed metallic tones and soft velvet accents that catch the low light differently.
Edges hold tiny beads that make a faint clink when someone moves, and the inside feels smooth against skin, softened by a ribbon tie. Wearing one invites a brief role change, and voices drop into conspiratorial tones.
I enjoy watching friends try on different shapes, each mask seeming to coax a new story from their smile.
Steps
- Trace a mask shape onto stiff cardstock and cut out the eyeholes with a craft knife.
- Layer metallic paper or fabric over the front and secure with adhesive, smoothing any air bubbles.
- Embellish with sequins, beads, and trim around the edges, letting glue set fully.
- Attach satin ribbons to either side for comfortable tying behind the head.
Paper garlands that shimmer across the room
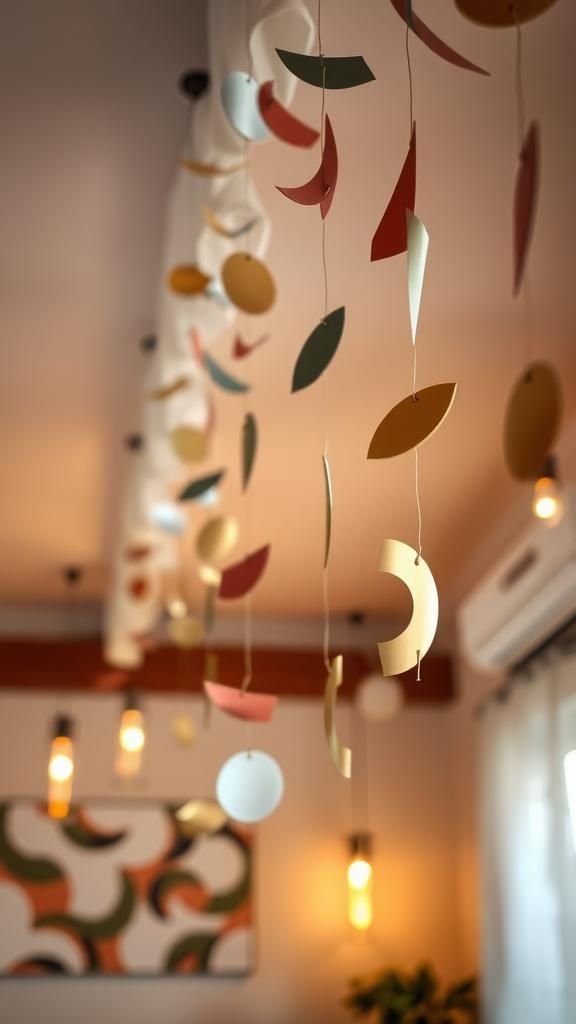
Suspended across my living room, these garlands feel like captured fireworks frozen mid-flight. Each paper piece flutters slightly when a draft moves through, casting tiny moving shadows on the wall.
Textures vary from glossy metallic to soft, fibrous paper, and the joins create a rhythmic visual beat. The gentle rustle becomes part of the evening soundtrack, complementing clinks and laughter.
I often find myself tracing the line with my eyes as glasses are refilled, enjoying how the garland divides the ceiling into pockets of warm light and quiet celebration.
Steps
- Punch or cut identical shapes from paper in alternating colors and textures to form the garland elements.
- Create small holes near the tops of each shape and thread through a length of twine or thin ribbon, spacing elements evenly.
- Secure knots beneath the last shape on each section to keep pieces from sliding.
- Hang the garland across the room with removable hooks or tie it to fixed points like curtain rods.
Balloon drop curtain that saves a dramatic moment
The hush before the drop is its own kind of flavor, a tiny electric pressure that makes everyone smile a little too widely. My balloon curtain hangs heavy and patient, each inflated orb tight against its neighbor, their latex skins whispering when nudged.
Light plays on the glossy surfaces and mirrors in the room, multiplying color. When the curtain gives way, latex and confetti tumble like a slow-motion rain, soft plastic thump against coats and hair.
The aftermath is a playful disarray that somehow brightens the whole floor, like confetti had married color and decided to stay.
Steps
- Inflate a large number of balloons to uniform sizes and knot each securely.
- Attach balloons to a long mesh or netting by tucking knots into the openings or tying them on.
- Suspend the filled netting from a ceiling beam or frame using strong tape or hooks, ensuring it can be released safely.
- Release the netting at the chosen moment to allow balloons to cascade down over guests.
Moon and star string lights for midnight ambiance

These salvaged lights have a soft, intimate glow that changes the room’s mood from bright to neighborly. Moon shapes cast a gentle, pearly light while tiny stars sprinkle pinpricks of gold across walls.
The plastic feels cool and familiar when rearranged, and the wires hum faintly when plugged in. I appreciate how the tiny bulbs create pockets of shadow that invite hushed conversations and quiet corners for reflection.
Guests tend to linger under the string, hands tucked into pockets, as if the light makes time slow just enough to savor the moment.
Steps
- Lay out the string lights and test each bulb to ensure proper operation and replace any faulty ones.
- Attach lightweight moon and star cutouts onto specific bulbs using small loops or clips, spacing them attractively.
- Hang the lights along a mantel, across a doorway, or above a seating area with secure hooks.
- Dim other ambient lighting so the string lights become the focal mood source for the space.
Shimmering place cards with mini tassels
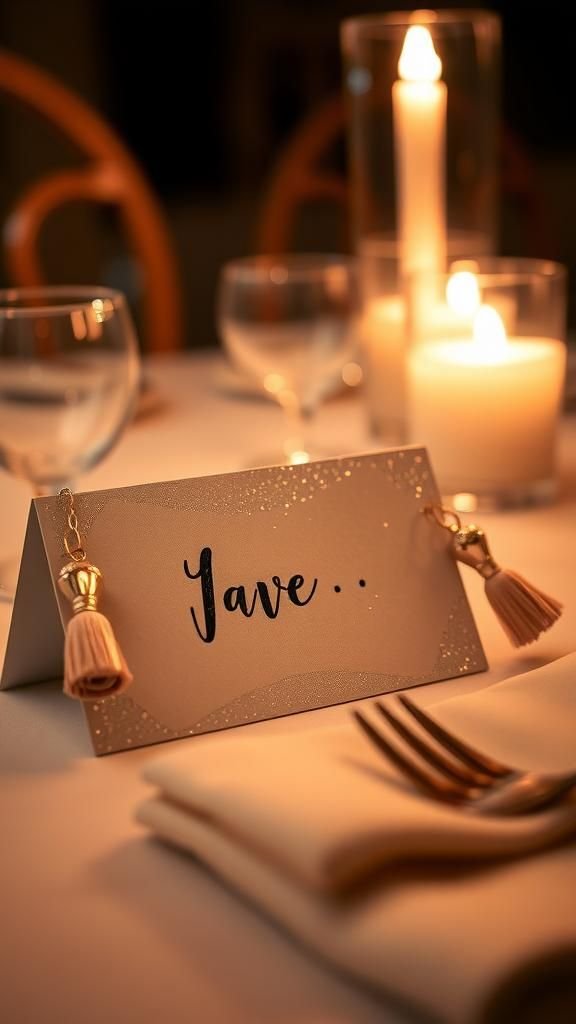
Finding a tiny, personalized token at a place setting always brings an extra smile; these cards have a tactile flourish that feels celebratory. The shimmer in the cardstock catches light as people slide plates back, and a small tassel adds a soft sway when chairs move.
The edges retain a hint of crispness, and the ink impression is slightly raised beneath fingertips. I remember making a stack of these while a playlist played, feeling an odd contentment in choosing which flourish matched which friend.
The cards become keepsakes, small reminders of who sat where and why that night lingered.
Steps
- Cut place card shapes from shimmery cardstock and fold them to stand upright.
- Punch a small hole in one corner and thread a tiny tassel through before knotting it securely.
- Write guest names on each card with a gel pen or metallic marker and allow ink to dry.
- Position the cards at each setting so the tassels drape onto plates or napkins for a decorative touch.
Sparkly party hats with playful silhouettes

There is a silly, freeing quality to a hat that tilts at an angle and refuses seriousness. These little cones and crowns glitter without being loud, catching the low light as people nod or tilt their heads.
The interior feels cushioned enough to stay put through laughter and song, and elastic bands press gently against the chin like a small promise of mischief. I enjoy watching someone who was reserved all evening don a hat and immediately begin speaking in exaggerated stories.
The hats become conversation starters, lending a whimsical tone to the last hours before midnight.
Steps
- Trace hat patterns onto stiff glitter paper and cut them out cleanly.
- Curve each pattern into a cone or crown shape and secure the edges with adhesive or tape.
- Add inner headbands or soft felt circles to improve comfort and glue on decorative trims.
- Attach elastic straps to the base so the hats stay in place during wear.
Noisemakers with painted wooden handles

The sound of a noisemaker announcing midnight is a small jolt that somehow feels communal. These hand-painted handles are warm in the hand, the brushstrokes visible beneath a glossy finish.
The paper or wooden body emits a bright, breathy rattle that mixes oddly well with the clink of glasses. I like the weight balance between the handle and the mouthpiece; it makes shaking feel deliberate and satisfying.
After a few rounds, the handles collect tiny dings and fingerprints, each mark a small badge from conversations and toasts that stretched into the night.
Steps
- Sand and prime wooden handles so paint adheres smoothly and finishes evenly.
- Paint handles in festive colors and add simple patterns, letting each layer dry before the next.
- Attach the noisemaker heads to handles securely with adhesive or fitted connectors.
- Season the instruments by testing the sound and adjusting any loose parts for a sharp rattle.
Mini chalkboard countdown on a wooden easel
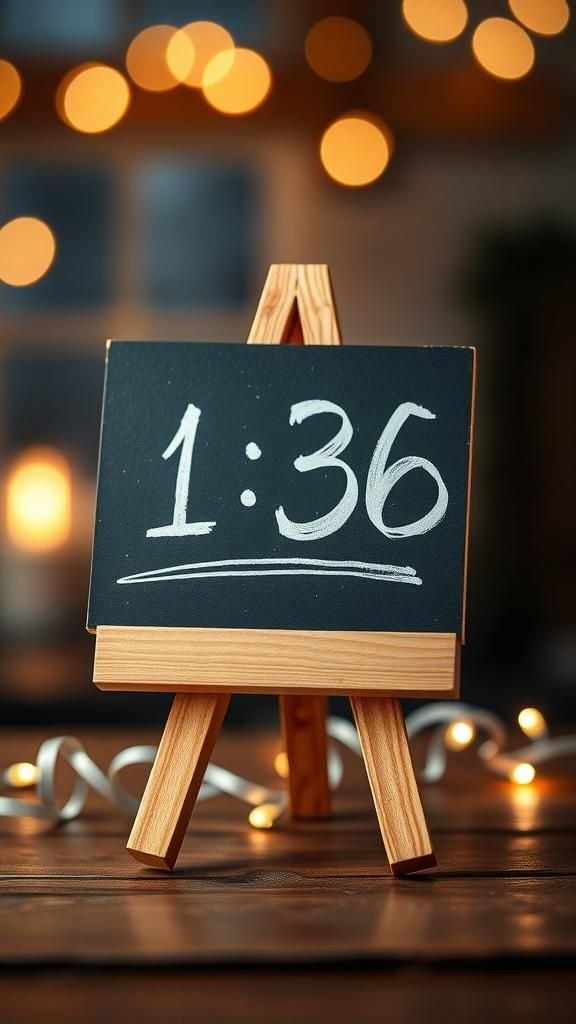
There is a small ritual in stepping up to a board and marking the minutes. The chalk dust leaves a faint scent and a soft residue on my fingers, and the chalk line looks proud and slightly smudged under close inspection.
The wooden easel has a weight that feels domestic and familiar, like a signpost for the evening. People gather around it, leaning in to suggest a playful time or tease an overly optimistic number.
When wiped clean, the board sighs and waits for the next scribble, already eager for the next small ritual.
Steps
- Select a small chalkboard and place it on a tabletop easel at a central spot in the room.
- Use white chalk or a chalk marker to write a bold countdown or midnight message clearly on the board.
- Keep a soft cloth or chalk eraser nearby for quick corrections or updates as the evening progresses.
- Refresh the lettering periodically so the countdown remains legible as smudges occur.
Memory jar with handwritten wish tags

There is a quiet joy in watching folded notes collect in a jar, each one a small voice captured on paper. The glass reflects candlelight and the overlapping colors of the tags, creating a layered mosaic.
Writing feels private; pen against paper scratches in a way that feels honest. At one point, someone tipped a tag free and read aloud, causing a ripple of laughter and the occasional hush.
The jar becomes a vessel for the night’s textures: hopeful scribbles, inside jokes, and the way handwriting wobbles when a glass is half full.
Steps
- Place a clear glass jar on a table with a pen and small slips of paper in a nearby bowl.
- Invite guests to write a wish, a memory, or a note and fold or roll it before dropping it into the jar.
- Seal the jar with a decorative lid or ribbon if desired and set it aside for reading after midnight.
- Open the jar the next day or at a chosen future moment to read the collected notes together.
Countdown coasters that mark each passing hour

These little circles on the table become miniature milestones; sliding one aside feels like turning a page. The texture of thick cardstock or cork absorbs condensation and takes light differently as the night deepens.
Each coaster bears a tiny number or word that prompts shared glances and easy jokes, and I enjoy how people peek down as their drink reaches a resting point. After a while, the stack looks like a small tower of time, evidence of hours spent in easy company.
The coasters pick up faint ring marks that tell the story of refills and conversations paused and resumed.
Steps
- Cut coaster shapes from cork or thick cardstock, ensuring they are uniform for a tidy stack.
- Print or handwrite numbers or tiny phrases on each coaster to represent hours leading to midnight.
- Seal cork or cardstock with a clear protective coating to resist moisture and allow for wipe cleaning.
- Place them at each setting so guests can replace or move a coaster as time passes.
Shimmering napkin rings with tiny bells attached

A clink at the table can be an accidental punctuation mark that draws a smile. These rings hug a napkin with a metallic sheen and let a small bell jingle when plates shift.
The metal feels cool at first, warming in the hand, and the bell tone is bright and quick, never overpowering. I like how they add a light auditory layer to the dinner conversation, an extra little punctuation that people begin to expect.
Napkins tucked through the rings take on an elevated look, and there is a quiet satisfaction in arranging them just so.
Steps
- Form rings from metallic cardstock or thin flexible metal strips, shaping them into smooth circular loops.
- Attach a tiny bell to each ring with thin wire or a jump ring so it dangles freely.
- Slide napkins through the rings and position them at each place setting for a cohesive look.
- Test the bells by lightly tapping a ring to ensure the sound is pleasant and not overly loud.
Glow bottle lanterns from recycled glass
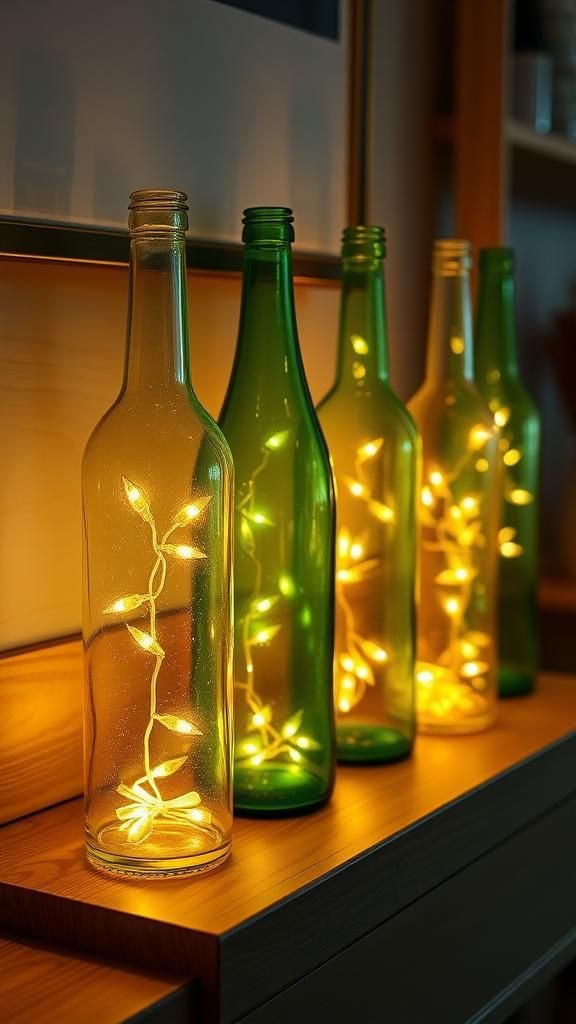
Empty bottles take on a new life when they glow from within, soft halos of color warming the table. The glass feels cool and familiar, and light seeps through labels in interesting patterns.
When grouped, the bottles create a gentle constellation that shifts as the lights breathe. I remember arranging a cluster on the mantle and watching how children’s faces softened in the light, less alert to schedules and more tuned to the small magic of illumination.
The sound of a candle flaring briefly is small and domestic, a punctuation worth savoring.
Steps
- Clean and dry recycled glass bottles thoroughly, removing labels and adhesive residue.
- Insert battery-operated LED lights or fairy light strings into each bottle, arranging them so light distribution feels even.
- Add decorative touches like twine, metallic paint accents, or ribbon around the neck for a finished look.
- Group bottles at varying heights on a mantel or table to create an inviting luminous display.
Frosted jar candle holders with glittery rims

There is a hush that arrives when candlelight moves through frosted glass; the flame becomes a soft heartbeat. The frosted surface diffuses the glow into a muted, honeyed wash, and a glittered rim catches stray sparks and looks like a tiny crown.
Hands hovering nearby can feel the slight heat through the glass, oddly comforting. I often make a small row of these and place them along a windowsill where they throw gentle halos outward.
Guests tend to linger near the light, speaking quieter, as if the glow asks for a gentler tone.
Steps
- Clean mason jars thoroughly and apply a frosted glass spray evenly over the exterior, allowing full drying time.
- Paint a thin ring of clear-drying adhesive around each jar mouth and sprinkle fine glitter along the adhesive ring.
- Shake off excess glitter and let the adhesive set fully before placing candles inside.
- Add tea lights or battery-operated candles and arrange jars along a windowsill or centerpiece for ambient warmth.
Clock-face centerpieces for a cheeky midnight tease
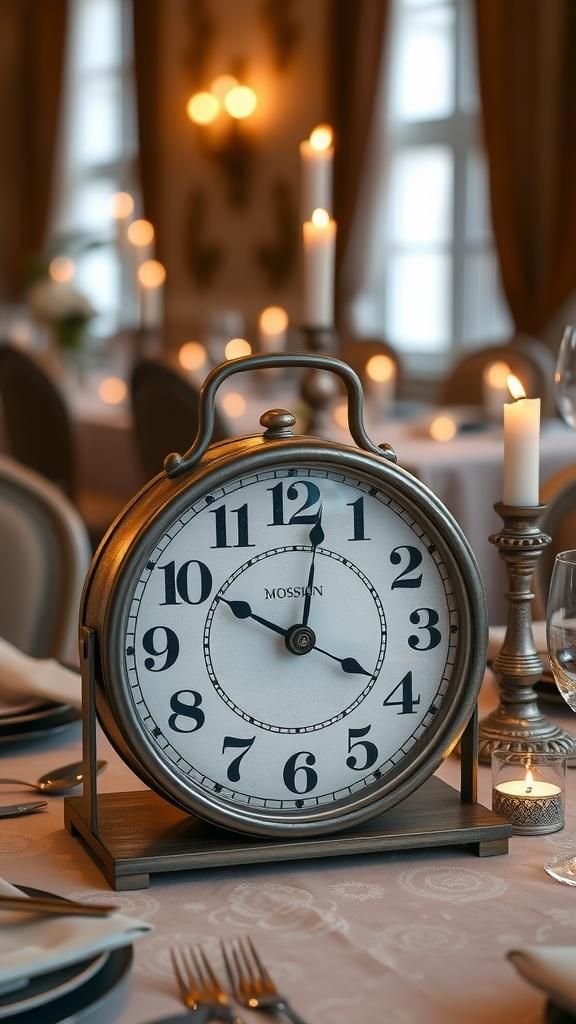
A centerpiece that looks like a clock invites fingers to hover and voices to guess how many minutes remain. My favorite version has a slightly askew hand, which everyone notes with a small laugh.
The textured face might be paper, wood, or ceramic, and the tickless silence allows the imagination to fill in the rest. Metallic numerals catch the light and give the centerpiece a formal wink.
It becomes a focal point for photos and playful commentary, a little prop that encourages people to play with time for a night.
Steps
- Choose a round base like a wooden circle or heavyweight cardstock and mark hour positions lightly.
- Attach numeral stickers or small metal numbers at each hour position for a decorative effect.
- Create clock hands from painted cardboard or thin wood and secure them to the center with a small brad so they rotate slightly.
- Place the clock-face on a low pedestal or tray and surround it with seasonal greenery or confetti for a complete centerpiece.
Mini fireworks centerpiece made from paper cones
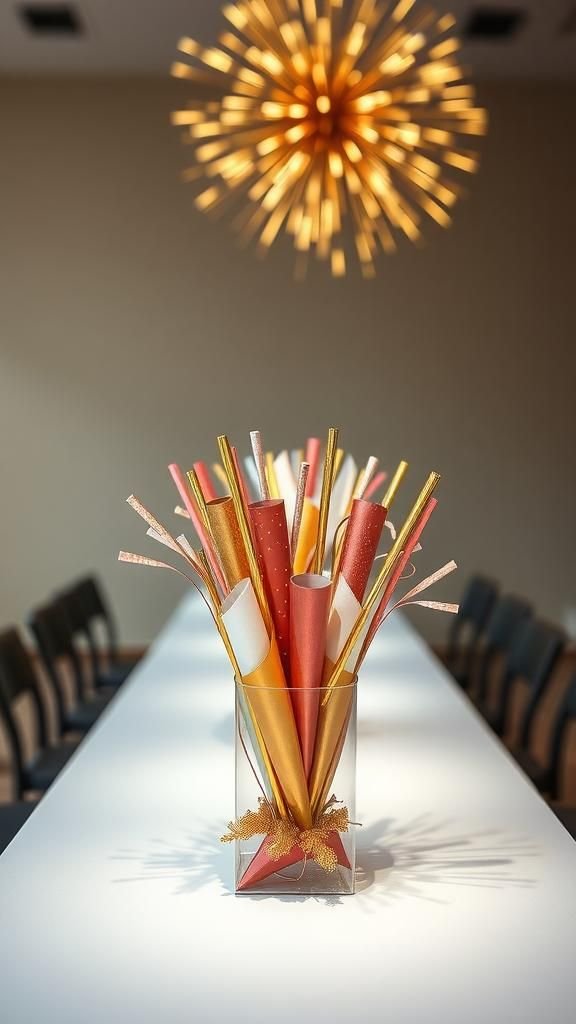
A paper-based centerpiece can mimic the upward motion of fireworks without the noise, offering a sculptural flourish. Each cone points skyward with a crisp silhouette, and the mix of metallic and matte papers catches light in contrasting ways.
The edges carry a faint crisp sound when brushed, and the arrangement forms a playful skyline across the table. I find the height variance creates pockets of intimacy between place settings, and people enjoy leaning in to inspect the delicate patterns.
The whole thing looks poised and celebratory, like a tiny paper city about to cheer.
Steps
- Roll sturdy paper into cone shapes and secure the seam with tape or adhesive so cones hold their form.
- Vary cone heights and cover them with metallic or patterned paper for textural contrast.
- Arrange the cones tightly on a flat base or tray so they stand upright and create a clustered silhouette.
- Tuck small battery lights or reflective confetti between cones for added shimmer without open flame.
Glittery favor boxes with surprise notes inside
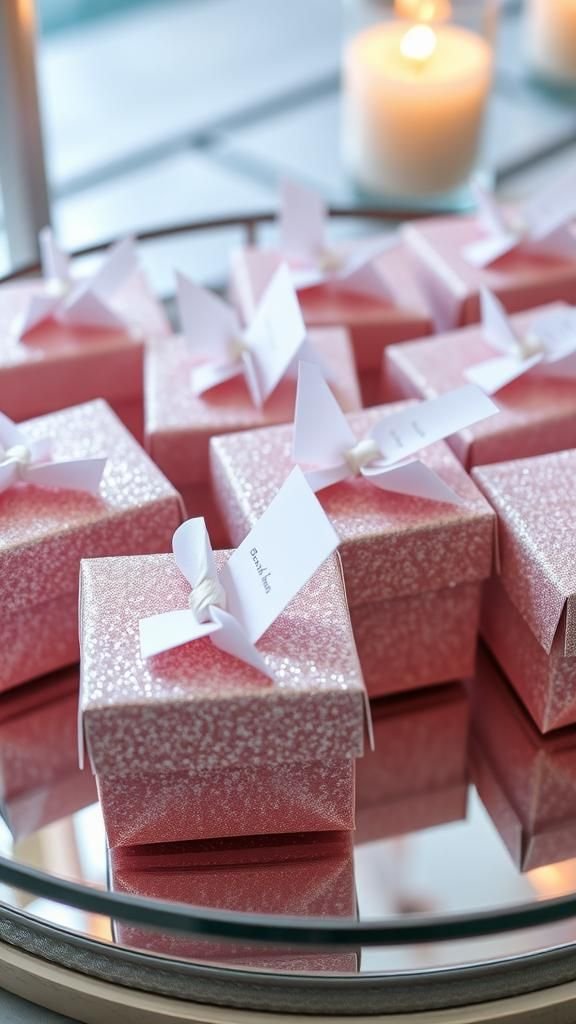
Small boxes have a ritualistic charm; opening one feels like breaking a tiny spell. The glitter catches light in a way that makes the lid look encrusted with tiny suns, and the box itself is pleasantly small enough to tuck into a palm.
Inside, a folded note can contain a line that prompts a grin or a raised eyebrow, and I delight in how people hold the box at arm’s length before committing to the reveal. The tactile click of a secure lid and the soft rustle of paper inside feel like small theatrical beats amid a louder party scene.
Steps
- Fold small favor boxes from cardstock, reinforcing edges for a neat finish.
- Apply glue to the exterior lids and press fine glitter into the adhesive, tapping off excess glitter when dry.
- Slip a handwritten note or small trinket inside each box and close securely.
- Arrange the boxes at place settings or a central gift table for guests to collect as they leave.
Paper streamer wands for gentle confetti trails
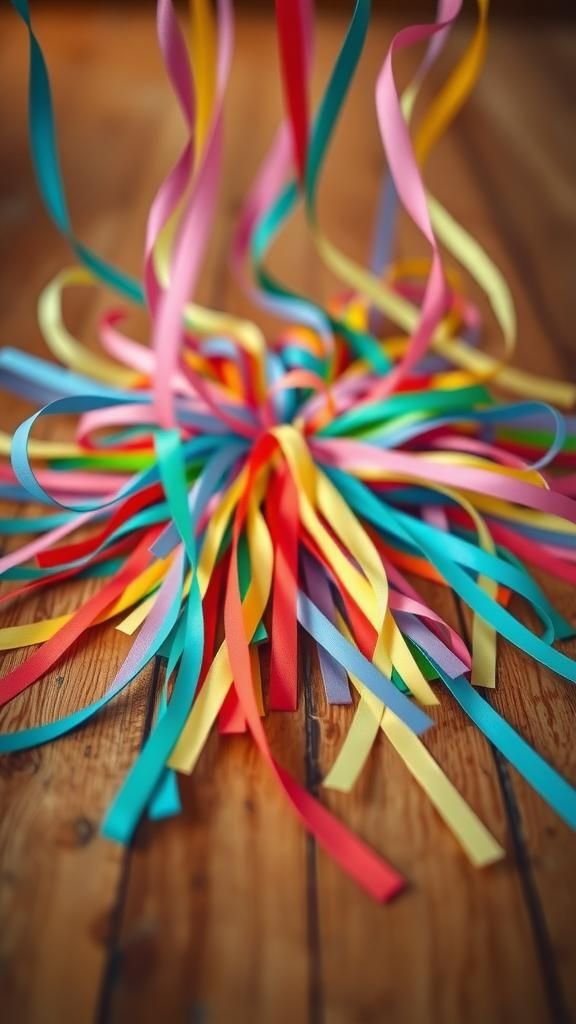
Streamers trailing from a wand add a playful motion that invites waving and small parades. The textures vary from satin ribbons to crinkled tissue, each producing a distinct rustle as it moves.
Wands have a satisfying balance, neither too heavy nor too light, and the ribbon colors throw ribbons of motion into the air, turning a walk around the room into a low-key procession. I like seeing children and adults alike caught up in the simplicity, twirling and laughing while the streamers leave soft traces across shoulders and sleeves like temporary adornments of joy.
Steps
- Gather ribbons and paper streamers in complementary colors and cut them into uniform lengths.
- Bundle the streamers at one end and secure them to a dowel with strong adhesive or wrapped twine.
- Add decorative tape or washi around the handle for grip and visual refinement.
- Offer wands to guests for playful waving during a dance or the countdown moment.
Table of Contents