I grew up with a box of red paper and a curious need to make light feel festive. There is something comforting about folding paper, watching warm color spill through thin fibers, and hearing a soft papery rustle while lanterns catch their first flicker.
Lunar New Year Paper Lantern Crafts have a way of turning quiet afternoons into family ritual and shared laughter.
Over the years I tried many paper lantern ideas and kept the ones that made me linger by the window. These Lunar New Year Paper Lantern Crafts lean on textures, color, and small personal touches that make a room feel like celebration.
Traditional Red Cylinder Lantern with Paper Tassels

This lantern felt like a hand-me-down from memory, all warm red and soft edges. I loved the gentle curve where the paper met the bamboo frame and the way light pooled at the bottom like honey.
The tassel offered a playful counterpoint that ever so slightly danced when a draft passed. The scent of ink and rice paper lingered on my fingertips while the glow softened the room, coaxing everyone toward the table to admire the quiet, familiar glow.
Steps
- Cut a rectangle of red rice paper and a strip for the fringe tassel.
- Shape the paper into a cylinder and secure the seam around a thin bamboo hoop.
- Attach a second hoop at the base so the paper keeps its form.
- Create a tassel from the strip and fasten it to the bottom hoop.
- Place a battery tea light inside and hang from a short cord.
Cherry blossom cutout lantern with delicate glow

This piece felt like spring tucked into winter celebration, soft pink petals cut against a red backdrop. The edges of each blossom caught the light and threw tiny floral shadows on the walls, like a quiet garden at dusk.
My fingers left faint smudges of ink from tracing the shapes, and glue shimmered where the cutouts overlapped. There was a small pleasure in how the lantern changed as the light dimmed, petals becoming silhouettes that invited close inspection.
Steps
- Trace cherry blossom shapes onto pink paper and cut out the motifs.
- Layer those cutouts onto a red paper sleeve and secure with archival glue.
- Form the sleeve into a cylinder and attach top and bottom hoops.
- Add a soft paper lining to diffuse the light further.
- Hang with a satin ribbon and place a soft LED candle inside.
Calligraphy band lantern with inked characters

The strip of calligraphy around this lantern felt like a whisper of wishes. Strokes of black ink on translucent paper created rhythm and contrast against the lantern’s red skin.
I found myself tracing the characters with my eyes, enjoying the slight bleed of ink into fibers and the tactile grain beneath the brushwork. At night the characters became dark, floating islands against the warm interior, and the whole object felt like both light source and a small poem in the corner.
Steps
- Prepare a long strip of thin paper and write characters with sumi ink and brush.
- Allow the ink to dry fully to avoid smudging.
- Wrap the inked strip around a red paper cylinder and secure the edges.
- Reinforce top and bottom with thin bamboo hoops for stability.
- Insert a frosted LED light to create even illumination.
Fortune strip lantern with hidden wishes inside

This lantern carried a playful hush because it held folded fortunes tucked into tiny slots along the inner wall. The rustle when someone reached to peek made the lantern feel like a secret keeper.
Light slipped through the small openings in thin ribbons, creating vertical bands of illumination on the table. I noticed how the paper’s weight balanced those little pockets and how the act of slipping a fortune in felt intimate, like passing a note between friends under a warm lamp.
Steps
- Cut a red cylinder of paper and mark small vertical slits along the lower half.
- Fold tiny strips of paper with wishes and tuck them into the slits.
- Secure the cylinder seam and attach top and bottom hoops.
- Add a decorative band around the center to hide any rough edges.
- Place a soft LED inside to reveal the slits as glowing lines.
Origami star lantern for delicate layered light

The layered origami points formed a crown of soft light that felt both intricate and gentle. Each folded star petal caught highlights along its creases, giving a subtle metallic sheen when gold-edged paper was chosen.
I liked the tactile rhythm of repeating folds and how the lantern blurred into a prismatic halo when seen from across the room. There was a calm pleasure in the symmetry and little shifts in shadow where the tips overlapped, creating depth without heaviness.
Steps
- Fold multiple paper modules into star points following a simple origami pattern.
- Join the modules by tucking tabs into pockets to assemble a spherical star.
- Reinforce internal joins with small strips of clear tape if needed.
- Attach a lightweight ring at the top for hanging.
- Place a battery-powered light at the center to illuminate evenly.
Shadow puppet lantern with playful silhouettes

This lantern behaved like a tiny theater, casting sharp silhouettes onto nearby walls. Cutouts of dancing figures and stylized dragons created moving narratives when the lantern swayed.
I enjoyed how the black shapes felt dramatic against the warm paper, transforming a quiet corner into a scene full of motion. The contrast between bright inner light and dark silhouettes created pockets of drama that prompted conversation, and the tactile sound of the paper as it moved added to the storytelling mood.
Steps
- Cut silhouette shapes from black cardstock and attach them to the inner surface of a translucent paper cylinder.
- Ensure each silhouette sits a small distance from the light source to sharpen the shadow edges.
- Seal the cylinder seam and install top and bottom hoops for structure.
- Hang the lantern where gentle air movement will animate the shadows.
- Place a warm LED inside to create crisp silhouettes on surrounding walls.
Tea light paper cup lantern — cozy little glow

This humble lantern felt like the craft version of a warm cup of tea. A paper cup wrapped in decorative red paper offered a small, intimate pool of light that fit perfectly on a windowsill.
The rim caught tiny highlights and the base threw a circular glow that seemed friendly and low-key. I liked how the object invited quiet moments, the soft heartbeat of light that felt both festive and homey, a small beacon for winding down in evening hush.
Steps
- Wrap a paper cup with decorative red paper and secure with a small strip of double-sided tape.
- Cut small shapes or patterns into the outer paper to allow light to escape.
- Place a frosted battery tealight inside the cup to diffuse the glow.
- Add a tiny tassel or sticker to the outside rim for a decorative touch.
- Display on a windowsill or tabletop away from drafts and direct flammable materials.
Fan-pleated lantern with rhythmic paper folds

The pleats created a gentle rhythm that felt musical when light traveled across the ridges. Each fold gathered a slightly different shade, creating alternating bands of brightness and shadow that shifted with the angle.
Handling the lantern revealed the crispness of the paper and the faint whisper of accordion folds meeting and releasing. It had a pleasing structural honesty, where the form was its ornamentation and the play between light and ridge gave the piece a quiet, measured presence on the mantel.
Steps
- Accordion-pleat a long strip of paper into evenly spaced folds.
- Bring the folded strip into a circular form and secure the ends together.
- Attach top and bottom rings to hold the shape open.
- Add a hanging cord or loop at the top.
- Place a soft LED inside to highlight the pleated texture.
Stained paper lantern with watercolor washes

This lantern looked like a small sky captured in paper, with watercolor blooms fading into one another. The pigments bled into fibers and created a soft, painterly landscape when lit.
I could almost smell the faintness of dried pigment and felt the subtle tooth beneath my fingertips. The light transformed the washes into luminous layers, and every angle offered a new color relationship.
It felt handcrafted in the quiet, contemplative way of a sketchbook left open on a table.
Steps
- Paint loose watercolor washes onto heavyweight translucent paper and let them dry flat.
- Cut and shape the painted paper into a cylindrical sleeve.
- Attach thin bamboo hoops at both ends to support the form.
- Optionally add a frosted inner lining to soften the glow.
- Place a battery light inside to reveal color gradients vividly.
Collage memory lantern with layered ephemera
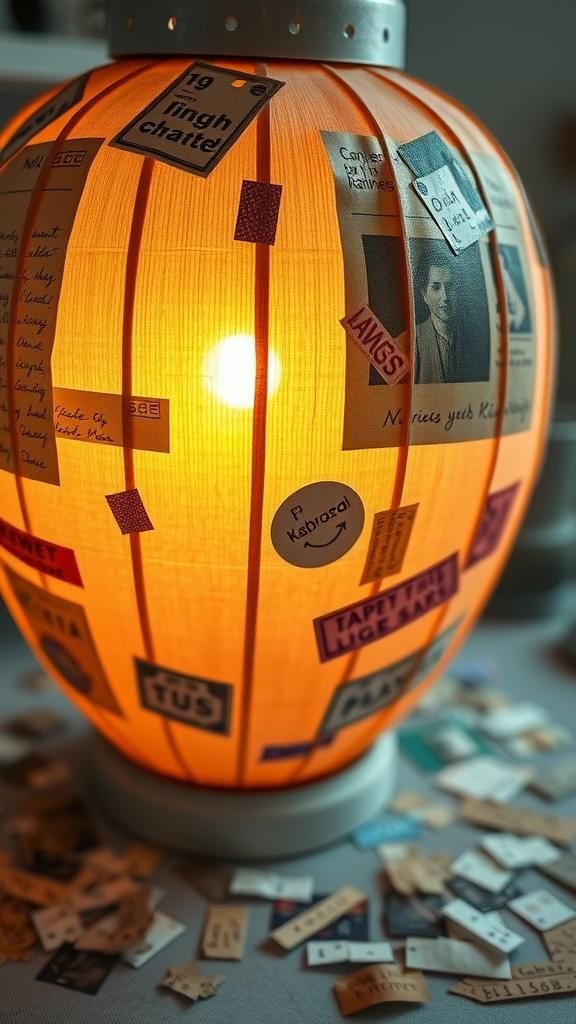
This lantern felt like a small scrapbook under light, with ticket stubs, fabric scraps, and faded notes layered beneath translucent paper. Each fragment suggested a memory, and the glow made them feel gently preserved.
Handling it provoked a string of small recollections, the smell of old paper and the soft texture of worn cloth. The edges of the bits overlapped in a way that created accidental patterns, and the assembled surface shimmered with patina when the lantern turned in the evening breeze.
Steps
- Arrange snippets of ephemera on a sheet of translucent paper, creating an appealing composition.
- Adhere pieces with archival glue to prevent wrinkling.
- Form the decorated sheet into a cylinder and secure seam.
- Reinforce top and base with thin hoops for structure.
- Add a warm LED light inside to highlight the layered elements.
Embroidered-silk inspired lantern with stitched detail
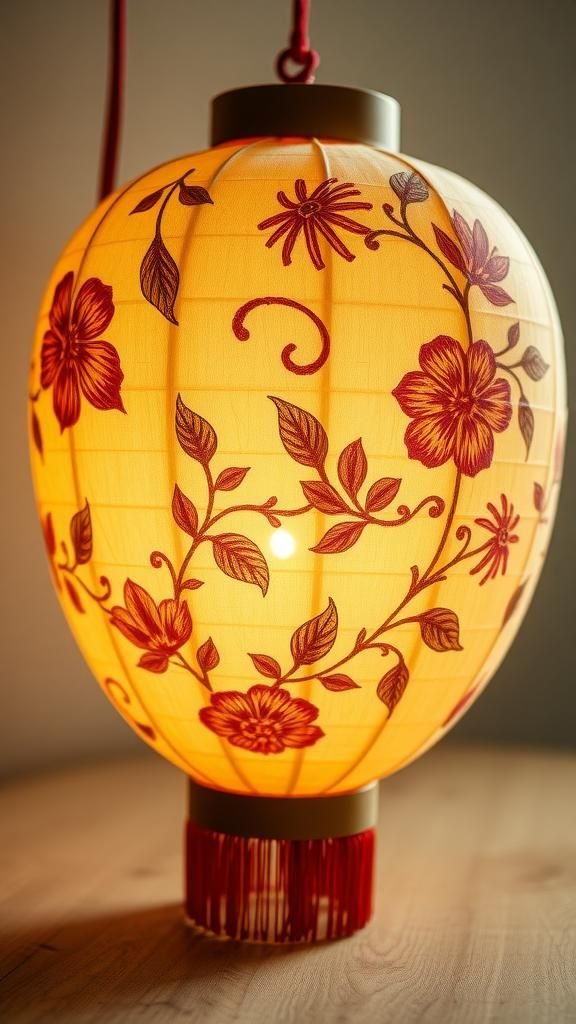
This lantern married paper with the illusion of silk through printed embroidery motifs and fine thread accents. The stitched lines created tiny ridges that caught highlights while the printed floral patterns read like vintage cloth.
I enjoyed the subtle mixture of texture and flatness, the way light emphasized thread shadows and lent the whole piece a refined quiet. The overall feeling was domestic elegance, like a small textile remade as light, inviting a pause to admire the delicate marks.
Steps
- Print or draw embroidery motifs on thin paper and add small stitched accents with embroidery floss.
- Keep stitches shallow to avoid tearing the paper.
- Wrap the decorated sheet around a supportive hoop structure and secure the seam.
- Attach top and bottom rings for stability.
- Insert a soft LED to bring out thread shadows and pattern detail.
Gold leaf accent lantern with faint metallic shimmer

Tiny flecks of gold leaf felt like small stars scattered across the paper surface. The metallic shimmer shifted with movement and caught light differently than the paper’s matte areas, creating a refined contrast.
I found the understated gleam especially lovely against the lantern’s warm red, where highlights popped like quiet surprises. The result felt celebratory but restrained, an object that offered fleeting sparkle in the right moments without overwhelming its simple silhouette.
Steps
- Apply thin adhesive to selected lantern areas and place gold leaf sheets gently over the tacky surface.
- Brush away excess leaf with a soft dry brush to reveal delicate metallic flecks.
- Seal the gold leaf with a clear archival spray if desired.
- Form the paper into a lantern and secure top and bottom hoops.
- Place a warm LED inside to reflect light off the gold highlights.
Window silhouette lantern for soft narrative shadows

This lantern felt like a small window to another room, with layered silhouettes that told a calm story when light passed through. Birds, branches, and rooftop edges created a distant landscape that shifted as the lantern moved.
I enjoyed watching the scene change subtly with different viewpoints and how the shadows softened or sharpened according to light placement. The whole effect conjured evenings spent gazing out at quiet roofs and made the lantern feel like a miniature moment suspended in the room.
Steps
- Cut scenic silhouettes from dark paper and adhere them to the outer surface of a translucent sleeve.
- Ensure spacing allows light to travel between layers for depth.
- Form the sleeve into a cylinder and attach reinforcing hoops.
- Hang the lantern near a neutral wall to catch the shadows.
- Illuminate with a low-intensity LED to produce soft, layered silhouettes.
Lunar phases lantern with moon cutout sequence

Rows of moon shapes marched around this lantern, shifting from crescent to full as the eye traveled the circumference. The cutouts created a chorus of little moons that made the lantern feel tied to the night sky.
Light moving within emphasized each phase differently, offering a playful sense of time passing. I liked how the repetition felt meditative, and the pale glow through the moon holes suggested quiet nocturnal hours that fit well with the holiday’s late evenings and lingering conversation.
Steps
- Draw moon phases along the paper strip and cut out each shape carefully.
- Line the interior with a frosted sheet to soften the light.
- Wrap the decorated strip into a cylinder and secure the seam.
- Add top and bottom hoops for support.
- Place a dimmable LED inside to vary the mood of the lunar cutouts.
Dragon silhouette lantern with fierce red shadow

The dragon’s sinuous form wrapped around the lantern like a myth made of paper. Dark cutouts suggested scales and claws that threw dramatic shadows, and the overall presence felt proud and lively.
Handling it conjured a little theatrical flourish as the dragon crept across walls when the lamp moved. I appreciated the way the long silhouette led the eye around the lantern, and how the red paper made the creature feel both festive and a touch mysterious in the glow.
Steps
- Draw a long dragon silhouette on black cardstock and cut it out precisely.
- Attach the silhouette along the outer surface of a red translucent cylinder.
- Secure the seam and add supporting hoops at top and bottom.
- Hang where gentle motion will animate the dragon’s shadow.
- Insert a warm LED light to create bold shadow contrast.
Kids’ handprint lantern — colorful childhood echoes

Tiny palms in bright pigments decorated this lantern like a chorus of small moons. The overlapping prints created a joyful tangle of color and texture that felt playful and affectionate.
Each smudge and edge spoke of a moment at the table, sticky fingers and earnest concentration. When lit, the layered pigments softened into a stained-glass effect that felt almost ceremonial in its innocence.
The piece always summoned laughter and stories about who left which handprint, making it a favorite for shared making sessions.
Steps
- Paint children’s palms with washable craft paint and press prints onto translucent paper.
- Allow the paint to dry fully before handling.
- Wrap the painted paper into a cylinder and secure the seam.
- Add top and bottom hoops for structure and a hanging cord.
- Place a battery-powered light inside to reveal overlapping colors softly.
Rice paper painted landscape lantern, poetic and calm

Thin rice paper absorbed ink washes in a way that felt very old and quiet. Mountains and waves suggested themselves with a few loose strokes and the inner light made the scene feel like a memory of dusk.
The paper’s delicate translucency allowed subtle textures to emerge and the lantern read like a tiny scroll turned into light. I often found myself lingering beside it on cooler evenings, watching the painted motifs glow and thinking of long stretches of sky and distant hills.
Steps
- Paint an ink wash landscape on rice paper, keeping brushwork loose and suggestive.
- Let the painting dry flat to retain smoothness.
- Mount the rice paper onto a supportive backing if needed, then form into a cylinder.
- Attach bamboo hoops at top and bottom for shape.
- Place a soft LED light inside to accentuate brush textures and tones.
Modern geometric lantern with crisp folded edges
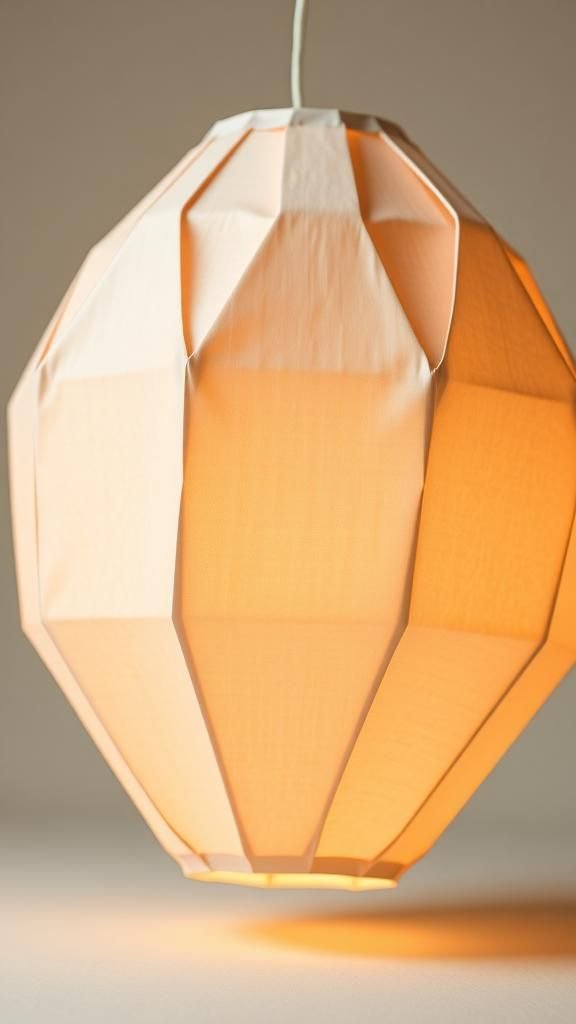
Sharp lines and clean planes made this lantern feel contemporary and calm. The geometry caught highlights along edges, producing small bright seams that contrasted with broad flat faces.
I appreciated the structural clarity and low-key palette that let shadow speak as much as color. The object had a quiet presence on a shelf, looking intentional and refined.
When the light came on the shapes read like architectural details, a small study in how folded paper can suggest whole rooms of light.
Steps
- Score and fold heavyweight paper into a geometric pattern with crisp, precise folds.
- Secure connecting tabs with thin double-sided tape to keep faces aligned.
- Add top and bottom rings to maintain the structure’s opening.
- Attach a hanging loop if desired.
- Position a centralized LED to cast even light across the geometric planes.
Tissue tassel cluster lantern for playful texture

Clusters of tissue tassels created a lively fringe that bubbled around the lantern’s base and hung like a skirt. The lightweight tassels fluttered with the faintest air movement and caught light at their tips, producing a lively shimmer.
I enjoyed the tactile softness and how the layers of tissue altered the silhouette into something festive and exuberant. The sound of soft paper brushing together felt almost celebratory and the whole piece invited people to come closer and smile.
Steps
- Create multiple tassels from tissue paper by folding and twisting strips.
- Attach tassels around the lantern base and optionally along the top edge.
- Form or wrap the main lantern body and secure seams.
- Add a supporting hoop at the top for hanging.
- Place a soft LED inside so the tassels glow subtly from above.
Bamboo frame sky lantern inspired tabletop piece

This tabletop version echoed flying lanterns without aiming skyward. The slender bamboo ribs peeked through thin paper, giving the form a skeletal grace.
Light filtered between the ribs and created linear highlights along the frame that felt architectural. There was a satisfying contrast between the organic grain of bamboo and the smooth translucent paper, and the whole object suggested gentle upward movement even while resting on the table.
It felt ceremonial and quiet, a small symbol of sending wishes outward.
Steps
- Bend thin bamboo ribs into a lantern frame and tie crossings with thin twine.
- Stretch translucent paper over the frame and secure at the edges with glue.
- Trim excess paper and reinforce seams with small paper bands.
- Add a decorative top loop and base hoop for stability.
- Place a battery-powered lantern light in the center to create a soft upward glow.
Paper-cut lace lantern with intricate filigree patterns

Lace-like cutouts turned this lantern into a delicate tapestry of light and shadow. Intricate filigree caught tiny highlights and cast a fine dappled pattern onto nearby surfaces.
Handling it felt like tracing small passages of a map, where every tiny hole had its own personality. The overall effect was ornamental without being heavy, a meeting of craftsmanship and softness.
When lit the pattern seemed to breathe, offering a slow, shifting ornament that invited close attention and quiet admiration.
Steps
- Draw a repeating filigree pattern on sturdy paper and cut out the shapes with a craft knife.
- Clean any rough edges and reinforce fragile areas with thin paper backing if needed.
- Form the cut sheet into a cylinder and secure the seam.
- Add top and bottom hoops to maintain shape.
- Insert a warm LED inside to let the lace pattern cast detailed shadows.
Table of Contents