Last Minute Halloween Crafts feel like a safety net for spooky season. I’ve been saved more than once by quick Halloween crafts when decorations felt flat and daylight disappeared fast.
Last-minute Halloween crafts turn jars, paper, and tape into instant atmosphere, and the mess somehow adds to the charm. These easy Halloween crafts keep spirits high without a long supply hunt.
One October evening, neighbors were on the way and the porch looked bare.
A rummage through the junk drawer sparked a burst of last minute Halloween crafts—paper bats, glowing jars, and a cobwebby wreath. Ten minutes later, the house felt haunted in the best way.
Glowing Mason Jar Mummy Lanterns For Doorsteps

Gauze-wrapped jars cast soft, eerie light that suits porches, stoops, and shadowy corners. Clear glass, gauze or cheesecloth, and wiggly eyes form a playful mix, while LED tealights keep everything calm and flicker-filled.
Tea-stained fabric brings an aged, sepia tone; bright white strips read crisp and cartoonish; charcoal ribbon or twine adds a darker accent. A trio looks charming at an entry, and a line of jars frames a walkway with friendly spooks.
Small jars create a clustered vignette on a mantle, and taller ones anchor a window ledge. A gift version pairs a jar with wrapped candies tucked inside.
Steps
- Wash and dry mason jars, removing labels and residue.
- Wrap each jar with strips of gauze or cheesecloth, securing the ends with double-sided tape.
- Stick wiggly eyes near the top, peeking between layers for a playful expression.
- Drop in LED tealights and place the mummy lanterns along the porch or windowsill.
Quick Trash Bag Spiderwebs For Windows And Doors

Glossy black plastic forms a graphic web with sharp angles and a modern sheen. Trash bags, painter’s tape, and a pair of scissors create a lightweight piece that clings to glass with minimal fuss.
The look ranges from minimal to dramatic depending on strand thickness and spacing. Against frosted glass, the web reads silhouetted and bold; on a white wall, it feels graphic and pop-art.
Mini webs suit cabinet doors; oversized versions become a focal point across a picture window. A travel-friendly idea rolls into a tube for gifting and unfolds into a surprise web at a friend’s place.
Steps
- Flatten a large trash bag and fold it into a triangle.
- Draw radiating lines and connecting arcs with a white pencil to outline the web.
- Cut along the lines through all layers and unfold to reveal the spiderweb.
- Fix the web to glass or a wall with small loops of tape at the anchors.
Paper Plate Black Cat Door Mask

A matte black plate transforms into a moonlit feline with perked ears and a sly gaze. Cardstock scraps provide ears, whiskers, and a tiny nose, while metallic markers lend shimmer along the edges.
A satin ribbon loop turns it into a quick door charm, and glitter paper adds party-ready sparkle. Cat eyes can skew cute in lime green or mysterious in amber.
Hung on a knob or layered over a wreath, the piece welcomes trick-or-treaters with mischief. Pairs nicely with a cluster of orange balloons and a string of paper bats for a cohesive entryway scene.
Steps
- Paint a paper plate black and let it dry completely.
- Cut two triangles from black cardstock for ears and smaller inner triangles from contrasting paper.
- Glue ears to the back of the plate, add cardstock eyes, a tiny nose, and whiskers.
- Punch a small hole at the top and thread ribbon for hanging on the door.
Coffee Filter Floating Ghost Garland For Hallways
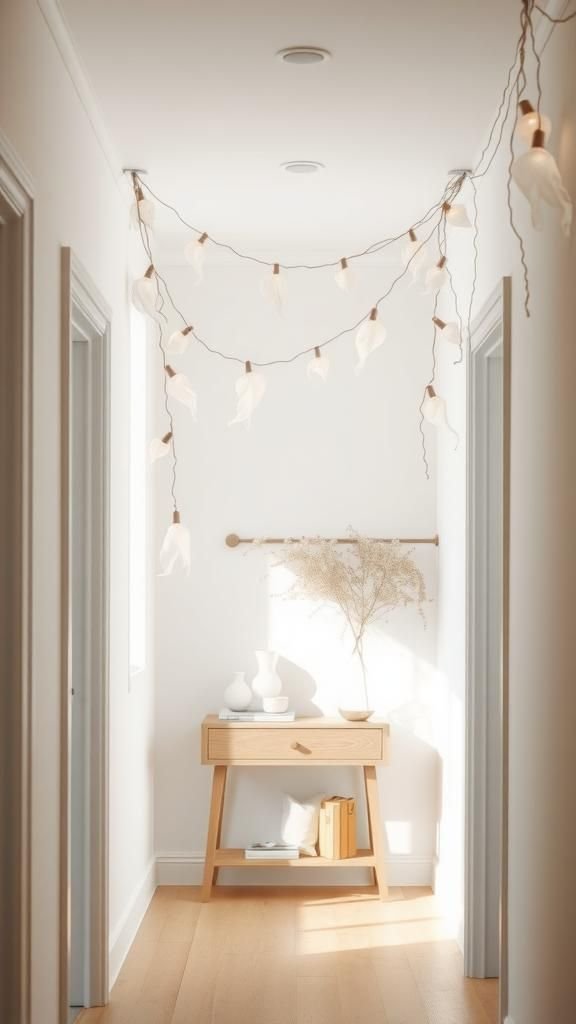
Feathery coffee filters create airy ghosts that sway with the slightest draft. The translucent white paper softens light and gives a cloudlike presence along mantels, doorways, and curtain rods.
Black marker eyes add a playful expression, while pale gray shading along the edges introduces depth. Strung on cotton twine or silver thread, the garland reads light and fluttery in motion.
Mini versions sit in potted plants, and larger ones float across windows like friendly apparitions. Packaged in a narrow envelope, the strand makes a sweet doorstep gift to share a bit of whimsy on Halloween night.
Steps
- Layer two coffee filters and form a small ball of tissue for the head underneath.
- Tie thread beneath the head to create a loose ghost shape.
- Draw tiny eyes and mouths with a black pen or marker.
- Knot each ghost onto a long string at intervals and hang across a hallway.
No-Carve Sparkly Pumpkin Makeover With Tape
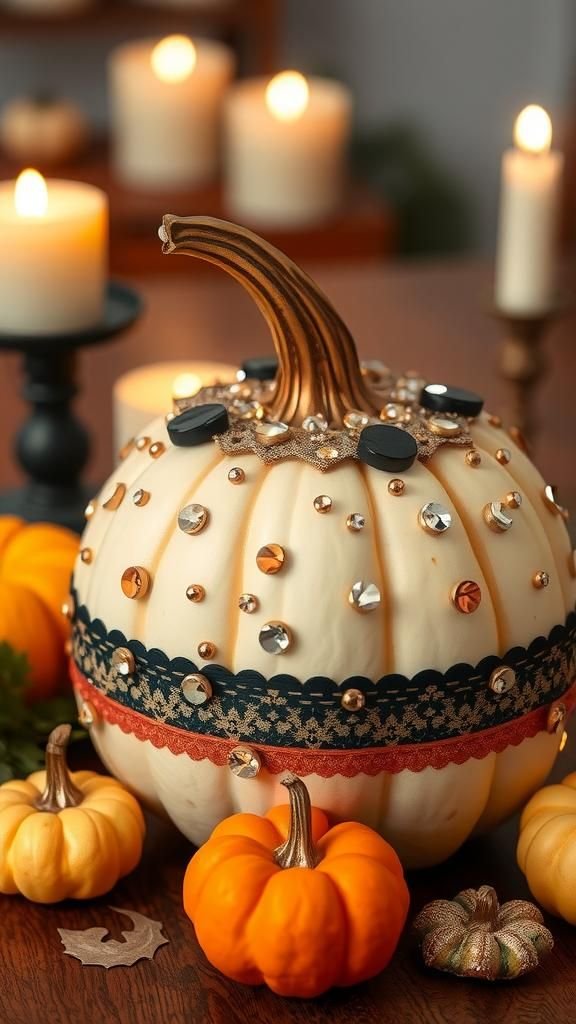
A store-bought pumpkin, real or faux, turns glam with tape and glitter accents while keeping the surface intact. Metallic washi, striped fabric tape, and stick-on gems build patterns that feel party-ready.
Black and copper create a moody palette; iridescent white pulls in a moonlit shine. Grouped on a sideboard with candles, the pumpkins bring warmth without mess.
A monogram or geometric pattern personalizes a hostess gift, especially when paired with a cellophane-wrapped candy mix. Smaller gourds stacked around a centerpiece create a tiered display that feels finished yet low-hassle, perfect for a last-minute dash before guests arrive.
Steps
- Wipe the pumpkin clean and dry thoroughly.
- Lay strips of washi or fabric tape in stripes, chevrons, or spirals.
- Press down edges firmly and add adhesive gems or stickers for sparkle.
- Finish with a bow tied around the stem and display on a table.
Cardboard Tombstones With Chalkboard Lettering Effects

Flattened boxes morph into graveyard props with charcoal shades and chalky writing. Corrugated cardboard offers texture that catches dry-brushed gray, while white marker lettering mimics classroom chalk.
Playful epitaphs bring humor; spider doodles and crack lines add drama. A cluster of varying heights creates depth near the lawn or along an entryway.
Lightweight construction means easy storage after the holiday, and the makeshift cemetery pairs well with faux moss and dried branches. Gift-ready versions slip into a mailer with a stick of chalk attached for personalized messages at the recipient’s doorstep.
Steps
- Cut tombstone shapes from cardboard and peel small sections to reveal texture.
- Paint the surfaces in layers of gray and black, letting streaks show through.
- Outline cracks and chips with a darker marker; add a white marker epitaph.
- Tape a skewer to the back and stick into planters or foam for display.
Milk Jug Ghost Porch Lanterns Glow
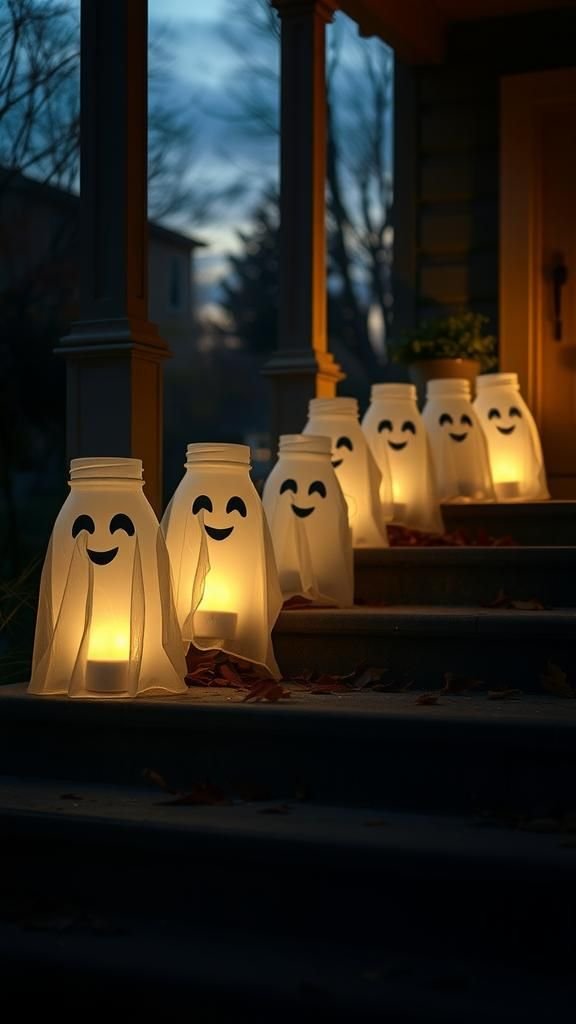
Recycled jugs transform into friendly specters with wide grins and glowing bellies. Translucent plastic diffuses light for a soft halo, perfect along steps or balconies.
Simple black marker faces create personality, while pastel accents around the edges give a soft cartoon charm. Different lid colors introduce variety, and a row of matching caps feels clean and graphic.
The lightweight bodies move slightly with breezes, adding a gentle wobble that reads playful. Presented as a neighborly gift, a jug filled with wrapped sweets turns into a lantern later, making it a two-in-one treat during the holiday rush.
Steps
- Remove labels and clean milk jugs thoroughly; dry the inside.
- Draw ghost faces on the front with a permanent marker.
- Cut a flap in the back for inserting string lights or an LED candle.
- Set along the porch, tucking lights inside each jug to glow.
Witch Hat Centerpiece From Stacked Paper Cones

A tall, whimsical hat rises from nested cones, creating a sculptural focal point for dining tables and entry consoles. Matte black paper forms the core silhouette, while a satin ribbon band or glittery trim lifts the mood.
Tulle and tiny star stickers bring a sprinkle of magic. A wide brim balances the height, and a crooked tip adds character.
Paired with brass candlesticks and tiny pumpkins, the setup feels seasonal without heaviness. A compact version fits a side table; a taller one commands a buffet.
Wrapped in tissue, it transports well as a last-minute hostess surprise.
Steps
- Roll cardstock into two or three cones and secure seams with tape or hot glue.
- Cut a wide circle for the brim and a center hole to sit the cone.
- Stack or trim cones to reach a pleasing height and glue together.
- Wrap a ribbon band around the base and add tulle or star stickers.
Bat Silhouette Garland From Black Cardstock Scraps
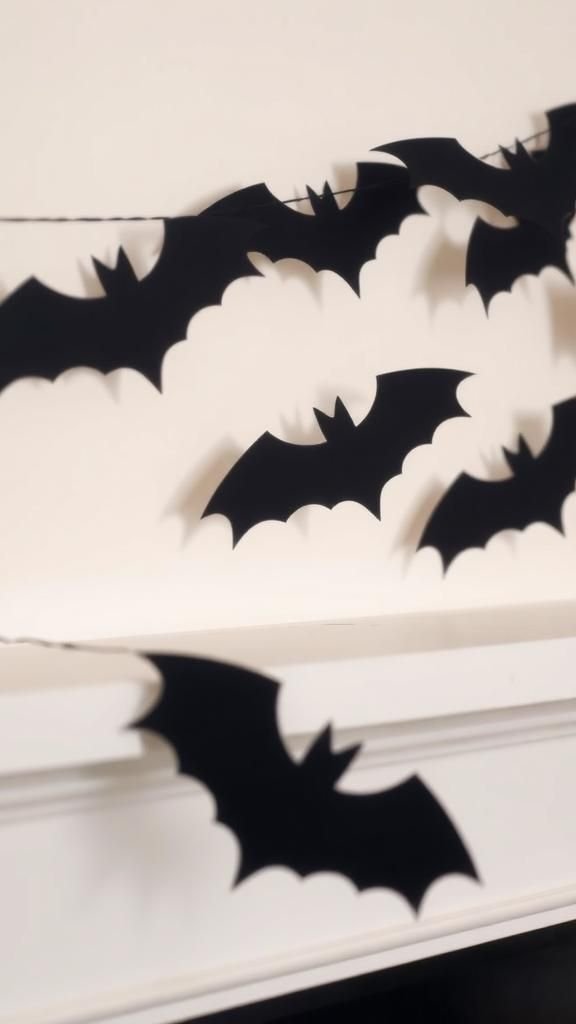
Crisp bat shapes bring movement and shadow to mantels and windows. Heavy black cardstock keeps edges sharp, while metallic thread introduces a glint that catches light.
A mix of wingspans creates a dynamic flock, and a few purple or navy bats add a moody accent. Draped across a bookshelf or layered over a mirror, the garland reads graphic and modern.
Packed in a flat envelope, it travels well as a quick gift for a Halloween gathering, ready to string wherever a blank space needs drama.
Steps
- Trace bat shapes on black cardstock and cut them out.
- Punch tiny holes near the wing tips or center of each bat.
- Thread bats onto twine or metallic thread, spacing them irregularly.
- Hang across mantels, windows, or door frames with small tape loops.
Yarn-Wrapped Candy Corn Table Cones Arrangement
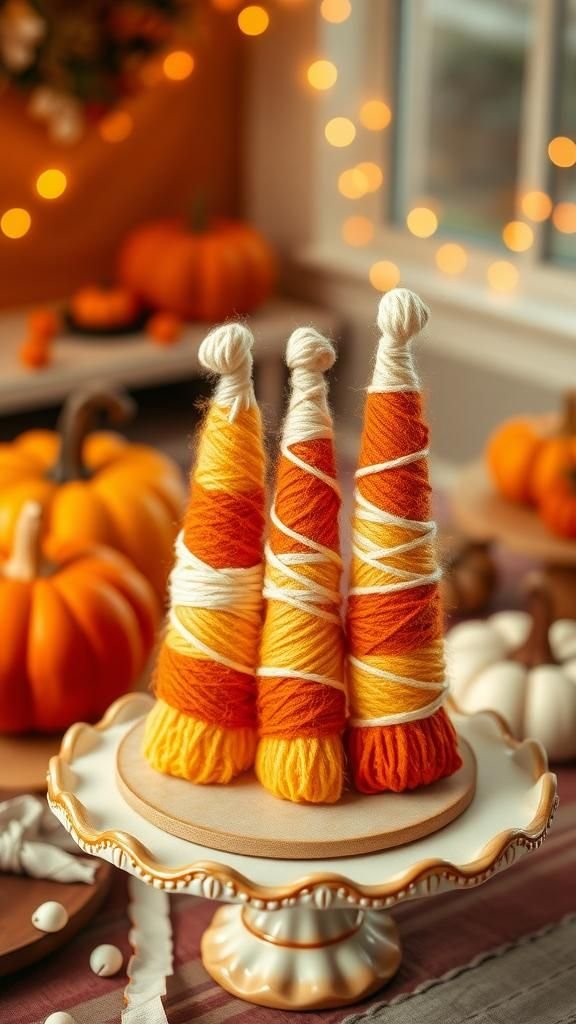
Plushy yarn bands in white, orange, and yellow create a candy corn homage with a cozy twist. Foam or paper cones provide structure, while matte yarn fibers deliver a soft, knit-like surface.
A trio of sizes reads playful on console tables and dessert stations, and miniature versions nestle into tiered trays. Neutral cones in cream and gold feel sophisticated for dinner parties, while bright hues skew nostalgic and fun.
Clustered on a cake stand, the cones become a centerpiece that pairs nicely with caramel apples and gingham napkins. Cellophane-wrapped sets make cheerful little gifts for neighbors.
Steps
- Cut cone forms from cardstock or use foam cones from a craft store.
- Wrap white yarn at the tip, orange in the middle, and yellow at the base.
- Secure the ends with hot glue and trim any stray fibers.
- Display cones in small clusters or on a cake stand for height.
Newspaper Origami Coffin Favor Boxes Tonight

Recycled newsprint folds into quirky coffin favor boxes with vintage typographic charm. The grayscale print offers a moody backdrop for tiny labels and ribbon pulls.
A matte black band or wax seal elevates the look, while tiny skull stickers land a wink of humor. Perfect for wrapped candies or tea bags, these boxes line a snack table with a touch of gothic flair.
A small bundle tied with twine becomes a party favor that fits easily into a tote, adding a last-minute handmade touch without fuss.
Steps
- Cut a rectangle of newspaper and fold a classic origami box base.
- Repeat with a slightly larger rectangle for the lid.
- Press crisp creases and tape inside corners for structure.
- Add sticker labels, ribbon pulls, and fill with wrapped candy.
Spooky Potion Bottles From Recycled Glass
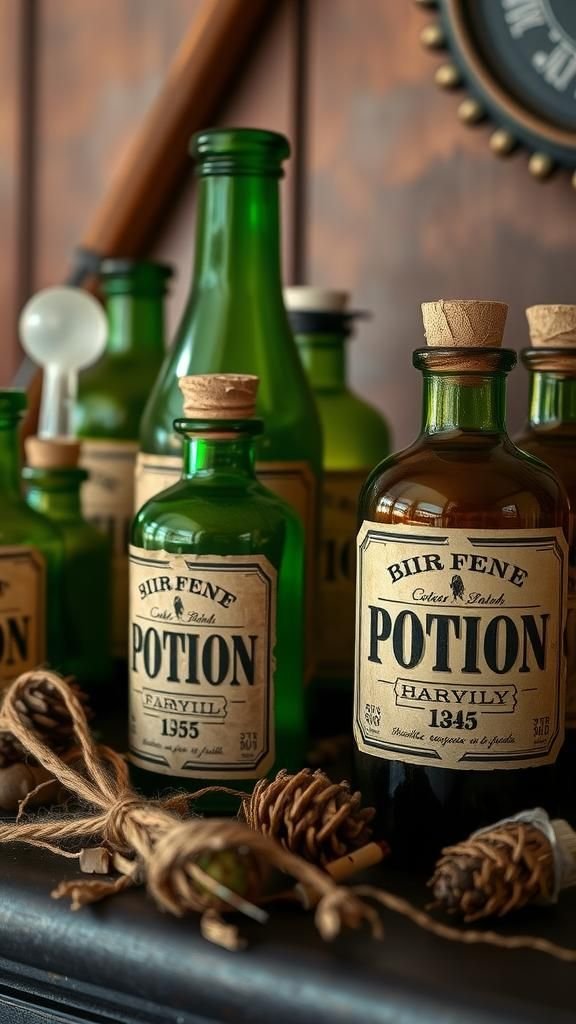
Old jars and bottles transform into apothecary wonders with labels and tinted liquid. Amber, green, and clear glass create a cabinet-of-curiosities vibe, while twine, wax drips, and charms build texture.
Tea-dyed paper labels bring an aged tone; black-and-white graphics lean graphic and clean. Clustered on a mantle with dried herbs and a black candle, the bottles read mysterious and theatrical.
Small sets become quirky host gifts, especially with a tag that hints at charmingly silly “elixirs.” A tray display on a bar cart adds Halloween mood without overt ghoulishness.
Steps
- Remove labels from glass bottles and dry thoroughly.
- Mix water with a drop of food coloring to tint and fill bottles.
- Print or handwrite labels and attach with glue or double-sided tape.
- Wrap twine around necks and add wax drips from a candle for effect.
Window Silhouette Monsters With Colored Cellophane
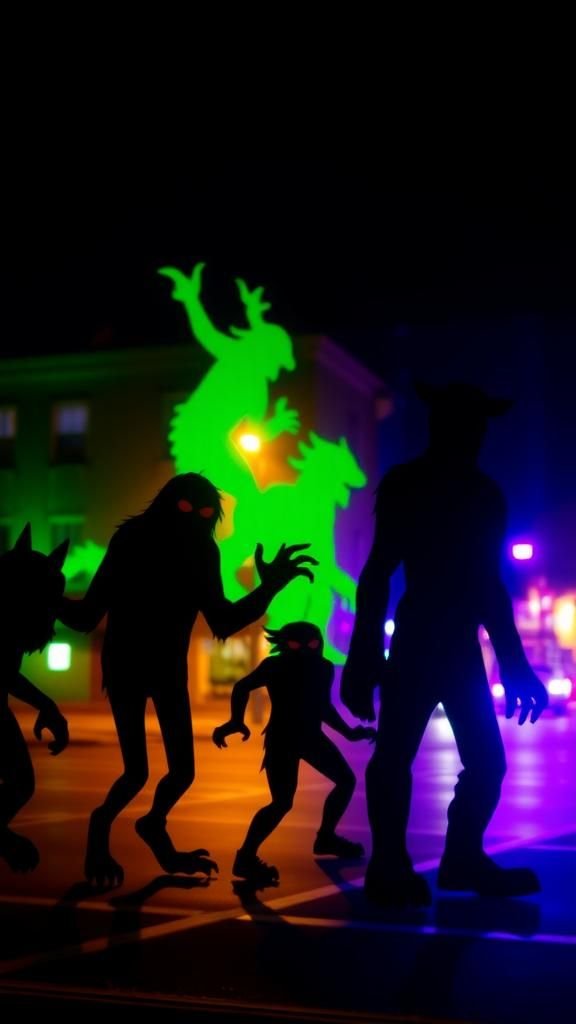
Bold monster shapes transform windows into comic-book frames with backlit color. Black cardstock outlines define goofy teeth and horns, while cellophane fills glow like stained glass.
Lime green and purple read playful; fiery red adds a dramatic scene. The effect pops from the street at night and adds cheery color by day.
Easy to stash flat after the holiday, the panels layer nicely with string lights for extra glow. Rolled in a tube, the set travels easily to a party as a quick decorate-on-arrival surprise.
Steps
- Sketch monster shapes on black cardstock and cut out large silhouettes.
- Cut cellophane panels for eyes, mouths, and body sections.
- Tape the cellophane behind the cutouts to fill the openings.
- Mount silhouettes on windows with removable tape and backlight with string lights.
Paper Bag Luminaries With Creepy Cutouts

Brown lunch bags gain a haunted glow with simple cutout shapes and sandy bases. The kraft paper gives a warm, rustic hue; black silhouettes of cats, bats, and skulls lean playful or eerie depending on design.
Lined along a walkway or stairs, these luminaries create a welcoming path for visitors. White bags bring a brighter glow; stamped patterns add an artisanal touch.
As a quick gift, a set of folded bags with a packet of LED candles tucks neatly into a ribboned bundle for neighbors.
Steps
- Sketch shapes on the front of each paper bag and cut out carefully.
- Pour a cup of sand or small pebbles into each bag for weight.
- Place an LED candle inside, positioning it behind the cutout.
- Arrange luminaries along a path or steps with safe spacing.
Duct Tape Spider Garland Over Fireplace Mantel
Matte and metallic duct tape shapes turn into bold spiders marching across a mantle. Cardboard provides a sturdy base, while glossy tape gives a shiny exoskeleton effect.
Jet black reads classic; holographic silver sets a futuristic tone. The garland pairs nicely with black candlesticks and a cluster of mini pumpkins for layered texture.
A few strands dangle downward for a playful sense of movement. As a shared project, the pieces tuck into a zip bag for transporting to a party and stringing on the spot.
Steps
- Cut spider bodies and legs from scrap cardboard.
- Cover shapes with black or metallic duct tape, trimming clean edges.
- Punch holes and thread spiders onto cord, adding knots for spacing.
- Drape across the mantel and let a few hang lower for movement.
Bloody Handprint Candle Jars With Labels
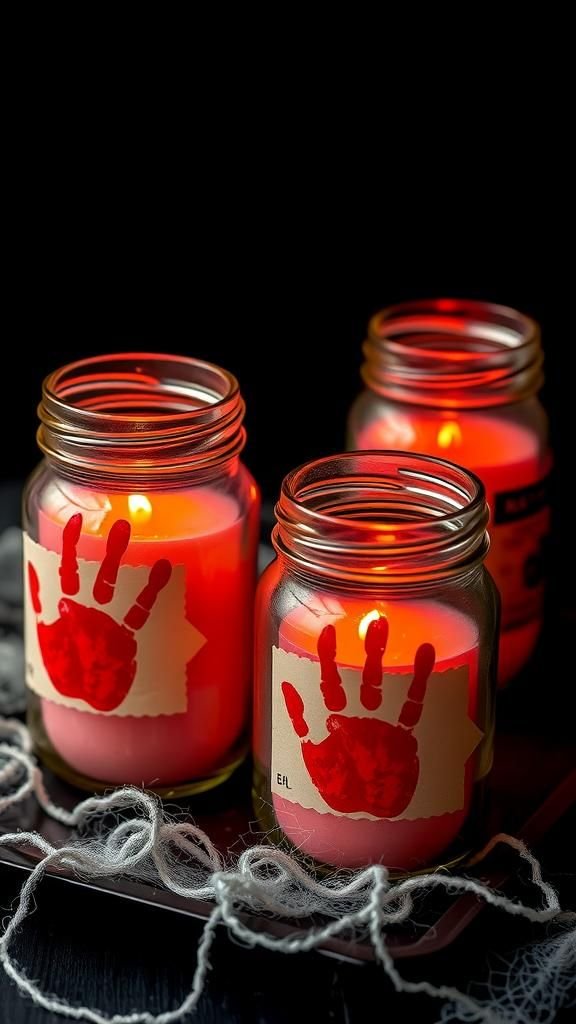
Repurposed jars take on a horror-movie vibe with crimson smears and stark labels. Drippy red effects against clear glass create drama when backlit by candle glow.
Minimalist black-and-white labels say “Beware” or “Keep Out,” adding a mischievous edge. Grouped in odd numbers, the jars read theatrical on a coffee table or stoop.
Frosted glass spray or etched-look cream softens light for a hazier silhouette. As a gift, a pair of jars arrives nestled in shredded black paper within a simple box, ready to spark conversation at a party.
Steps
- Clean jars and dry thoroughly.
- Mix a small amount of red acrylic paint with a drop of gloss medium.
- Press hands into the mixture and stamp onto the glass, adding drips.
- Apply labels and insert LED candles or tea lights before displaying.
Haunted Terrarium In A Repurposed Jar

A small world under glass brings Halloween to a shelf with mossy greens and tiny figures. A layer of pebbles and preserved moss forms a miniature landscape.
Mini tombstones, a twig fence, and a paper bat tucked under the lid complete the scene. The palette leans foresty with touches of black and gray, and a hint of orange brightens the composition.
A row of these jars turns a windowsill into a tiny cemetery. Gift ideas include a jar, a pinch of moss, and a small envelope of minis for the recipient to arrange later.
Steps
- Add a base of pebbles to a clean jar and top with preserved moss.
- Cut tiny tombstones from gray cardstock and write names with a fine pen.
- Place tombstones and a twig fence into the moss bed.
- Suspend a small paper bat from the lid with thread, then close the jar.
Creepy Crawly Magnet Bugs For Fridges
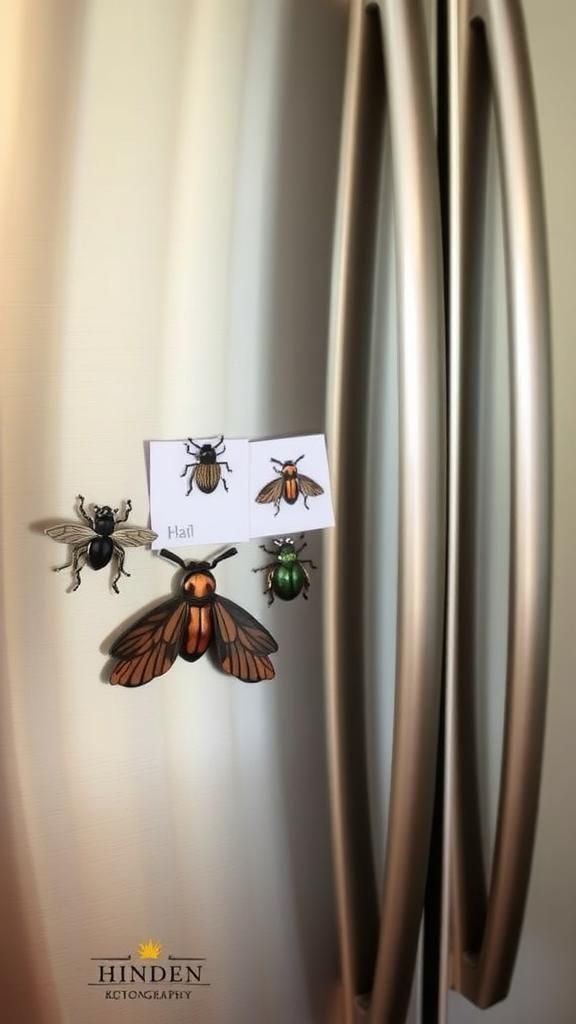
Plastic insects gain a glossy makeover and become quirky magnets for kitchen fridges and memo boards. Black, emerald, and copper finishes create a luxe look that still feels Halloween-ready.
A magnet disk on the underside turns the critters into useful note holders for party invites and candy coupons. Groupings of beetles, spiders, and centipedes creep across metal surfaces in playful patterns.
Packed in a small tin with a clear lid, they travel as a fun host gift, doubling as decor and organizers through the season.
Steps
- Clean the plastic bugs and let them dry.
- Spray paint bugs in black or metallic colors; allow to cure fully.
- Glue small round magnets to the undersides with strong adhesive.
- Arrange on the fridge to hold notes or create a creepy cluster.
Balloon Pumpkins With Leafy Paper Stems

Inflated orange balloons transform into cheerful pumpkins with hand-drawn grooves and leafy toppers. A quick flourish of green paper leaves and a twine curl brings garden charm.
Matte or pearl-finish balloons shift the mood from playful to polished. Clustered near a candy buffet, they act as space-fillers with big visual payoff.
Smaller versions float above a dessert table; larger ones sit in a corner basket like a harvest haul. For gifting, a trio bundled with ribbon becomes a festive doorstep surprise that says Halloween without any fuss.
Steps
- Inflate orange balloons and knot securely.
- Draw curved pumpkin grooves with a brown marker.
- Cut green paper leaves and tape near the knot to form a stem.
- Tie on twine curls and display in clusters or baskets.
Foil Relief Skulls On Cardboard Panels
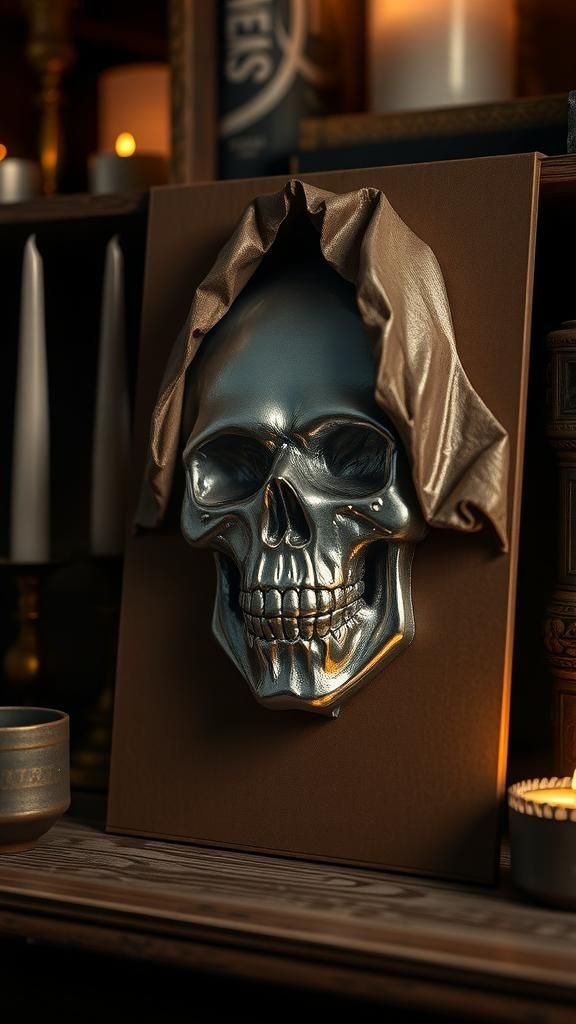
Shiny aluminum foil pressed over string outlines creates dramatic skull reliefs on cardboard. The metallic surface reflects candlelight and adds a gallery-like shine, while black marker shading defines hollows and teeth.
A triptych on a wall becomes a focal point above a console table, and a single panel leans nicely on a shelf. Gold or copper foil warms the palette; silver reads classic and cool.
Gift-ready panels slip into a flat mailer with a note about seasonal wall art, ready to brighten a friend’s space for the evening.
Steps
- Sketch a skull on cardboard and glue yarn along the lines for raised edges.
- Cover the front with aluminum foil, pressing to reveal the raised design.
- Color recessed areas with black marker for shadow and contrast.
- Mount with removable strips or lean the panel on a shelf.
Shadowy Door Wreath From Black Trash Bags
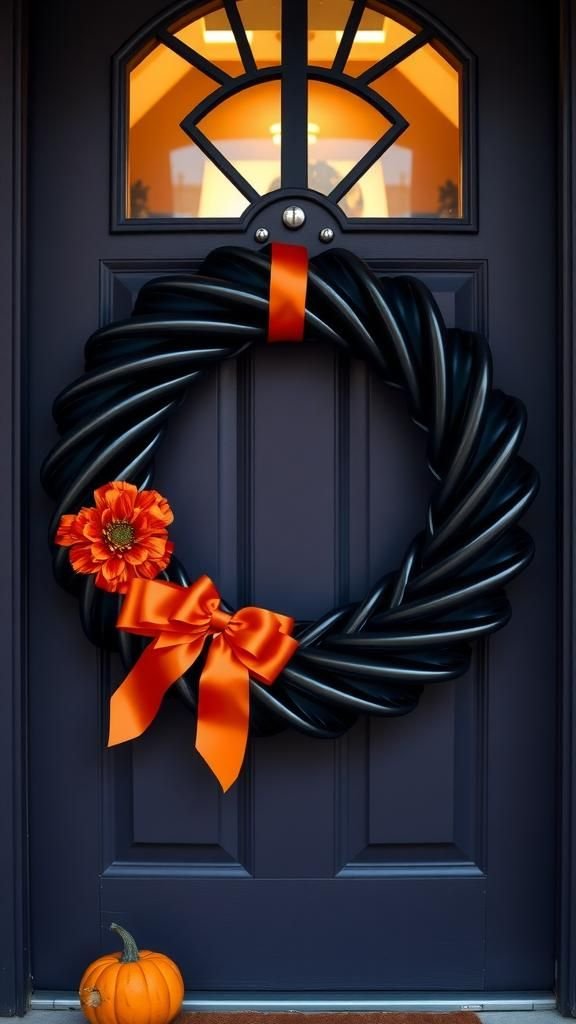
A wreath base gets a stormy, feathery halo from strips of black plastic with high-shine edges. The texture catches every flicker of light, giving movement to the entry.
A satin bow or orange ribbon anchors the palette, while a small bat charm or plastic spider hints at mischief. The wreath pairs well with a row of paper luminaries or a stack of white pumpkins for contrast.
As a quick neighborly gesture, it hangs well on apartment doors and stores flat for next year without fuss.
Steps
- Cut trash bags into long, thin strips.
- Tie strips around a wire wreath frame until the form looks full.
- Trim ends for a fluffy, even silhouette and add a ribbon bow.
- Hang on the door with an over-the-door hook or removable hanger.
Table of Contents