The holiday season feels different when a tree is dotted with ornaments made by hand. I still remember a chilly evening when a string of mismatched baubles, each a small, imperfect keepsake, transformed the living room into a cozy gallery of memories.
Those little objects carried the warmth of hands and stories, and that feeling is what draws me to handmade Christmas ornament ideas year after year.
Over the years I experimented with simple materials pulled from drawers and pockets, learning how textures, light, and tiny imperfections shape an ornament’s personality. Sharing these handmade Christmas ornament ideas feels like swapping notes over hot drinks and soft music.
Cinnamon stick star with warm, spicy aroma

I adore the way a cinnamon stick star fills a room without shouting. Its rough, slightly fibrous surface catches soft tree lights and releases a quiet, woody spice that blends with evergreen.
The brown tones have a raw homeliness that pairs well with burlap ribbons or faded red twine. When held, the pieces feel pleasantly brittle under gentle pressure, leaving a faint dust that smells like quiet kitchens and slow afternoons.
It sits on a branch like an old friend, lending a modest, fragrant charm.
Steps
- Break cinnamon sticks to even lengths and arrange them into a five or six point star on a flat surface.
- Secure the intersections with a small dab of hot adhesive and let the adhesive cool until firm.
- Loop a piece of twine or thin ribbon through an open point and knot it to form a hanger.
- Optionally add a tiny sprig of dried greenery or a small bead tied to the twine for a finishing accent.
Salt dough heart with fingerprint and patina

There is something quietly intimate about a salt dough heart that still bears a child’s fingerprint. The surface can be slightly grainy where flour met salt, and the browned edges give a weathered look when left to oven-bake and cool.
Soft chalky residue lingers under fingertips when it is handled, and the scent is muted and comforting, like afternoons spent shaping small things at the kitchen table. Hung with a faded ribbon it looks like a small heirloom, full of hands-on history and simple honesty.
Steps
- Mix equal parts salt and flour with a small amount of water to form a pliable dough on a floured surface.
- Roll dough to a quarter inch thickness, press out heart shapes, and press a fingerprint into the center.
- Make a small hole near the top for hanging, then bake on a lined tray at low temperature until dry and firm.
- Once cooled, lightly sand any rough edges and rub a wash of diluted acrylic or stain for an aged patina.
- Thread thin ribbon or twine through the hole to create a hanger.
Felted animal face with stitched details

A tiny felted animal face seems to listen to the room, with stitched eyes that catch light and a soft wool surface that begs to be touched. The felt gives a gentle, matte finish that contrasts with shiny tree lights, while the embroidered whiskers and tiny nose add character without fuss.
Holding one brings back afternoons over a sewing basket, the faint scent of wool, and the quiet rhythm of a needle. Clustered in threes, these faces can make a strand of tree branches feel like a small, cozy menagerie.
Steps
- Cut two matching shapes from felt for the front and back of the animal face and layer small wool or stuffing between them.
- Stitch the edges together with small running stitches, leaving a short opening for stuffing before finishing the seam.
- Embroider eyes, nose, and whiskers using contrasting thread and simple backstitch or French knots for texture.
- Add a small loop of thread or ribbon at the top before closing the final seam to create a hanger.
Pressed orange slice ornament with translucent glow

A pressed orange slice glows like a tiny sun when backlit by tree lights. Its translucent segments reveal delicate membranes and jewel-like pockets where light pools, and the citrus scent is faint but lively when held close.
The dried rind keeps a slightly rough, leathery texture while the inner flesh becomes glassy and amber with time. Hung as a single accent or strung with cranberries, it carries a fresh, rustic note and a sunny contrast to deep evergreen branches, making the tree feel warm and citrus-bright.
Steps
- Slice oranges thinly and place the slices on parchment in a single layer to dry in a low oven or dehydrator until translucent and firm.
- Optionally press dried slices between parchment under a heavy book for flatness once cool.
- Thread a fine needle with thin twine or fishing line and pierce near the top of the slice to form a hanger loop.
- Combine with dried cranberries or small beads on the loop for a complementary visual rhythm.
Hand-painted wooden slice with snowy scene

A thin wooden slice becomes a tiny canvas where paint transforms grain into a winter scene. The bark edge keeps a raw, tactile border while layers of color mingle with wood grain beneath, offering a gentle depth.
The smell is faintly woody and clean, and the painted snow seems to catch light differently depending on viewing angle. When hung near a warm lamp it reads like a miniature landscape painting, small enough to hold yet rich enough to spark a quiet, wintry memory.
Steps
- Sand the wood slice surface smooth and wipe away dust with a soft cloth to prepare a receptive surface for paint.
- Sketch a simple snowy motif with pencil, then apply thin layers of acrylic paint for background, midground, and highlights.
- Add fine details with a small brush such as tree silhouettes or tiny stars, allowing layers to dry between applications.
- Seal the painted surface with a clear matte varnish and affix a loop of ribbon to the top for hanging.
Glass ball filled with glitter and tiny surprises

A clear glass ball holds a little world where sparkle floats like distant stars. Each swirl of glitter shifts with the slightest motion, catching branch lights and throwing tiny reflections across nearby ornaments.
The glass surface is cool to the touch and the interior contents rattle softly when nudged, offering a playful, tinkling sound. Adding a sliver of ribbon or a miniature keepsake inside gives the ornament a personal twist, making it feel like a tiny, shimmering capsule of memory suspended among fir needles.
Steps
- Remove the glass ball topper and carefully pour in a small amount of fine glitter and any miniature decorative elements desired.
- Insert a thin strip of metallic foil or a tiny tag for contrast, then replace the stopper securely.
- Wipe the exterior clean and thread a decorative ribbon through the topper loop to create a hanger.
- Gently shake the ornament to ensure the glitter disperses evenly and settles attractively when hung.
Tiny embroidered hoop with miniature holiday motif
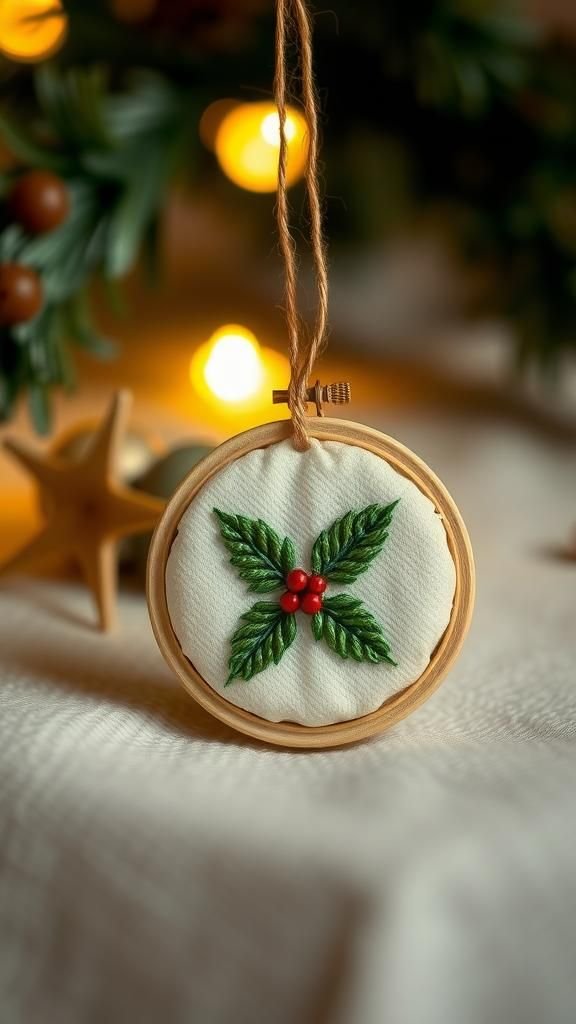
A tiny embroidery hoop frames a miniature scene that feels like a stitched secret. The cloth carries the faint drag of needlework and threads sit like thin rivers across the surface.
Close inspection reveals tiny knots and uneven stitches that add warmth rather than flaw. The whole piece has a quiet, homey rhythm, smelling faintly of fabric and thread, and it nestles into a tree branch as if it were waiting there all along.
Seeing it invites a slow appreciation that feels wonderfully unhurried.
Steps
- Cut a small circle of fabric slightly larger than the embroidery hoop and tighten it in the hoop for a smooth working surface.
- Transfer a simple holiday motif onto the fabric with a washable marker and select contrasting embroidery threads.
- Stitch the design using basic techniques such as backstitch, satin stitch, or French knots for texture.
- Trim excess fabric from the back, tuck it neatly, and secure a loop of ribbon to the hoop for hanging.
Pressed flower globe with pastel petals inside
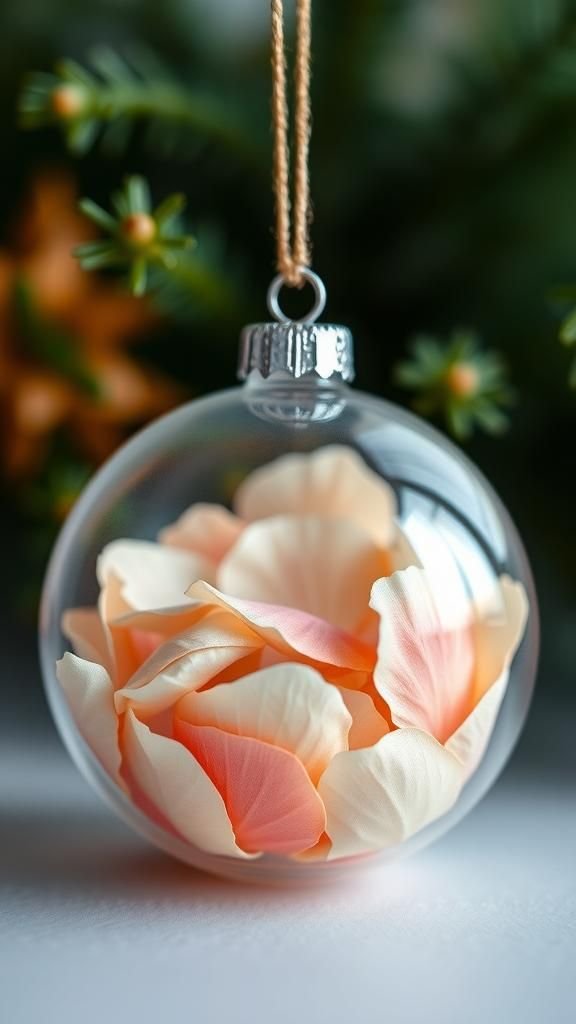
A clear globe filled with pressed petals becomes a fragile, botanical jewel. The petals rest like confetti suspended in glass, their faded hues ranging from pale peach to dusty rose, and each vein remains visible under close gaze.
The air around the ornament feels light and floral, while the globe itself cools fingers like a pocket of winter. Placed near a window, the petals seem almost illuminated, casting faint colored shadows onto nearby branches and reminding one of long summer gardens tucked into winter branches.
Steps
- Carefully arrange pressed and fully dried petals inside a clear round glass or acrylic globe using tweezers for delicate placement.
- Add a tiny amount of clear resin or a sealing medium to stabilize the arrangement if desired, avoiding air bubbles.
- Allow any added medium to cure fully according to product instructions before handling.
- Attach a small ribbon or metallic loop to the globe top to hang on the tree.
Twig miniature wreath with tiny berry accents

A miniature wreath made of twigs feels like a woodland crown for a single branch. The twig texture is crisp and slightly rough, and small berry accents add pops of glossy red that contrast with the matte brown.
The smell carries a faint earthiness, like a walk through leaf litter, and the imperfect circle suggests a quick hand and a thoughtful eye. It settles naturally among needles, its modest scale drawing attention without demanding it, offering a gentle nod to outdoorsy, understated charm.
Steps
- Gather small flexible twigs and bend them into a circular shape, overlapping ends to form a tight ring.
- Secure the overlapping areas with thin floral wire, winding it neatly around the joint until firm.
- Glue or wire tiny artificial berries or dried berry clusters sporadically around the wreath for color contrast.
- Loop a small piece of twine or ribbon through the top to make a hanger and trim excess wire or twig ends.
Quilled paper snowflake—filigree paper lace
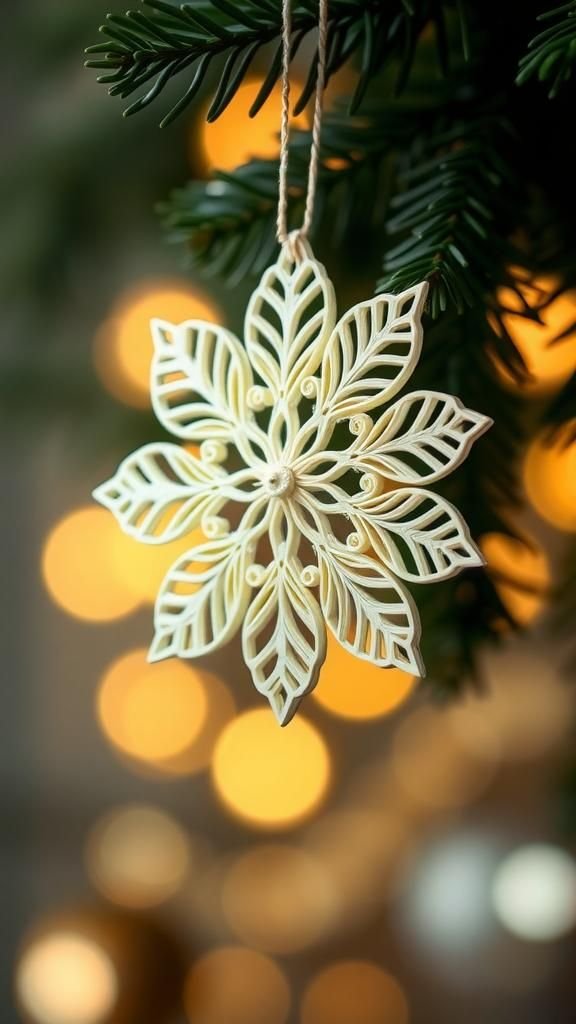
Paper quilling creates a delicate snowflake that feels almost lace-like, each rolled coil catching a shadow that adds subtle depth. The paper edges have a faint tooth and the thin strips curl into tight, neat shapes that glitter slightly when lights hit their edges.
Handling it demands a light touch; it rustles softly with any movement. Hung against dark greenery, the pale paper reads like frost, fragile and intricate.
There is a quiet satisfaction in watching the tiny coils combine into a symmetric, airy decoration.
Steps
- Cut or prepare narrow strips of paper and form coils and teardrop shapes using a quilling tool or a fine skewer.
- Arrange the paper shapes into a snowflake pattern on a flat surface and join contact points with small amounts of adhesive.
- Allow adhesive to dry thoroughly, ensuring stable joins between coils.
- Attach a lightweight thread loop to one point of the snowflake for hanging.
Pinecone dipped in metallic sheen for sparkle
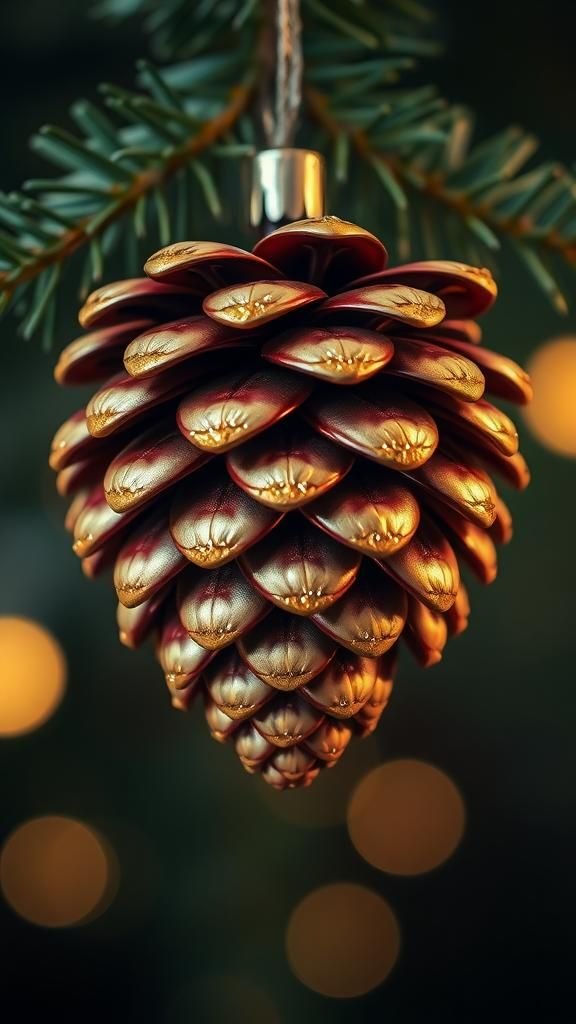
A pinecone with metallic highlights reads like a forest treasure that caught sunlight. The scales have a dry, papery texture and when brushed with metallic tones they pick up light in a way that feels both rustic and refined.
The scent of resin is faint and organic, while the metallic sheen gives an unexpected glamour that plays against the natural form. It jingles gently if nudged and sits nicely among branches, a little piece of woodland that has been dressed for a festive evening.
Steps
- Clean collected pinecones of debris and bake briefly to remove insects and sap if necessary, then cool completely.
- Apply metallic paint or gilding medium to the tips of the scales with a small brush or by lightly tapping with a sponge.
- Allow the finish to dry thoroughly and optionally add a clear protective sealer to preserve the sheen.
- Fasten a loop of twine or decorative ribbon to the top scale for hanging.
Photo transfer bauble with family snapshot inside

A photo transferred onto a bauble turns a glass sphere into a small portrait of a moment. The image wears a slight wash where the surface met liquid transfer medium, giving it an intimate, almost sepia softness.
The bauble’s smoothness contrasts with the image’s subtle irregularities, offering tactile calm when cradled. Hanging among other ornaments it becomes a quiet anchor, catching glimpses of faces when lights shimmer.
There is a hush to that effect, as though a private memory is being gently broadcast to anyone who looks close enough.
Steps
- Select a small printed photo and prepare the bauble surface by cleaning it to remove oils and dust.
- Apply a photo transfer medium to the printed side and press the image onto the bauble, smoothing to remove air pockets.
- Allow the transfer to dry fully, then softly rub away paper backing with a damp cloth to reveal the transferred image.
- Seal the transferred area with a clear varnish and attach a ribbon through the bauble topper for hanging.
Mini macramé hanger with tassel and texture
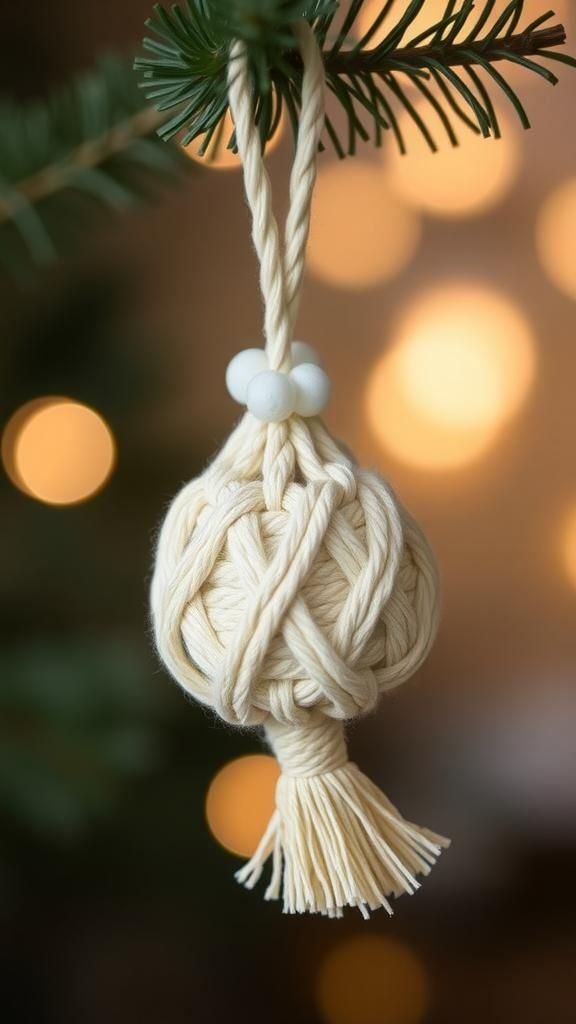
A tiny macramé ornament brings knotty texture and gentle movement to a tree. The cotton cords feel soft and slightly springy under fingertips, and the knotted patterns create shadowed channels that catch light subtly.
The tassel at the bottom sways when the branch moves, producing a quiet fabric whisper. Its neutral palette meshes with many color schemes, offering a handmade, textile note that feels both modern and handmade.
Placed near glass ornaments the contrast between soft fiber and hard surface is pleasingly tactile.
Steps
- Cut several lengths of cotton cord and fold them in half to create a working set for simple macramé knots.
- Attach the folded cords to a small metal or wooden ring and form a decorative series of square knots or half knots to build the body.
- Shape a neat tassel at the bottom by binding the cords and trimming the ends evenly.
- Add a loop at the top of the ring for hanging and gently comb the tassel ends for a soft finish.
Button bauble with layered colors and shine
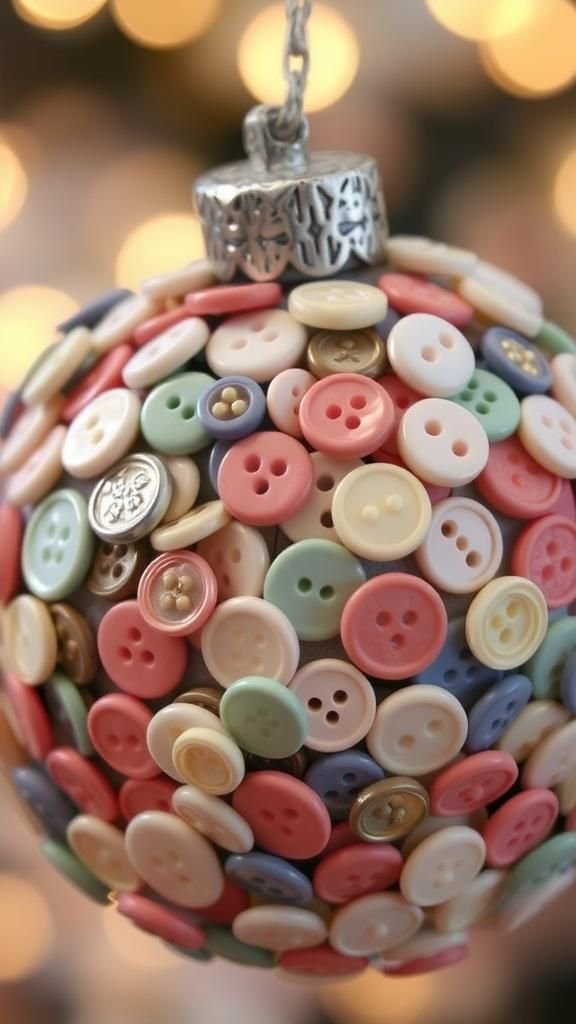
A bauble covered in buttons reads like a patchwork story, each rounded edge and glossy hole catching pinpricks of light. The plastic and mother-of-pearl finishes create a little mosaic, and the tactile variation between smooth, ridged, and slightly textured buttons is pleasing under fingertips.
When hung it carries a light clinking when shifted, a playful tiny sound that hints at craftroom afternoons. The overall effect is cheerful and a touch nostalgic, as though the ornament is a collage of forgotten shirt pockets and childhood sewing finds.
Steps
- Start with a plain foam or plastic ball and arrange buttons in an overlapping pattern to gauge coverage.
- Adhere buttons to the surface using a strong craft adhesive, pressing each button in place until secure.
- Fill small gaps with beads or tiny buttons for a finished look and allow adhesive to cure completely.
- Create a hanger by inserting a small eye pin into the top and threading ribbon or twine through it.
Miniature origami crane as a hopeful accent

A tiny origami crane perched on a tree branch feels like a miniature message, its folded wings crisp and paper edges neat. The paper surface carries subtle fibers and prints that peek out in small patterns, and when it moves the wings flutter with a fluttery whisper.
Its small size invites close inspection, and the labor of folding is readable in each precise corner. Nestled among needles, it reads like a delicate note from a distant afternoon of careful hands and quiet concentration.
Steps
- Select square sheets of thin decorative paper sized for small ornaments and fold each into a classic crane using precise creases.
- Gently shape the wings and tail for a balanced silhouette and refine creases for a neat finish.
- Thread a fine metallic or cotton cord under the crane body or tie a knot around the neck to create a hanger.
- Suspend from a branch where light can highlight the paper pattern and fold lines.
Miniature cookie cutter ornament with rustic charm

A small cookie cutter hung as an ornament brings a kitchen memory to the tree. The metal edge has a cool, slightly reflective surface while the inner cavity shows fingerprints from handling.
A thin ribbon threaded through the top adds a soft contrast and the overall silhouette is cheerful and familiar. When grouped with spices and wooden pieces it creates a homely vignette that smells like baked goods even if none are present.
The shape hints at cozy gatherings without announcing itself loudly.
Steps
- Select a small, clean cookie cutter in a festive shape and polish the metal if needed for an attractive finish.
- Thread ribbon or rustic twine through the cutter opening and tie a secure knot to form a hanger.
- Optionally embellish the cutter by tying a small sprig of dried herb or a tiny bell to the ribbon.
- Hang the cutter ornament in a visible spot where its silhouette complements other decorations.
Stitched felt mitten with flannel lining peek
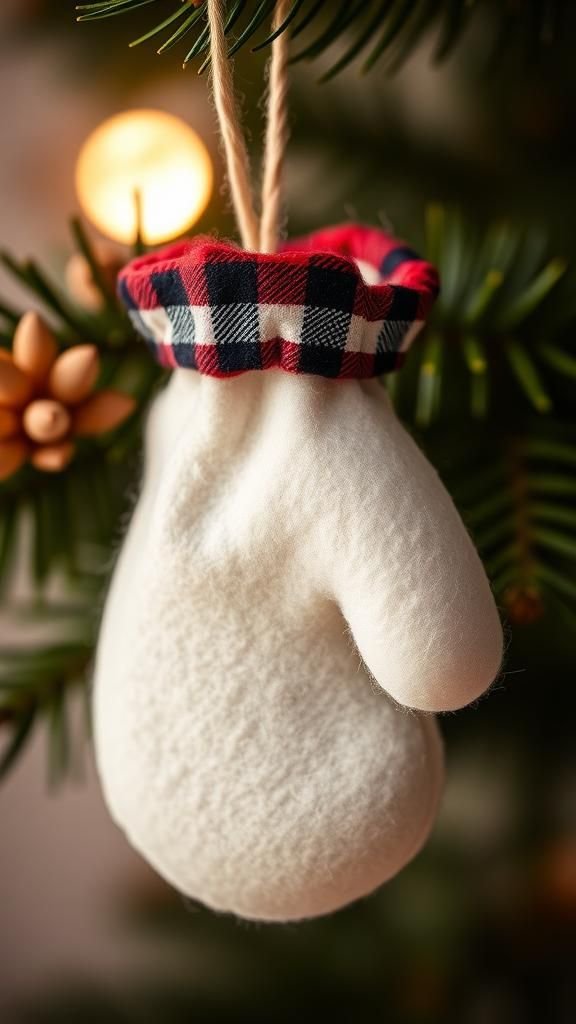
A tiny felt mitten with a peek of flannel lining evokes the feel of cold cheeks warmed by wool. The felt surface is soft and slightly fuzzy, while the flannel inside shows a cozy plaid hint that suggests warmth even when the ornament is stationary.
Hand stitching is visible along the cuff, and small embroidered details bring personality without fuss. It feels like a miniature tribute to bundled winter days, and when clustered with other textile pieces the tree gains a tactile, wearable quality that invites a gentle touch.
Steps
- Cut mitten shapes from felt and a smaller lining piece from flannel, positioning the lining inside the felt for a layered cuff look.
- Sew the edges together with small whipstitches or blanket stitches, leaving a small opening for stuffing.
- Add a tiny fill of soft polyester fiber and close the opening with neat stitching.
- Embroider small details on the cuff and attach a loop of decorative thread at the top for hanging.
Mosaic tile shard ornament with glass fragments

A mosaic ornament made from tile shards gathers tiny pieces of color into a small collage. The broken edges glint with glazes and glass, and grout lines add matte contrast that balances shine.
The surface feels slightly uneven under fingertips, and the light plays across tesserae to create micro-patterns that change as the tree moves. It carries an artisanal energy, as if a tiny artist assembled a rescued palette into a pendant of color.
When clustered with plain baubles it offers a concentrated visual feast.
Steps
- Arrange small ceramic or glass tile shards on a prepared base to compose an attractive mosaic pattern.
- Secure the shards with a strong adhesive, leaving small gaps for grout to settle between pieces.
- Mix and apply grout over the mosaic, pressing it into gaps and wiping excess away from shard surfaces.
- After grout cures, clean the surface gently and attach a hanger loop to the base for display.
Miniature terrarium bauble with tiny evergreen sprig

A small terrarium-style bauble captures a slice of forest inside a glass globe. A tiny evergreen sprig and a pinch of moss create a cool, green microlandscape whose damp scent is subtle and lively.
The glass dome magnifies the textures inside, making the twigs and moss appear larger than life. Light refracts through the curve and throws soft highlights onto surrounding branches.
It feels like a preserved bit of outdoors tucked into the warmth of the living room, lending a quiet green presence to the holiday display.
Steps
- Clean and dry a small clear glass globe and add a base layer of fine dried moss or substrate.
- Insert a tiny preserved evergreen sprig or artificial equivalent and arrange it so it sits upright within the globe.
- Seal the globe if needed and attach a small hanger at the top with a ribbon or metallic loop.
- Store in a cool spot when not on the tree to preserve natural materials.
Tiny knitted cap with pom-pom and ribbed cuff
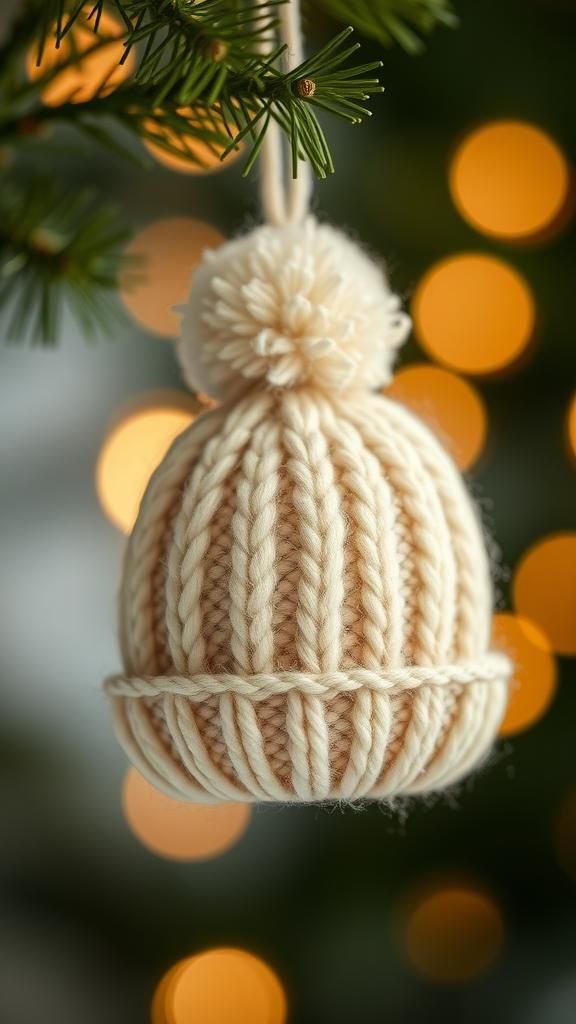
A knitted cap ornament sits like a small winter hat with a plump pom-pom on top. The yarn feels woolly and snug under fingertips, and ribbed stitching gives a pleasant raised texture that invites gentle rubbing.
The pom-pom bobs when the branch moves, producing a soft fabric sound. Its small scale makes the stitches readable, and the palette can range from muted tones to bright candy colors, each choice shifting the mood.
Together with mittens and scarves, it makes the tree feel dressed for cold-weather stories.
Steps
- Knit a small tube using double-pointed needles or a circular needle in a simple rib pattern to form the body of the cap.
- Decrease stitches at the top to close the crown and secure yarn with a tidy knot.
- Create and attach a small pom-pom to the crown and weave in loose ends for a neat finish.
- Attach a thin loop of yarn to the inside seam for hanging on a branch.
Small tin embossed tag with vintage shine

An embossed tin tag offers a soft metallic whisper that feels like a relic from a pocketwatch. The raised pattern catches light across tiny ridges, and the cool metal surface contrasts with warmer materials nearby.
Slightly tarnished edges add a lived-in gleam, and the faint sound it makes when nudged is bright and delicate. Hung among softer ornaments, it brings a touch of industrial charm and a hint of nostalgia, as though it carries a brief, wearable history within its thin profile.
Steps
- Select thin tin or aluminum tags and create embossed designs with metal punches or an embossing tool on a soft surface.
- Age the metal slightly by applying a patina or light rubbing with a darkening solution, then wipe to highlight raised areas.
- Drill or punch a small hole for hanging and thread a metallic loop or ribbon through it.
- Polish raised surfaces gently for contrast while leaving recesses darker for depth.
Table of Contents