I grew up messing around with egg dyes at kitchen sinks and backyard tables, and the tactile joy of bright colors and quirky patterns has stuck with me. Easter Egg Decorating Techniques still feel like a small, magical getaway where everyday items become playful art, and each method brings its own kind of happy mess.
When friends ask about fresh ideas I tend to describe a handful of favorite approaches that range from wax-resist patterns to marbled swirls.
Trying a few different Easter Egg Decorating Techniques always leads to unexpected textures and little stories worth keeping.
Classic dye bath colors with vintage charm
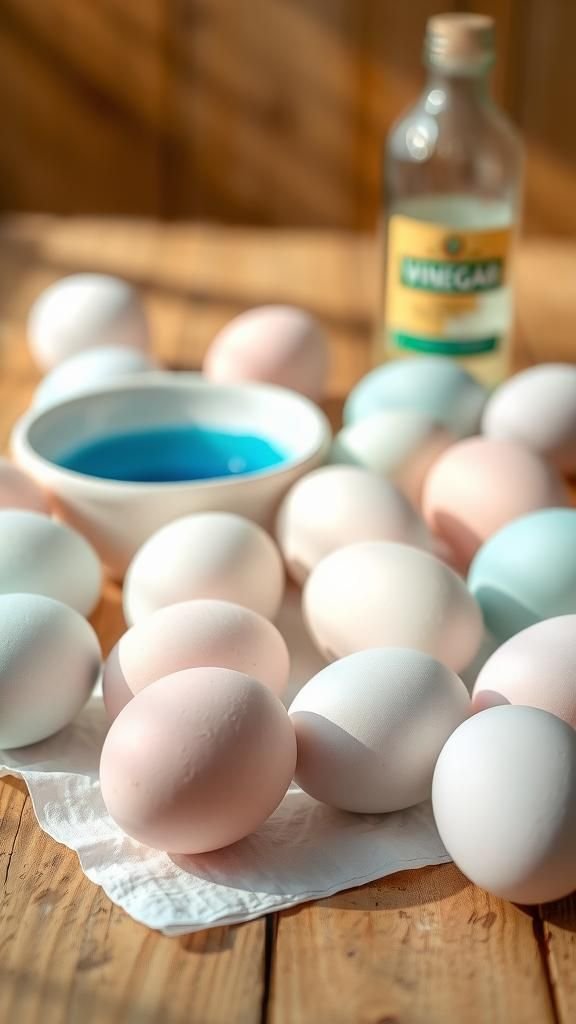
There is a quiet comfort in watching eggs soak in a dye bath while sunlight warms the countertop. The scent of vinegar and cold porcelain bowls blends with faint echoes of childhood kitchens.
Each egg shows a slightly different shade where the shell took the color unevenly, creating a collection that feels handmade and gentle. I often line them in a shallow basket so colors can reflect against one another, and I enjoy the small surprises when speckles or lighter patches appear without planning.
Steps
- Prepare a shallow bowl with warm water and a splash of vinegar, then stir in powdered or liquid dye until the color looks even.
- Gently lower room temperature eggs into the dye and let them sit until the desired depth of color is reached.
- Remove eggs with a slotted spoon and place on a paper towel-lined tray to dry, allowing naturally occurring variations to form.
- For tone adjustment, reintroduce eggs briefly to the dye to deepen hues or introduce a second color with a quick dip.
- Finish by letting eggs air-dry fully before arranging in a basket or display.
Natural dyeing using onion skins and beet juice

There is something grounding about coaxing color from kitchen scraps and garden finds. Piles of coppery onion skins and vivid beet juice whisper of an older way of coloring eggs, where the palette sneaks up slowly and earth-smells mingle with steam.
The tones are often warm and muted, with olive-browns, golds, and dusty pinks that feel like heirlooms. I remember how the air turned faintly sweet during a boil and how each shell absorbed pigment in its own quiet rhythm.
Steps
- Simmer onion skins, beet slices, or other plant materials with water until the liquid takes on a rich hue, then strain.
- Add a splash of vinegar to the strained liquid and return to a gentle simmer.
- Submerge room temperature eggs and allow them to sit in the warm dye until the color deepens to preference.
- Lift eggs out and let them cool on a rack, revealing subtle, organic variations in tone.
- Store in a cool spot or display once fully dry.
Pysanky inspired wax-resist detailed motifs
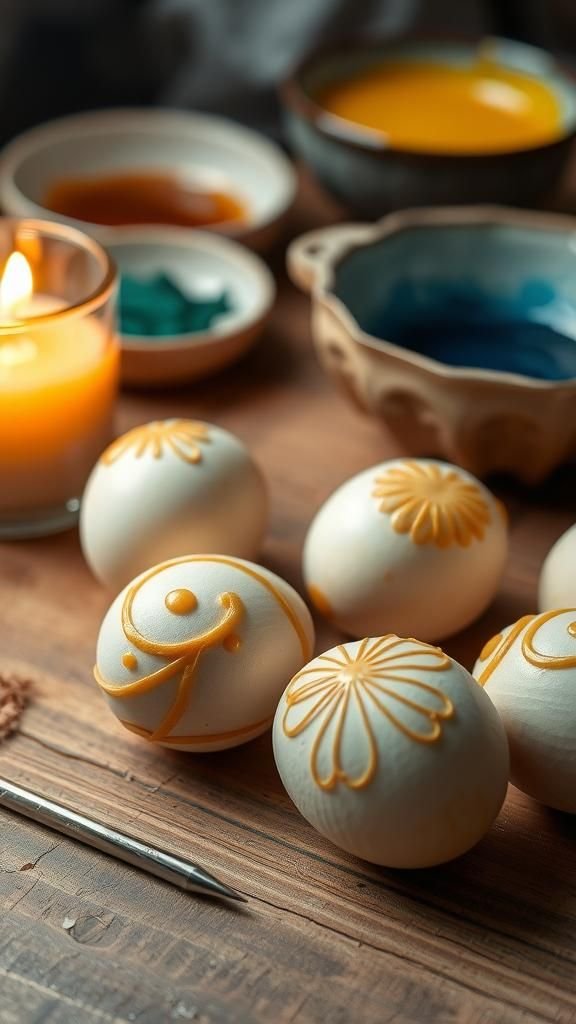
The wax-resist approach carries a patient, meditative rhythm that can feel oddly soothing. A thin line of beeswax against a smooth shell creates tiny barriers where dye cannot go, and layers of color build into intricate geometric motifs or flowing floral vines.
The smell of warmed wax pairs with the faint metallic tang of dye, and the finished pieces reveal crisp lines that glow when held to light. Sitting at a quiet table, the concentration required becomes part of the pleasure.
Steps
- Heat beeswax gently and transfer to a stylus or fine-point tool designed for wax-resist work.
- Apply wax to clean eggs to create thin lines and shapes that will remain the base color.
- Dip eggs into progressively darker dyes, applying new wax designs between immersions to preserve lighter areas.
- Once the layered design feels complete, warm the egg slightly to melt the wax and wipe away residue to reveal the pattern.
- Allow the egg to cool and set before handling the finished motif.
Crayon-resist doodles and scribbly charm
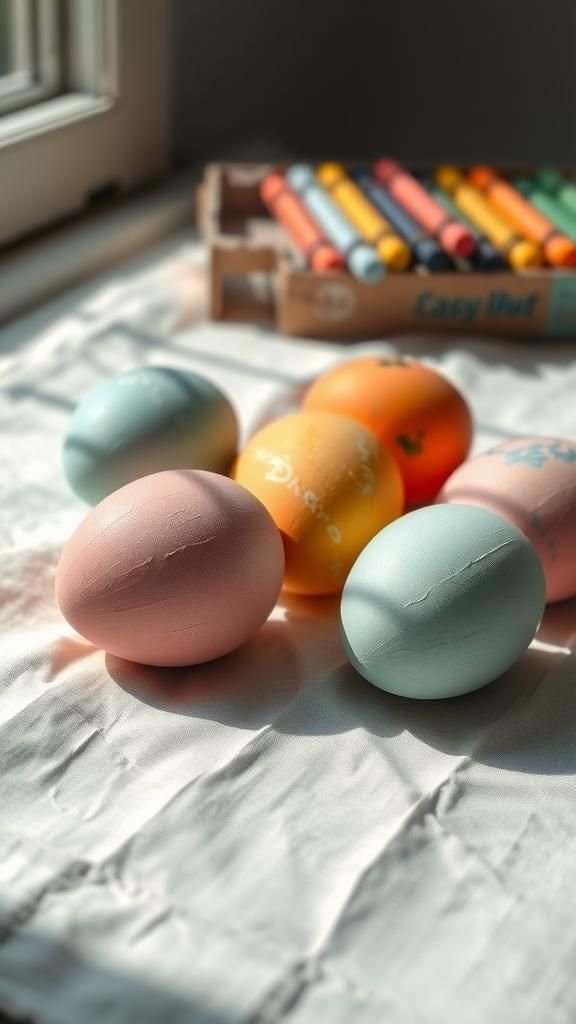
There is a playful honesty to crayon-resist eggs that always makes me smile. Bold wax lines and spontaneous doodles peek through translucent dye like tiny secret maps.
The wax creates raised textures that can be felt as well as seen, and the contrast between glossy shell and matte wax feels satisfying to the fingertips. A childlike mark or looping script brings a personal, joyful quality, and the overall effect reads like a collection of quick, affectionate notes passed around a table.
Steps
- Draw freeform designs on clean eggs with wax crayons, pressing firmly so the wax adheres to the shell.
- Prepare a dye bath and immerse the eggs until the color takes hold while the wax preserves the drawn areas.
- Remove eggs and gently dry them on a soft towel to avoid smudging the wax.
- For multi-tonal effects, layer lighter dyes first and add darker shades afterward, keeping wax lines intact between immersions.
- Display once fully dry to showcase the contrast between wax lines and dyed shell.
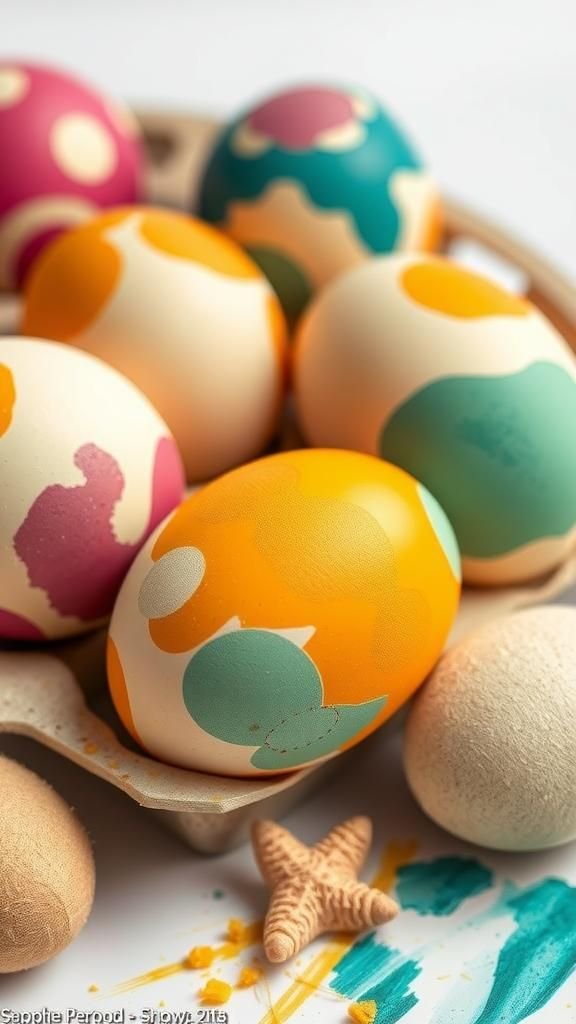
Shaving cream marbling for soft swirls
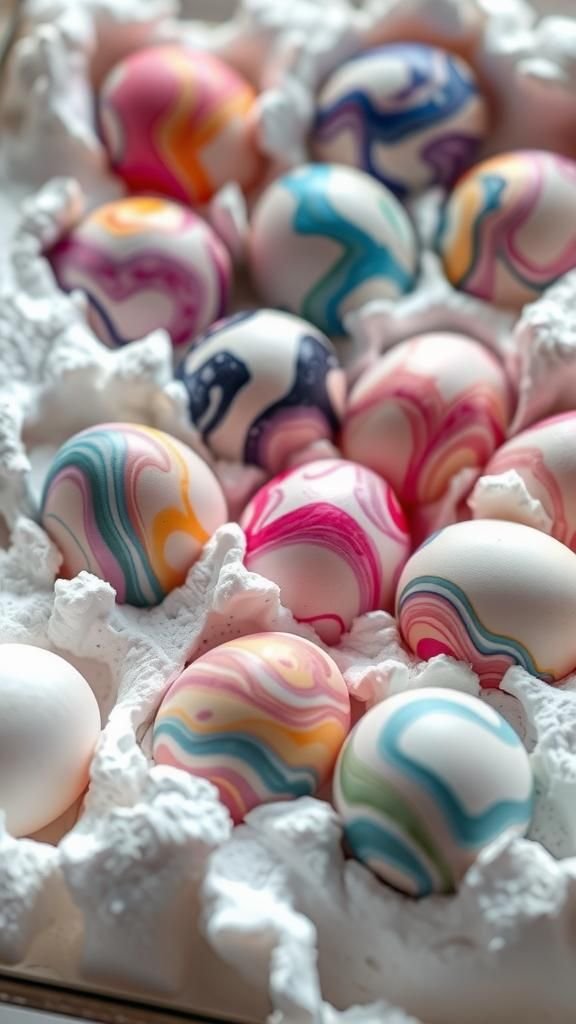
Shaving cream marbling always surprises with its cloudy, painterly swirls that feel like tiny nebulae. The texture of foam holds dye in playful patterns that slide across the shell, creating soft gradients and feathered edges.
The process smells faintly of soap and leaves behind glossy, jewel-like eggs that invite close inspection. I remember laughing at how each swirl refused to be perfectly controlled, and how the final rinsed reveal felt like opening a small, mysterious package.
Steps
- Spread a layer of shaving cream in a shallow tray and drip several dye colors across the surface to form pools.
- Use a stick to swirl the colors gently, creating a marbled pattern without overmixing.
- Roll or press eggs into the foam so the dye adheres in marbled patterns, then let them sit briefly.
- Wipe away foam to reveal marbled colors and rinse lightly if needed to remove residue.
- Place eggs on a drying rack to set the finish and allow patterns to settle.
Oil-and-water marble with glossy veining
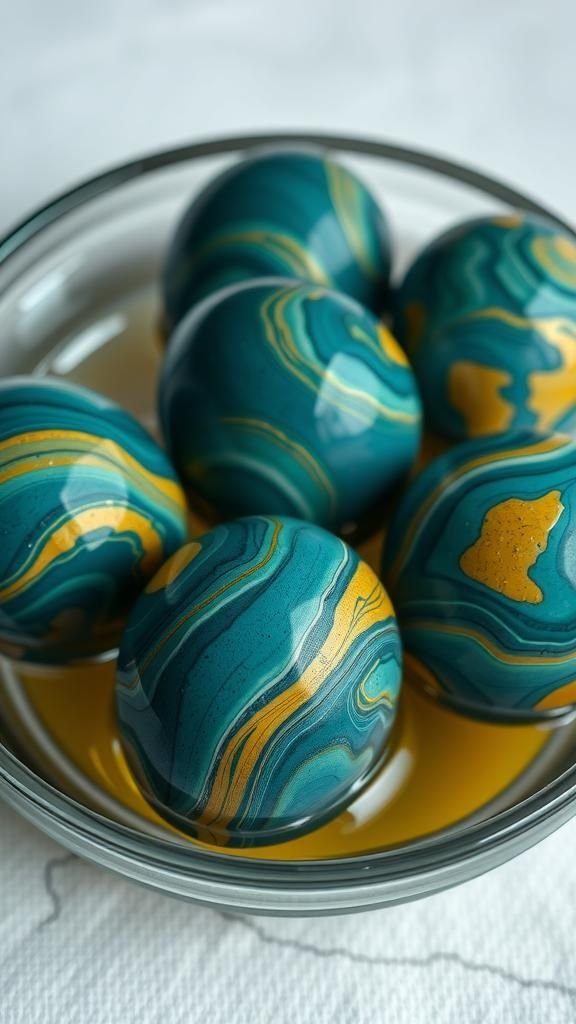
The slick, almost lacquered veins created by oil on water bring an elegant unpredictability to egg surfaces. Tiny beads of oil carry pigment into arcs and loops that sit on top of the shell with a glassy sheen.
The contrast between smooth, reflective veins and matte base colors makes each egg feel sculptural. I enjoy the quiet patience needed as droplets form and spread, and the moment when a lifted egg shows an intricate web that no two hands could make exactly the same.
Steps
- Fill a wide container with room temperature water and drizzle in a small amount of oil to form floating droplets.
- Add drops of oil-based pigments or mixed oil-dye suspensions onto the water surface until a pleasing pattern forms.
- Gently lower an egg onto the patterned surface so the pigment adheres and lift it straight up to capture the marbling.
- Blot excess oil carefully and allow the egg to dry until the glossy veins set.
- Reapply in areas or layer additional patterns as desired for greater complexity.
Dip-dye ombré fades and layered edges
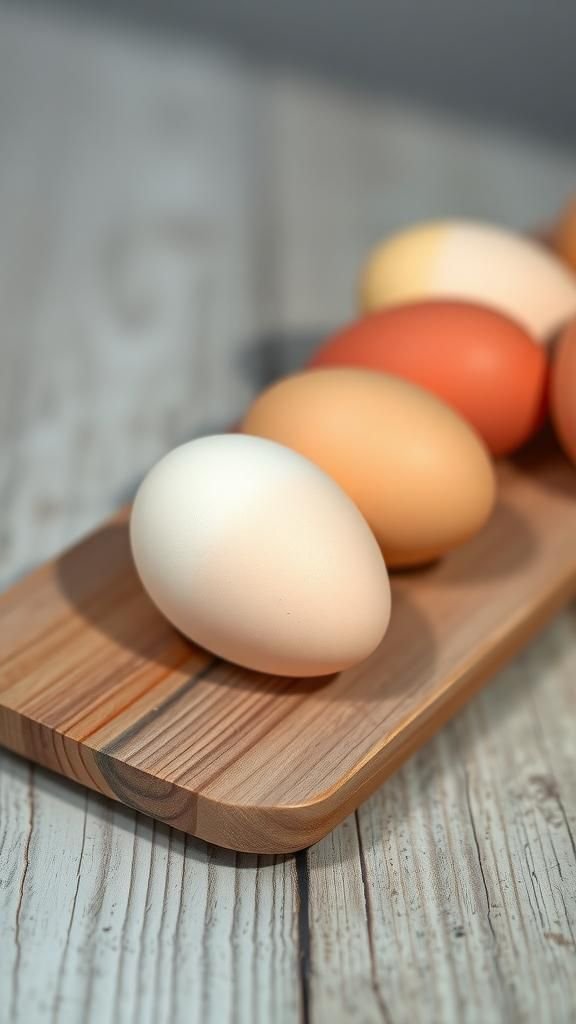
Watching color climb up a shell in a slow, graceful gradient is oddly soothing. The dip-dye approach produces soft ombré fades where the deepest hue pools at the base and a lighter wash creeps upward.
Layers can overlap so edges blend into one another, creating gentle horizons of color. I like arranging finished eggs in a line to admire subtle transitions, and I sometimes pause to trace the faint lines where two shades met, enjoying the visual rhythm.
Steps
- Prepare multiple dye baths in graduated intensities from light to dark.
- Hold each egg and dip it partially into the lightest dye, then remove and allow a subtle line to form.
- Dip the egg deeper into a slightly darker dye to create a gradual fade toward the base.
- Repeat dipping until a pleasing ombré effect emerges, drying between dips to control blending.
- Air-dry the eggs fully before arranging to preserve the layered transitions.
Speckled robin egg effect with rustic charm
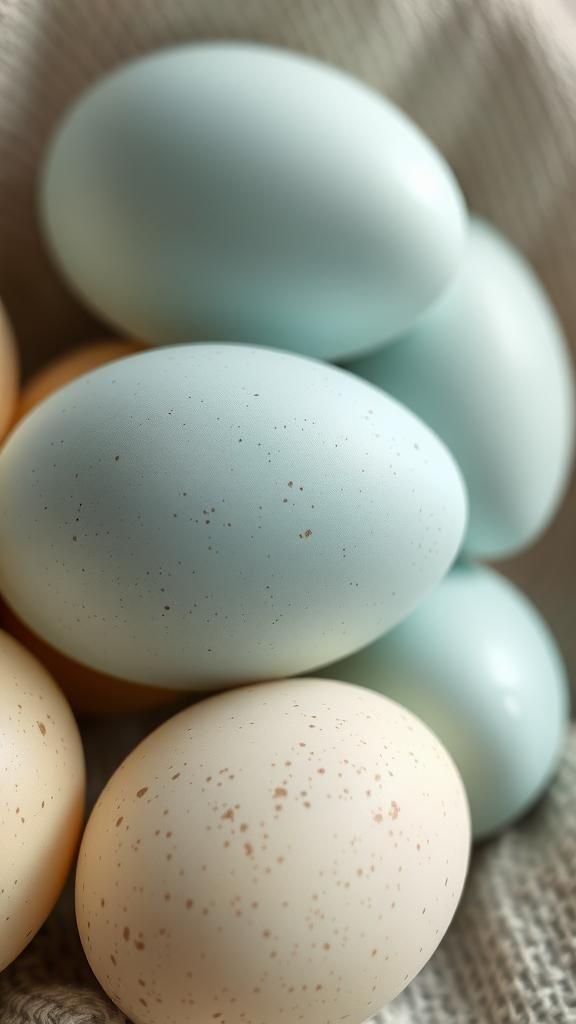
Speckling brings a delightful wildness that feels like a miniature bird’s nest found on a walk. Tiny flecks and dots scatter across glossy shells in a way that reads as accidental and organic, and the surface invites close inspection.
I often notice how the contrast between smooth background color and rough speckles creates depth, as if the egg has been kissed by a tiny rain of pigment. The result pairs especially well with softer base hues that let speckles pop without shouting.
Steps
- Thin dye slightly to create a fluid that will break into tiny droplets when flicked.
- Dip a stiff-bristled brush into the liquid and tap it gently to flick small droplets onto the egg surface.
- Rotate the egg to achieve even coverage, adding concentrated spots for denser clusters if desired.
- Allow speckles to dry naturally, avoiding smudging while the droplets set on the shell.
- Optionally seal with a lightweight varnish for added sheen once fully dry.
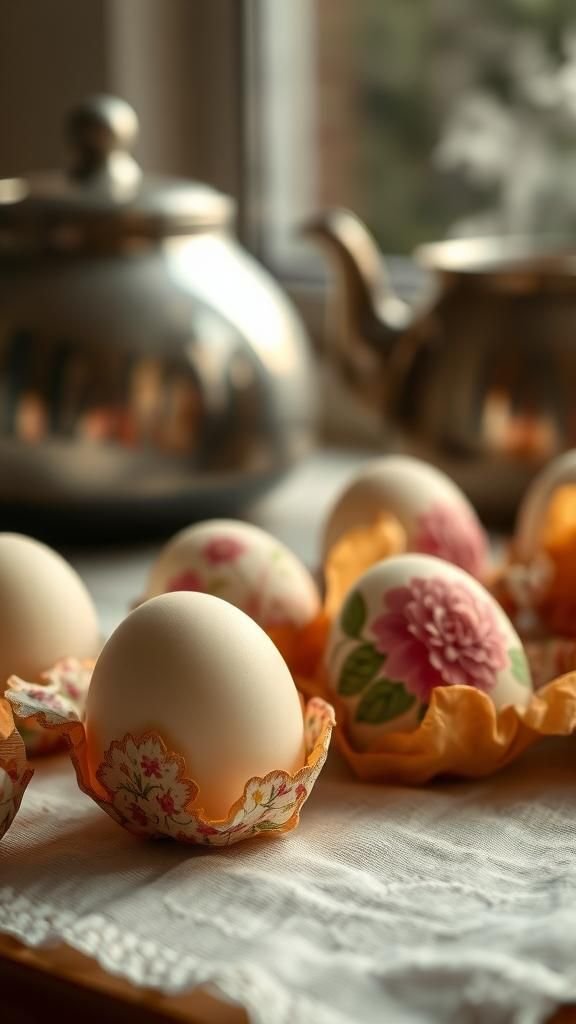
Decoupage layering with delicate napkin patterns
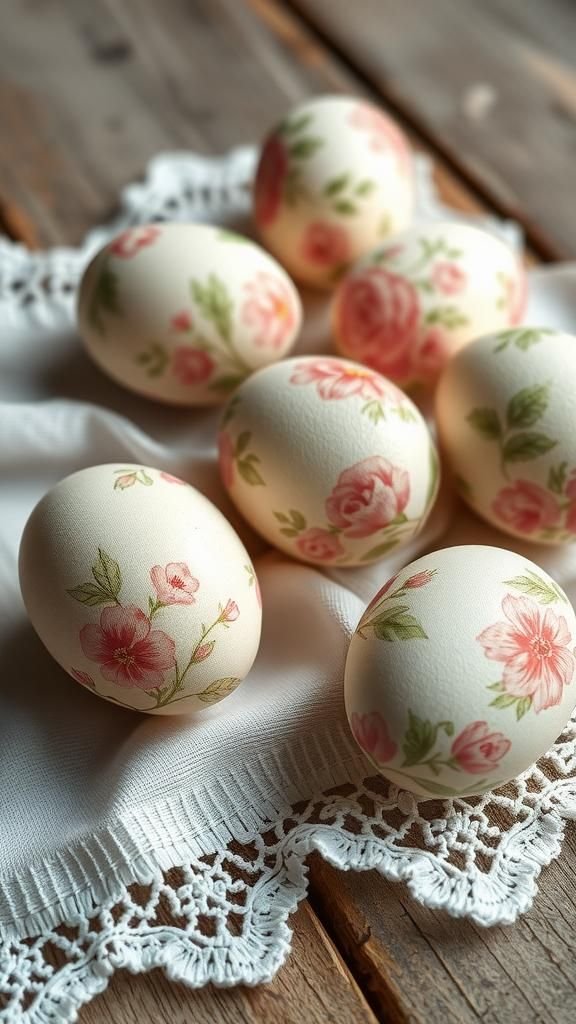
Decoupage feels like dressing an egg in miniature paper textiles, where thin napkin motifs cling softly to curve and seam. Floral prints, lace patterns, and vintage illustrations gain a second life wrapped around a shell, with translucent paper allowing the base color to glow beneath.
I like how edges feather into the surface, creating a slightly worn, antique feel that tells a story. The tactile quality of layered paper invites handling, and each collage becomes an intimate little scene.
Steps
- Select delicate paper designs and separate thin printed layers from backing to prepare for application.
- Lightly coat the egg surface and paper with an appropriate adhesive medium, smoothing the paper as it conforms to curves.
- Press and blend edges gently to avoid air pockets, adjusting placement until the motif sits naturally.
- Apply a protective top layer over the entire surface to secure the paper and unify the finish.
- Allow the piece to cure fully before displaying or handling frequently.
Botanical imprinting for leaf silhouettes and tones
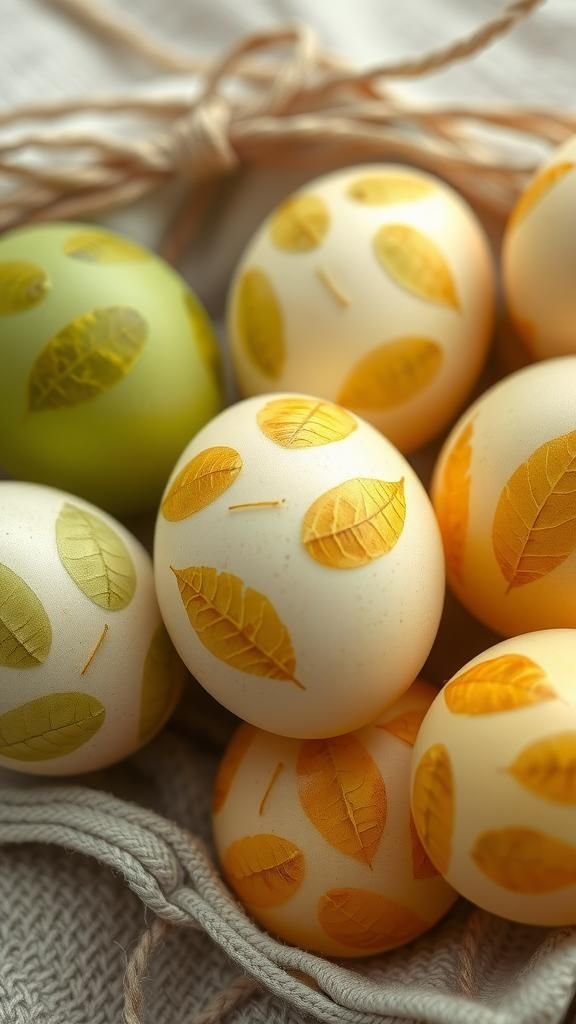
Placing tiny leaves and petals against a shell creates delicate silhouettes that read like pressed memories. When pigments migrate around the plant material, the result is a ghostly imprint with softened edges and faint veins visible beneath the surface.
The smell of boiled plant matter mingles with the faint metallic sharpness of dye, and the finished eggs feel like snapshots of a garden season. I find arranging leaves in repeating patterns yields a calm, organic rhythm across a curved canvas.
Steps
- Select small flat leaves or flower petals and press them gently against a clean egg surface.
- Wrap the egg with a breathable cloth to hold plant material in place without crushing delicate structures.
- Immerse the wrapped egg in a dye bath until the surrounding color develops around the plant shapes.
- Unwrap carefully to reveal faint botanical silhouettes and allow the egg to dry fully.
- Repeat with different plants or dyes for a varied collection of natural imprints.
Silk-tie transfer for vivid patterned wraps
The silk-tie transfer method delivers unexpectedly rich, painterly motifs borrowed from fabric prints. Wrapping an egg in an old silk tie or scarf releases color that flows into the shell, leaving behind blurred borderlines and jewel-like spots.
The fabric’s weave and sheen hint through the created surface, lending a textile elegance to each piece. I remember the satisfaction of finding an overlooked scrap of silk at a thrift store and how that single snippet produced a handful of eggs that felt like miniature couture.
Steps
- Cut a small swatch of silk fabric with a printed pattern and position it around a clean egg.
- Wrap the fabric snugly with a protective layer such as a cotton cloth to keep the silk in place.
- Simmer the wrapped egg in water for a brief period so the fabric dyes the shell through contact.
- Remove and unwrap carefully to reveal transferred patterns and allow the egg to cool and dry.
- Repeat with different fabrics to assemble a coordinated set of textile-inspired designs.
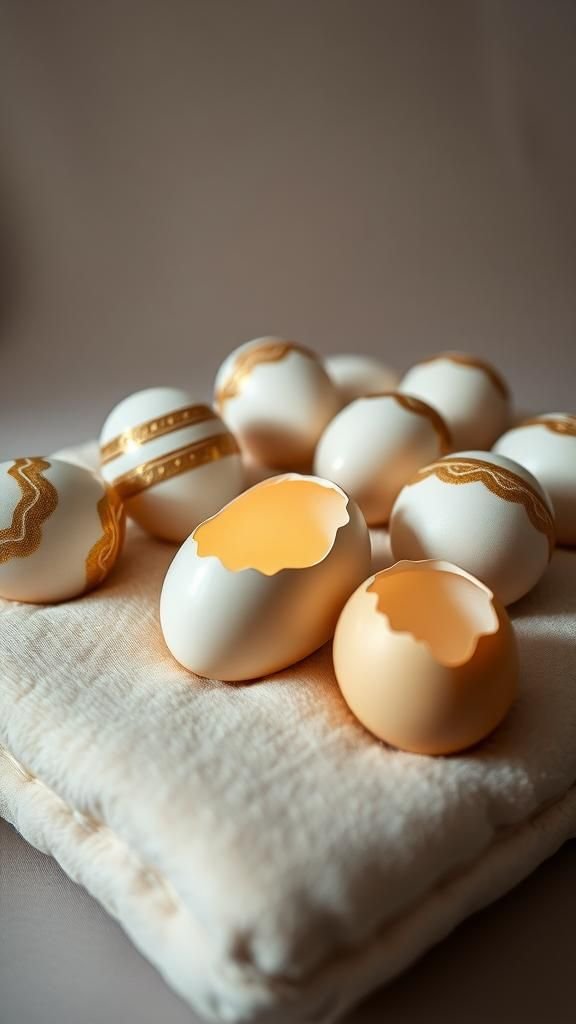
Gilded touch with delicate metallic leaf accents
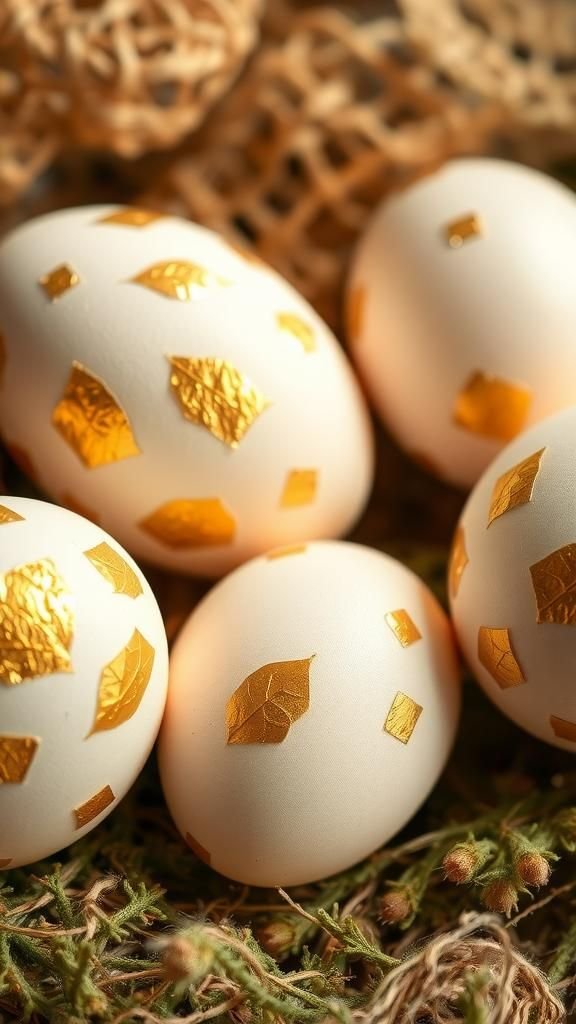
A whisper of metallic leaf lends a refined gleam that changes with angle and light. Tiny patches of gold or silver catch the eye against matte or deep-colored shells, creating little islands of shimmer that feel celebratory without shouting.
The thin, papery nature of metal leaf harmonizes with curves and can be given irregular edges for living, hand-made charm. I often place gilded eggs among woven nests so the metallic glints peek through natural fibers, adding a subtle luxury to a casual arrangement.
Steps
- Brush a thin layer of adhesive onto select areas of a clean egg where metallic leaf will adhere.
- Gently lay small pieces of metal leaf onto the tacky surface and press lightly to ensure contact.
- Remove excess leaf with a soft brush, revealing delicate patches of shimmer.
- Seal the metallic areas with a clear protective finish to preserve shine and prevent flaking.
- Allow the finish to dry completely before arranging with other decorative elements.
Glitter gradient for playful sparkle and sheen

Tiny particles of glitter transform shells into something that catches light like festive confetti. Gradual glitter gradients move from dense shimmer to a whisper of sparkle, producing a lively, tactile surface that delights fingers and eyes alike.
The contrast between sparkling zones and bare shell can feel celebratory, and I often mix different glitter sizes for a layered shimmer effect. Watching light bounce off clustered glitter moments brings a small, uncomplicated pleasure that reads as joyful and a little bit theatrical.
Steps
- Apply a thin layer of clear-drying adhesive along the area where glitter is desired.
- Sprinkle fine glitter onto the adhesive, starting with denser coverage at one end to create a gradient.
- Tap off excess glitter and add a lighter scattering further along the shell to soften the transition.
- Once set, apply a clear protective top coat to secure glitter and reduce shedding.
- Allow to dry fully before handling to preserve the gradient finish.
Soft watercolor washes and delicate blooms
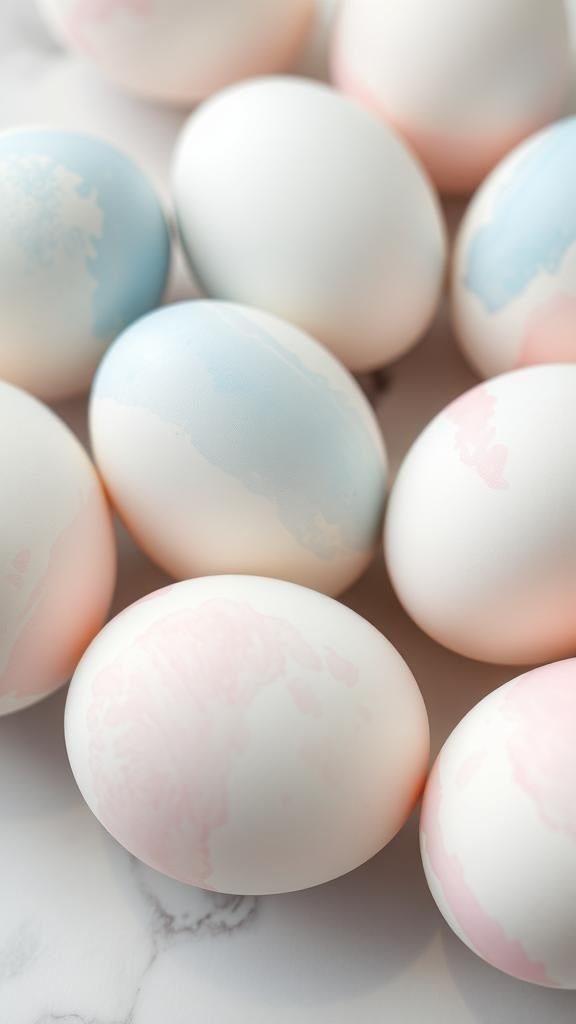
Watercolor washes impart a translucent, painterly feel that reads like tiny canvases. Pigment pools and feathered edges blend into one another, producing gentle washes of color that sometimes reveal faint streaks and brush textures.
The finish can feel ethereal, with pastel tones layered to suggest misty horizons or floral shadows. I find the unpredictability of pigment flow curious and calming, as if each egg holds a whispered landscape rendered in the smallest possible scale.
Steps
- Thin watercolor pigments with water until they achieve a translucent consistency suitable for washes.
- Apply gentle, sweeping strokes across a clean egg, letting pigments blend and feather naturally.
- Layer additional passes after drying to build subtle depth and color variation.
- Allow eggs to dry completely between layers to preserve soft edges and prevent muddiness.
- Optionally seal with a clear coating to protect the watercolor finish.
Sponge painting for tactile texture and color play
Sponge painting gives eggs a lively, tactile surface that feels almost textile-like. Dabs of saturated color land with soft borders, creating a mosaic of dots and washes that reads as energetic and handcrafted.
The porous marks invite touch and add a rustic rhythm when eggs are clustered together. I often find the repetition of stamped impressions oddly calming, and enjoying the mix of saturated centers and lighter halos becomes a quiet pleasure while arranging a display.
Steps
- Prepare a palette of paint colors and lightly load a sponge with pigment for a stippled effect.
- Gently press the sponge onto the egg in a variety of spots to build layered texture and color.
- Rotate the egg and repeat with complementary tones, allowing edges to overlap softly.
- Let the painted surface dry thoroughly to preserve the sponge texture.
- Add a protective coat if desired to enhance durability and sheen.
Masking with stickers and washi tape patterns

Using stickers and washi tape produces bold, graphic contrasts that feel both modern and playful. Clean, crisp shapes stand out against a colored background, offering a graphic punctuation of negative space.
The peel-away reveal is always satisfying, with sharp edges and surprising shapes that catch the eye. I tend to mix thin strips with small cutouts to compose a compact vocabulary of marks, and the finished pieces read as tiny graphic studies that are fun to rearrange within a bowl.
Steps
- Arrange stickers or strips of washi tape on a clean egg to create a desired composition of negative and positive space.
- Apply a dye or paint over the exposed areas, ensuring even coverage around the masks.
- Allow the colored surface to dry sufficiently before gently removing the masks to reveal clean edges.
- Touch up any areas if necessary and let the egg rest undisturbed to set.
- Optionally add a clear protective finish to preserve crisp contrasts.
Salt resist for cloudy blooms and texture

Salt added to wet dye creates starbursts and cloudy blooms that feel almost celestial. Tiny crystalline islands absorb and scatter pigment in ways that give the shell a textured, painterly look, with small points of brightness where salt concentrated.
The effect reads as both accidental and elegant, lending an organic rhythm of lighter and darker patches. I enjoy arranging salted eggs with smoother pieces to highlight the tactile contrast and often find myself leaning in to admire the little crystalline constellations.
Steps
- Immerse a clean egg in a shallow dye bath and let it soak until the color is saturated to preference.
- While the surface remains wet, sprinkle fine salt over chosen areas to create clustered textures.
- Allow the salt to sit until it absorbs pigment and forms visible crystalline patterns.
- Gently brush away the salt once dry to reveal soft, cloud-like blooms beneath.
- Let the egg air-dry fully before handling or displaying.
Tiny mosaic tiles for geometric collage eggs
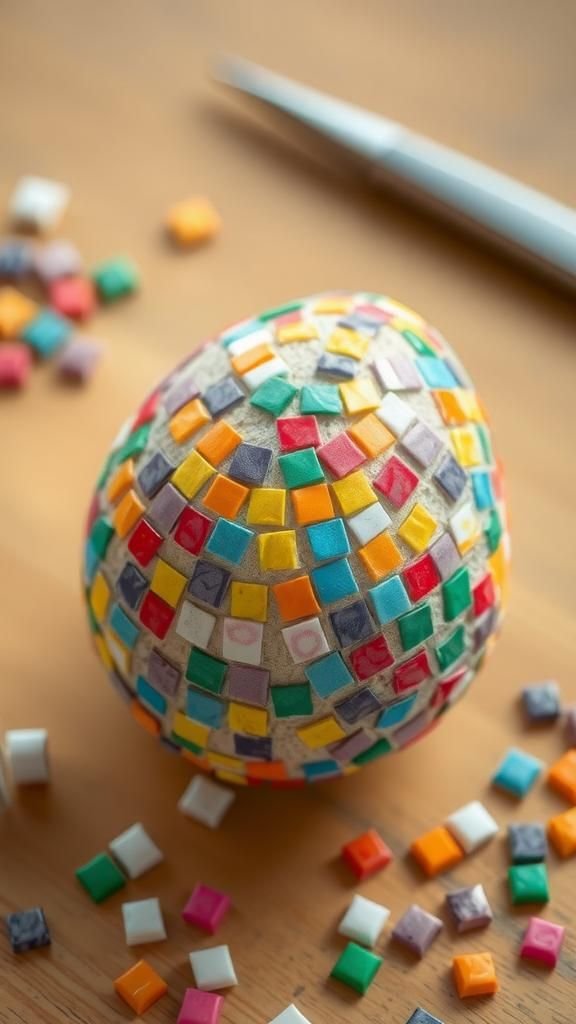
Creating a mosaic of small paper or seed tiles turns an egg into a miniature architecture of color. Each tiny piece contributes to an overall rhythm of pattern and contrast, like building a tiny stained-glass window.
The tactile repetition of placing elements yields a pleasant focus, and the finished surface catches light differently across facets. I like arranging tiles in concentric patterns or playful grids, watching how the shell’s curvature bends straight lines into gentle arcs that feel lively and handcrafted.
Steps
- Cut small squares or shapes from thin paper, seeds, or other lightweight materials to create mosaic tiles.
- Apply adhesive to the egg surface in small sections and press tiles into place in a chosen pattern.
- Work around the curve carefully, adjusting tile placement to maintain an even composition.
- Fill gaps with smaller pieces and allow the adhesive to dry thoroughly.
- Seal the completed mosaic with a clear coat to protect and unify the surface.
Pressed flowers adhered for romantic springtime eggs
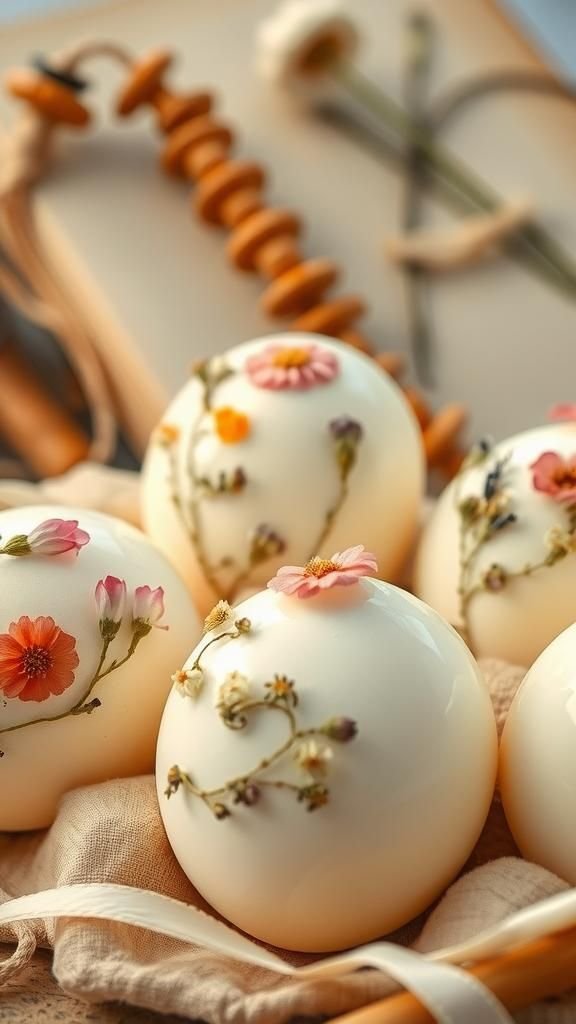
Adhered pressed flowers bring a gentle, botanical romance to each shell. Tiny petals flatten into soft halos of color and vein patterns peek through translucent layers.
The overall feeling is fragile and tender, like a flower preserved in a locket. I enjoy pairing neutral base hues with bright floral scraps so the petals feel both prominent and integrated.
When clustered together, these eggs read like miniature bouquets with an intimacy that invites quiet appreciation and a little bit of awe.
Steps
- Select small, well-pressed flowers or petals that will lie flat against a curved surface.
- Apply a thin adhesive to the egg and position the botanical elements gently, smoothing edges without crushing them.
- Cover the applied flowers with a protective clear layer to secure and preserve their delicate forms.
- Allow the sealed egg to dry fully in a stable place to prevent shifting.
- Arrange with complementary natural textures for a cohesive display.
Blown eggs as hollow canvases for delicate art
Blown eggs have a fragile, airy presence that makes them feel like ornaments to be treasured. The hollow shell offers a lightweight canvas that can be painted, washed, or decorated without the weight of a solid egg.
The sound when gently tapped is an airy whisper, and handling must be slow and reverent. I appreciate how hollowed shells hang easily in displays or sit perched on stands, their translucence catching light in a way that feels almost ethereal and museum-like.
Steps
- Create a small opening at each end of a raw egg and carefully blow out the contents into a container for later use.
- Rinse the inside with water to remove residue and allow the shell to dry thoroughly.
- Decorate the hollow shell using preferred techniques such as painting, gilding, or decoupage.
- Handle with care when moving or displaying to preserve the delicate structure.
- Store in padded compartments when not on display to avoid accidental cracks.
Stencil shapes for crisp graphic silhouettes

Stencils create immediate, crisp shapes that provide a graphic counterpoint to softer techniques. Bold silhouettes, letters, or tiny icons read clearly against a colored ground, introducing a playful or modern accent.
The clean edges feel striking on a curved surface and lend a sense of intentionality and design. I enjoy mixing tiny motifs across a group so each egg contributes to a themed set, where repeated forms bring cohesion and a pleasing visual rhythm.
Steps
- Secure a pre-cut stencil onto a clean egg so the edges sit flat against the shell.
- Apply paint or dye over the exposed areas, keeping coverage even to maintain crisp lines.
- Remove the stencil carefully to reveal a sharp silhouette and allow the surface to dry.
- Repeat with different stencils or colors to develop a coordinated series.
- Seal the finished motifs with a clear coating if desired for durability.
Table of Contents