I remember a box of corks accumulating on the kitchen counter after a few friendly dinners; they felt warm in my hand and oddly promising. The slow ritual of pushing a cork out of a bottle became the start of a small collection and the spark for DIY Wine Cork Crafts that turned scraps into cozy household objects.
Over the years, those corks graduated from mere memory holders to textured coasters, tiny planters, and playful charms.
Making wine cork crafts has felt like quiet evenings with a small, tactile puzzle and the satisfying click of pieces fitting together.
Rustic cork trivet that hugs hot pans
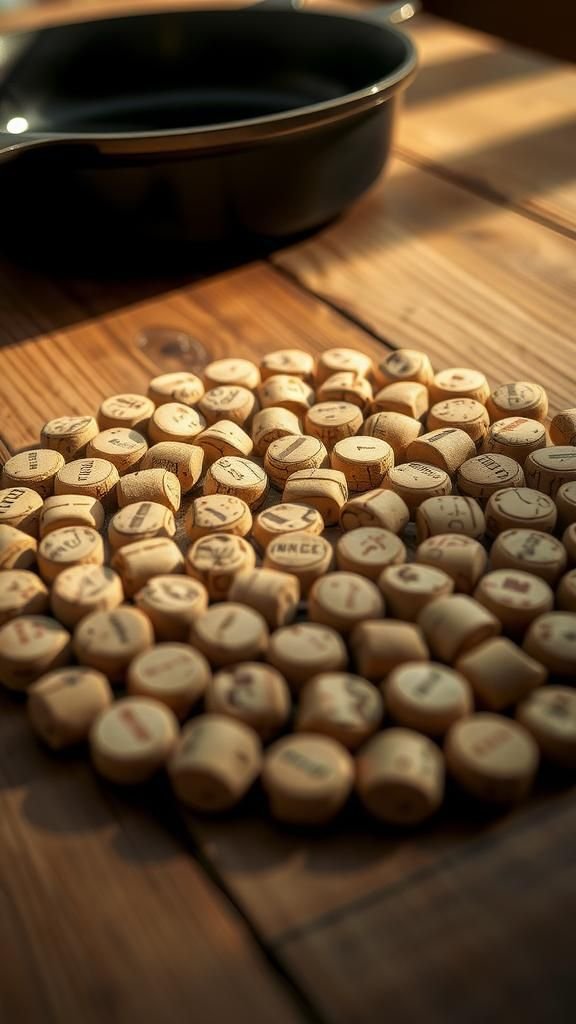
A trivet made of cork carries a warm, organic presence on the table. The surface gives under fingertips with a faint springiness and a gentle scent that hints at evenings spent around a bottle.
I like the mosaic look when corks are placed end to end, the tiny circles creating a patterned sea of tannin-stained rings. The edges wear a softer tone where hands have brushed against them, and the whole piece invites casual placement of a cast-iron skillet or a steaming casserole straight from the oven.
Steps
- Gather a pile of corks and a flat base material suitable for a tabletop protector.
- Trim corks lengthwise to achieve consistent heights and arrange in the preferred mosaic pattern.
- Adhere corks onto the base in tight rows, leaving minimal gaps for an even surface.
- Coat the assembled trivet with a clear, heat-resistant finish to enhance moisture resistance and longevity.
Coaster set with stamped cork designs

Coasters made from cork feel soft under a glass and offer a satisfying quietness when a cup is set down. I enjoy the tactile contrast between the rough stamp impressions and the smooth cork surface; little indents catch light differently and create tiny shadows.
The scent of natural cork brings back damp evenings and mellow conversations. Arranged in a stack, the coasters show variations in color where the wine met the cork years ago.
They make the small act of placing a drink into something quietly decorative.
Steps
- Slice corks into even thicknesses to form coaster rounds, ensuring each piece reaches similar diameter.
- Impress designs onto the cork surface with carved stamps or heated metal forms to create texture and pattern.
- Seal the decorated coasters with a thin, water-resistant finish to protect against spills and wear.
A map-style bulletin board from corks
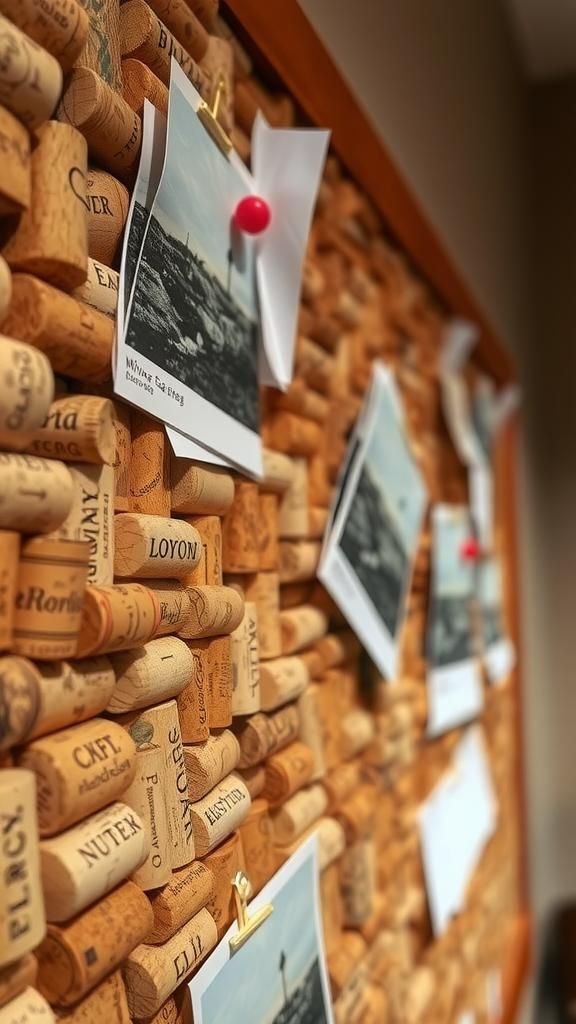
Turning corks into a pin-friendly map board brings together memory and function. Pushing a pin in feels pleasantly yielding, like a soft tap into history.
From across the room the board reads as a patchwork, each cork offering a slightly different grain and hue, creating subtle contour lines. I’ve noticed that tiny wine stains become part of the landscape, adding character.
The board gives a tactile invitation to arrange notes, postcards, and tiny mementos, and there’s a quiet satisfaction in watching the collage grow with time.
Steps
- Arrange corks flat on a rigid backing until a cohesive map-like surface is achieved, varying orientations for visual interest.
- Adhere each cork firmly to the backing to create a continuous pinboard area without loose edges.
- Trim surrounding backing for a neat frame appearance and mount onto the wall with secure hardware.
A wreath that carries vineyard memories
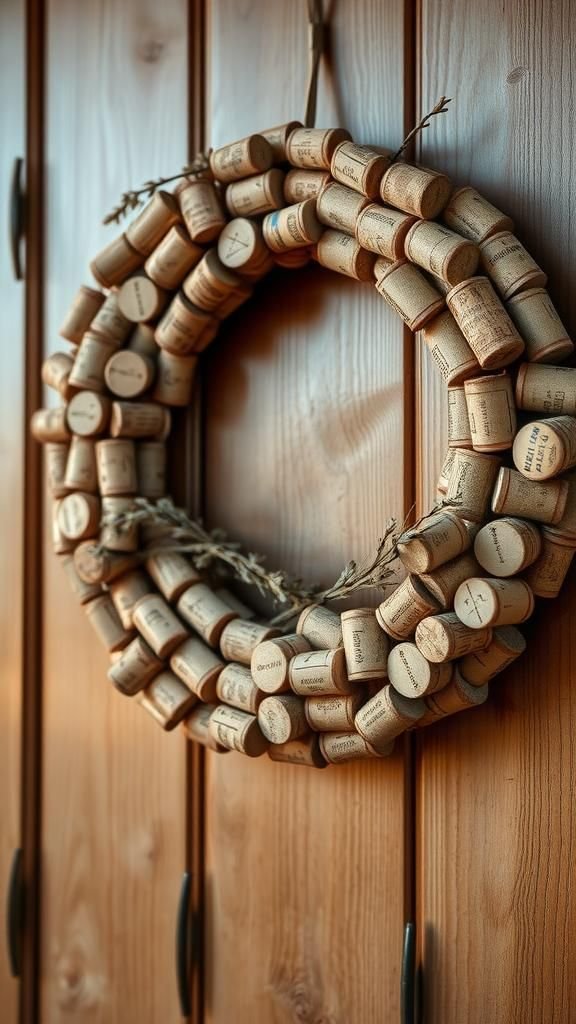
A cork wreath feels pleasantly rustic against a door, a circle of little memory capsules that whisper of dinners past. Handling it brings a mix of textures: rough ends, smooth sides, and faint stains like tiny fingerprints.
The circular form gives a rhythmic pattern that catches light differently throughout the day. I’ve hung one and watched neighbors pause, leaning closer to read handwritten scrap tied among the corks.
Its presence is subtle but inviting, a soft statement rather than an announcement, and it ages into something homely.
Steps
- Create a circular base and lay out corks around its edge to determine spacing and density.
- Secure corks in overlapping layers to form a full, textured wreath shape around the base.
- Add optional decorative accents like ribbon, sprigs, or small trinkets to personalize the wreath.
A cushioned bath mat made of corks

A bath mat of corks offers an unexpected warmth under bare feet, the natural material feeling slightly springy and dry even after a shower. The pattern of rounded ends creates a pebble-like landscape that massages the soles.
The aroma is earthy, faintly woody, a calming complement to steamy mornings. Water beads on the surface and drains between cork joins, and the whole piece carries a gentle, muffled sound when stepped on.
It blends better with natural-toned tiles and brings a handcrafted spa quality to the bathroom.
Steps
- Lay corks closely across a moisture-resistant backing in a grid pattern to create the mat surface.
- Bond corks securely to the backing with a durable adhesive suitable for humid spaces.
- Trim outer edges and add a non-slip underside to ensure safe placement on bathroom floors.
Tiny succulent planters carved from cork
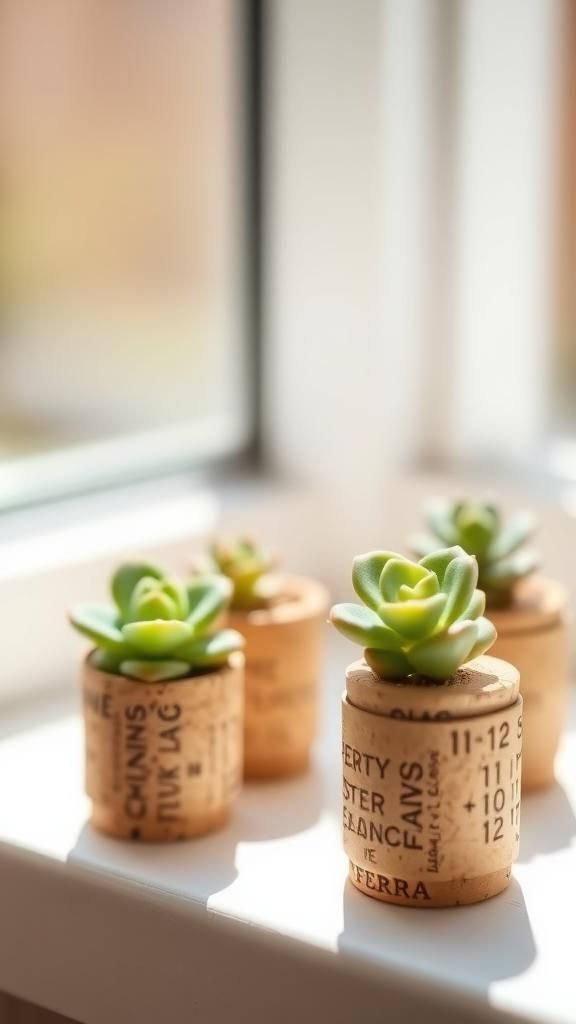
Mini planters made from cork have a charming, pocket-sized presence on a windowsill. They carry a faint earthy scent and a soft, slightly spongy texture that contrasts with the glossy green of succulents.
When I press a fingertip near the rim, the surface feels grainy but resilient. The tiny hollows offer snug nests for small rosettes and the visual of a living thing emerging from a wine memory brings a little smile.
Grouped together, the planters form a miniature garden with warm, muted tones against bright foliage.
Steps
- Hollow out cork centers to create small planting cavities large enough for miniature succulents.
- Place a tiny layer of gravel or drainage material at the bottom before adding potting medium and the plant.
- Group several cork planters together on a saucer to create a compact, decorative cluster.
A simple pendant with warm cork charm
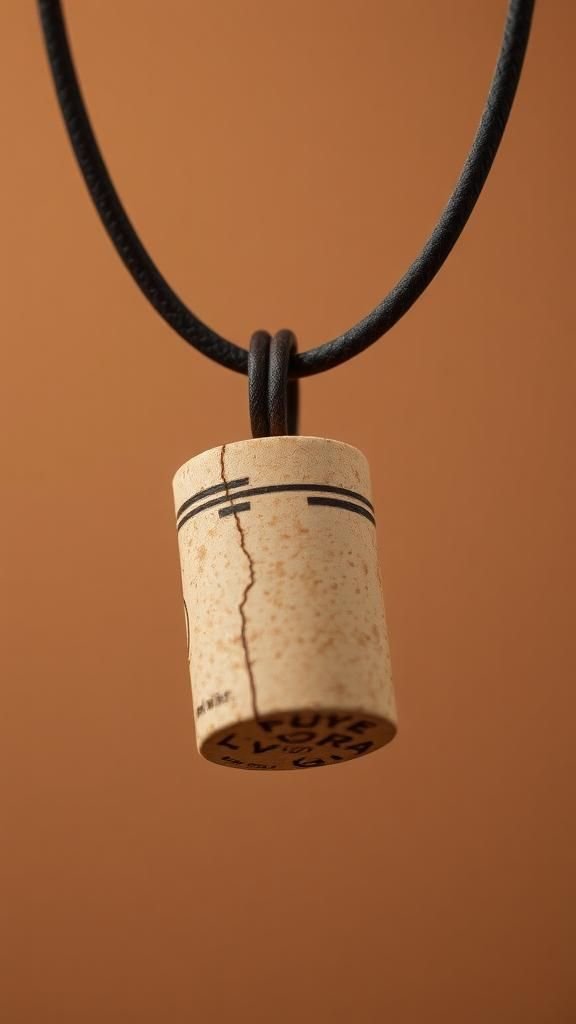
A cork pendant rests light against the skin and carries the faint smell of oak and evenings shared. Its surface is pleasantly warm to touch, and when turned the tiny pores catch the light, creating subtle highlights.
I’ve noticed that a small engraved initial or painted dot adds a personal note without overwhelming the material’s quiet personality. Wearing one feels casual and intimate, like carrying a small memento around the neck, and the pendant ages softly as oils from the skin deepen the cork’s tone.
Steps
- Slice a small section of cork and shape into the desired pendant form while keeping a smooth finish.
- Add a small hole for a jump ring and thread through a chain or cord to enable hanging.
- Personalize the pendant with a tiny painted mark or engraved initial and seal lightly for protection.
Delicate cork stud earrings with subtle texture
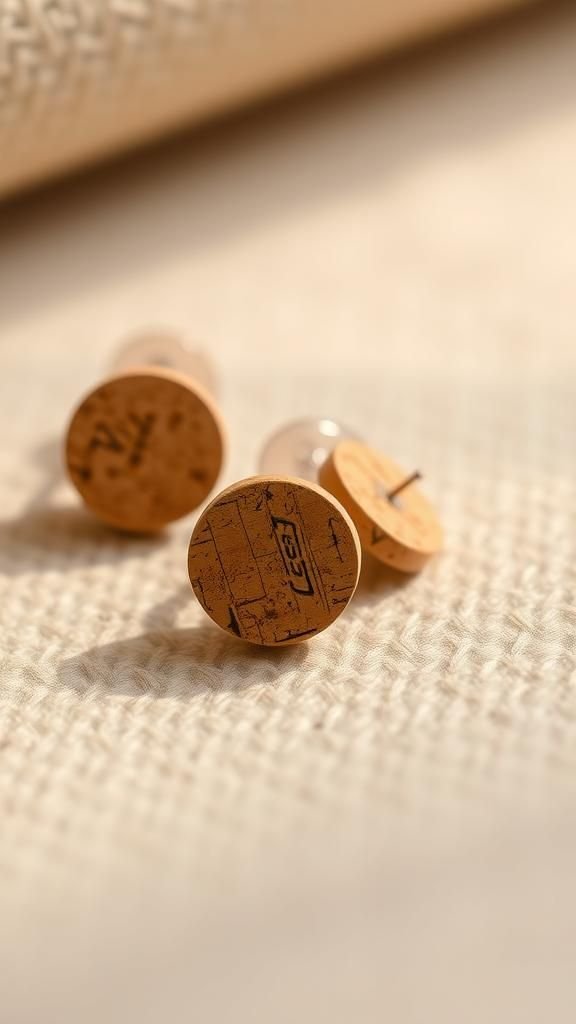
Cork studs feel barely there on the ear, light enough that they are often forgotten until a mirror catch reminds me. The texture reads like tiny woodlands, grain visible in miniature.
Colors range from pale beige to warmer caramel where age or wine has kissed the surface, and that variance makes each pair slightly different. When I handle them, the cork warms quickly and becomes almost velvety.
They pair well with linen shirts and quiet afternoons, offering a handcrafted accent that hums rather than shouts.
Steps
- Cut small, matching cork circles for the stud faces and smooth any rough edges for comfort.
- Adhere stud posts to the cork backs with a strong, skin-safe adhesive and allow full curing.
- Optionally coat the visible surfaces with a light finish to increase water resistance and durability.
Whimsical keychain charms made from tiny corks
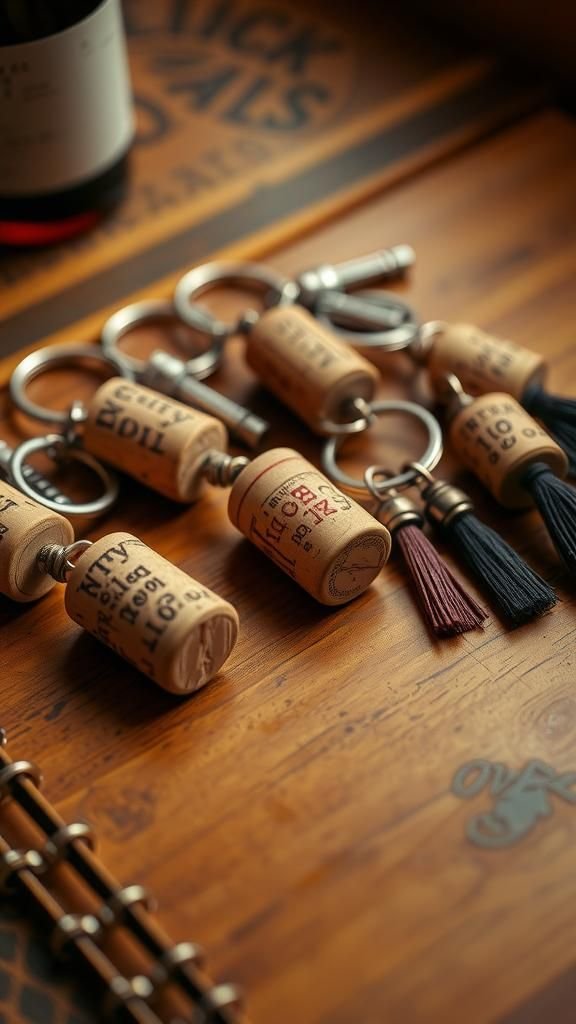
Keychain charms crafted from cork carry a playful bounce on a ring, and their light weight keeps keys from becoming bulky. The cork surface develops darker ridges where fingers grasp it most, telling a small story of daily use.
When the ring jingles, the charms tap softly together rather than clatter. I like how tiny additions like lacquered dots or a thin leather fringe brighten the humble cork without stealing its character.
They make keys feel more personal and less anonymous, slipping easily into pockets and purses.
Steps
- Select corks of similar size and prepare small holes or attachment points for key rings.
- Fasten metal key rings through the prepared points, ensuring secure connections for everyday wear.
- Decorate charms with paint, small tassels, or metal tags to personalize each piece.
Picture frame bordered in textured cork strips
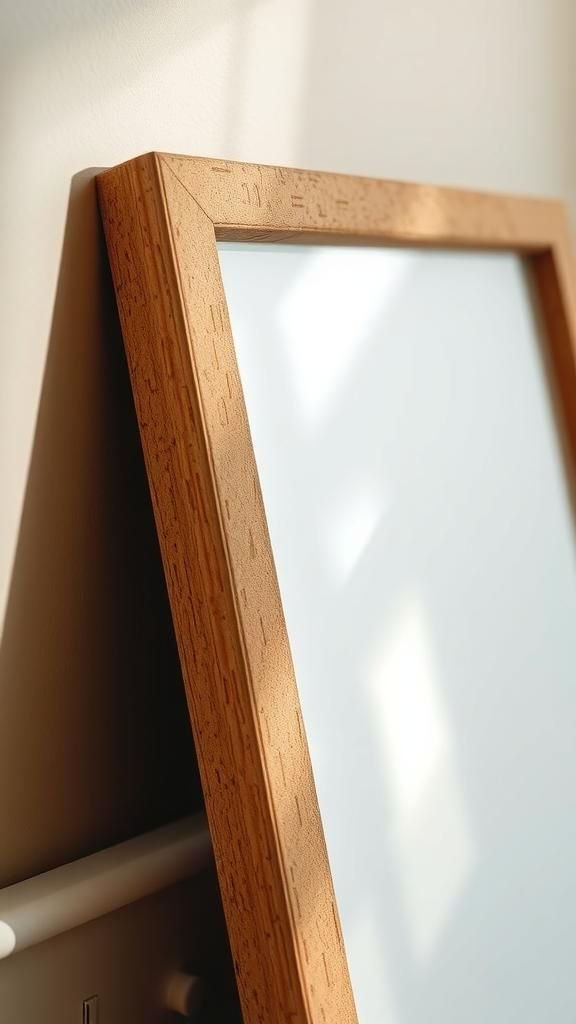
A picture frame framed by cork brings a soft, tactile border to photographs and prints. The contrast between glossy photo paper and matte cork texture makes images pop without a loud frame color.
Running a fingertip along the cork edge reveals tiny pores and the faint scent of aged oak, grounding the visual with smell. I remember one framed holiday photo where the cork seemed to warm the scene, making it feel more intimate.
The frame has an approachable quality that pairs well with casual portraits and candid snapshots.
Steps
- Slice corks lengthwise to create flat strips suitable for framing the outer edges of a photo frame.
- Attach cork strips evenly around the frame perimeter, maintaining consistent seam alignment for a tidy look.
- Trim any excess cork and apply a protective finish if desired to enhance longevity.
Floating candle holder with cozy cork base

A candle holder grounded in cork brings a warm, whispered quality to a tabletop arrangement. The cork base feels pleasantly light and offers a matte contrast to wax and flame.
When candles are lit above, the cork reflects a soft glow and the air carries a subtle earthy note. I like how the cork base muffles the small clinks of glass while giving off a rustic, handmade silhouette.
Over time the base gains little marks that read like a map of evenings with friends, simple and familiar.
Steps
- Form a stable base by arranging corks in a circular or geometric pattern to support a candle vessel.
- Secure corks together so the candle holder remains steady and resistant to shifting during use.
- Place the candle vessel into the base and ensure proper clearance from cork edges before lighting.
A shallow cork bowl that holds little things
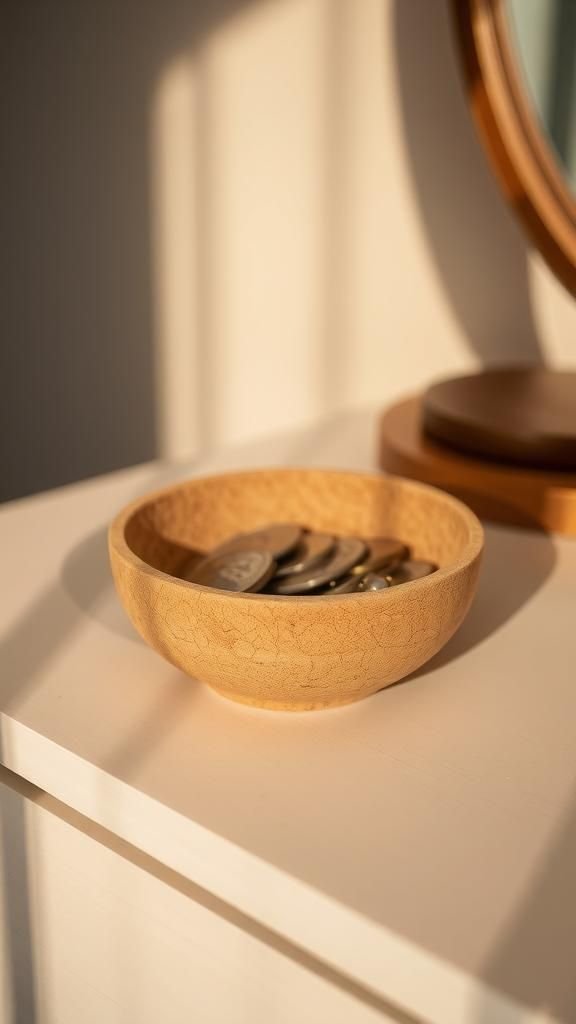
A shallow bowl carved from clustered corks holds spare change and tiny keepsakes with a gentle presence. The tactile interior is both slightly rough and yielding, and the whole object feels lightweight when lifted.
The outer silhouette softens the harder lines of a desk or dresser, and the warmth of the cork offsets cold metal coins. I have watched loose rings nestle into the bowl’s contours as if seeking a small harbor.
It keeps small clutter from scattering while remaining an unassuming part of the room’s texture.
Steps
- Arrange corks in a circular pattern to create the bowl’s base and build upward with concentric layers.
- Bond each layer securely to form a stable, shallow vessel shape that resists separation.
- Refine the rim and optionally coat the interior lightly for easier cleaning and increased durability.
Napkin rings with a corky, casual charm

Napkin rings made from cork add a relaxed, tactile touch to a tabletop. They feel featherlight in hand and show gentle variations where tiny stains or grain patterns peek through.
Setting a napkin with one of these rings brings a human texture to a meal, something that hints at many evenings rather than a single formal event. I enjoy how they pair with simple linen and ceramic dishes, complementing soft colors while adding an understated warmth that invites guests to linger a little longer.
Steps
- Slice corks into ring shapes and smooth inner edges to allow napkins to glide through comfortably.
- Decorate outer surfaces with subtle accents like thin bands of paint or small carved motifs.
- Seal the rings with a light protective finish to guard against moisture and wear during dining.
Tiny wine glass charms from cork slices
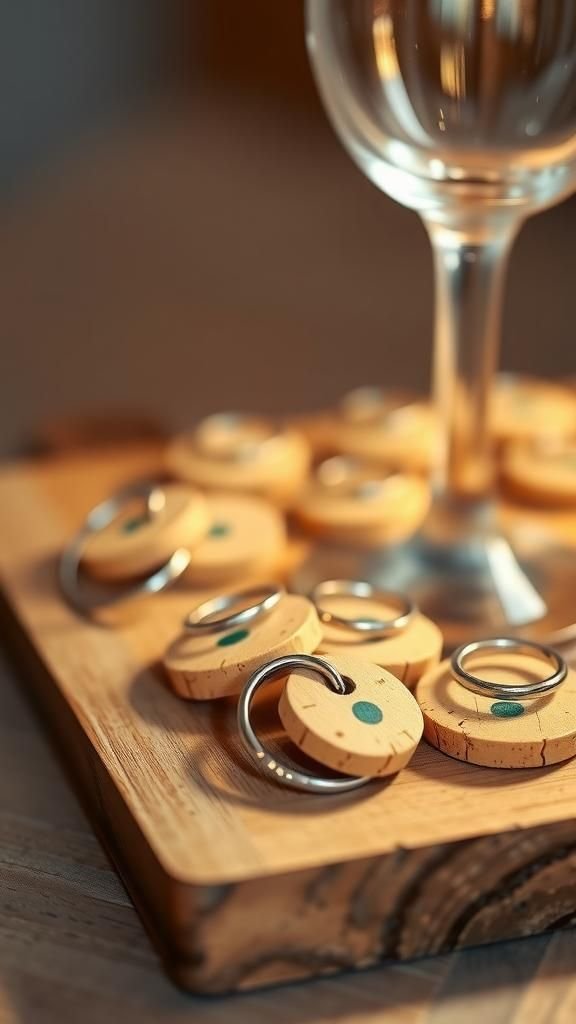
Wine glass charms cut from cork provide a clever nod to the bottles that birthed them. Each slice displays a microcosm of grain, with faint wine marks sometimes forming pale rings that act like natural decorations.
They hang lightly from stemware and make each glass feel a bit more personalized. When gathered around a tray, the mix of shapes and tiny painted dots creates a playful, low-key pattern.
The cork texture remains soft to the touch, and the little charms help conversations start with a smile.
Steps
- Slice corks into thin discs and drill small holes near the edge to accommodate metal loops.
- Thread small rings or chains through the holes to form the charm loops capable of slipping onto stems.
- Personalize each charm with painted dots or tiny engraved marks for easy guest recognition.
Monogram letters carved from clustered corks
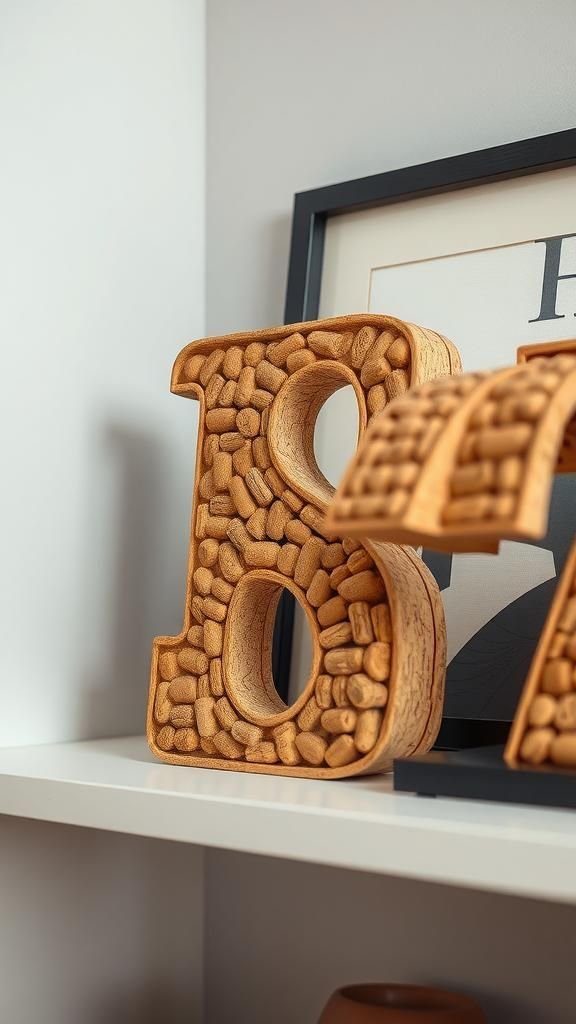
Monogram letters made from corks have a handcrafted statement that reads as quietly proud. The clustered corks build volume and grain that catches light in a pleasant, varied way.
Placed on a shelf or leaned against a wall, the letter carries both texture and a soft matte finish that feels warm to the hand. The arrangement of tiny circles forms a larger silhouette, creating a satisfying contrast between micro and macro patterns.
It’s an approachable accent that can anchor a room without demanding attention.
Steps
- Lay out corks to match the outline of the desired letter and adjust placement to achieve full coverage.
- Bond corks together along adjoining surfaces to create a stable, three-dimensional letter form.
- Trim outer edges and mount the finished letter on a backing for display on a shelf or wall.
A slim cork bookmark that smells like evenings

A cork bookmark slips into a book with the softest of presences and brings a whisper of woody fragrance with it. The strip feels warm and slightly textured between fingers, and it lays flat without adding bulk.
I often find the bookmark bearing tiny indentations from repeated page marks, which read like a journal of reading habits. Its durability surprises me; the material resists creasing and holds up to long afternoons of leafing through dog-eared paperbacks, always returning to the spine with quiet reliability.
Steps
- Cut cork into thin, even strips sized to slide into book pages without creating bulk.
- Round or bevel the corners for a smooth, comfortable feel when handled frequently.
- Embellish with a small tassel or painted edge for a touch of personal flair.
A vase wrapped in cork for muted texture
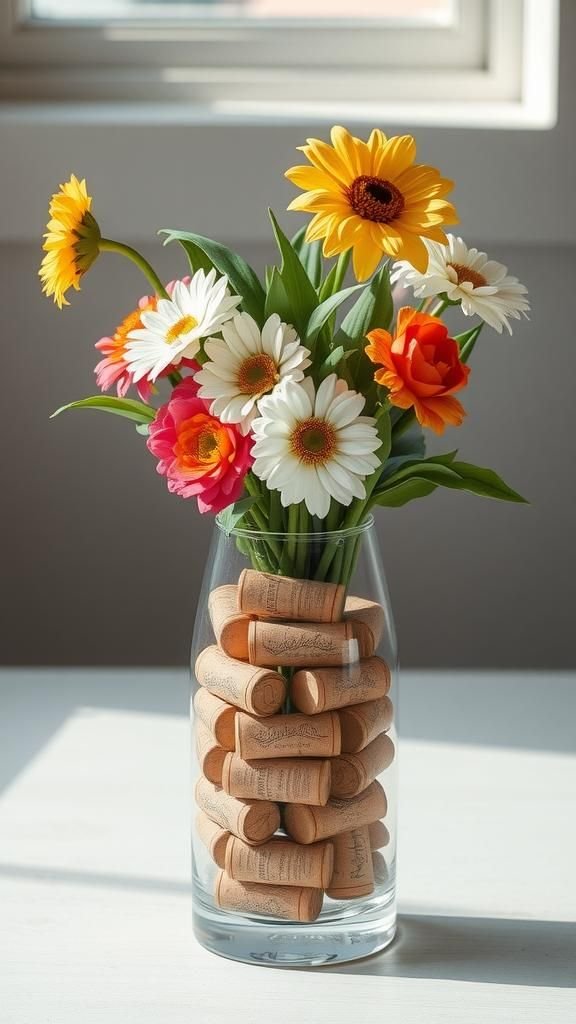
Wrapping a glass vase with cork introduces a muted, tactile skin that softens the reflective surface. The cork brings a matte contrast and a whisper of grain that quiets the vase’s shine.
I like how a bundle of corks in varied orientations creates a patchwork of shadows when flowers catch afternoon light. The combination of living blooms and aged cork evokes a layered story of celebration and calm.
It turns a simple arrangement into something comfortably worn-in, the vase acting as a bridge between nature and memory.
Steps
- Measure and arrange cork pieces around the vase to determine coverage and pattern rhythm.
- Adhere corks to the vase gradually to maintain a uniform wrap and avoid gaps.
- Finish with a thin protective seal where needed to guard against water exposure and staining.
Drawer knobs dressed in cork for soft grip
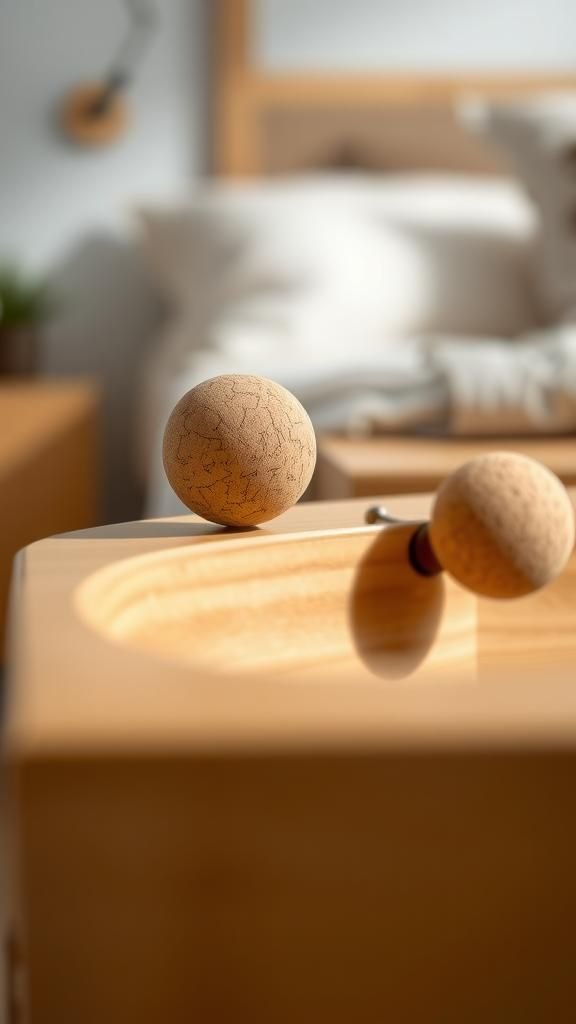
Cork-covered drawer knobs add a gentle touch to cabinetry, replacing cold metal with a warm, textured surface. The rounded cork yields slightly under fingers and carries a soft, tactile comfort that makes opening drawers a small pleasure.
Over time the knobs mellow, taking on subtle darkening where hands frequently meet them. The blend of cork’s matte finish with wood or painted drawer faces creates a balanced contrast, and the small change transforms daily interactions into moments of quiet sensory delight.
Steps
- Prepare cork pieces to match the knob bases and ensure snug coverage over existing hardware.
- Adhere cork sections onto knob surfaces, shaping gently to conform to rounded profiles.
- Secure and trim edges for a smooth, finished appearance and test for comfortable grip.
Garden markers with cork tops and handwritten charm

Garden markers topped with cork carry a homemade honesty among seedlings. The cork tops are soft to the touch and weather into warmer tones after sun and rain, while the handwritten names fade into a pleasant patina.
Planted stakes feel friendlier with a bit of cork at the top, and the soft material takes ink in a way that can be pleasantly imperfect. I enjoy checking the garden and seeing the little cork caps bob above foliage, their humble presence marking growth and small victories throughout the season.
Steps
- Attach cork slices to the tops of wooden or metal stakes to create readable garden markers.
- Inscribe plant names onto the cork surfaces using a permanent, weather-resistant marker.
- Place markers among seedlings making sure each label sits clearly above the soil line.
A tidy pencil holder from vertical corks
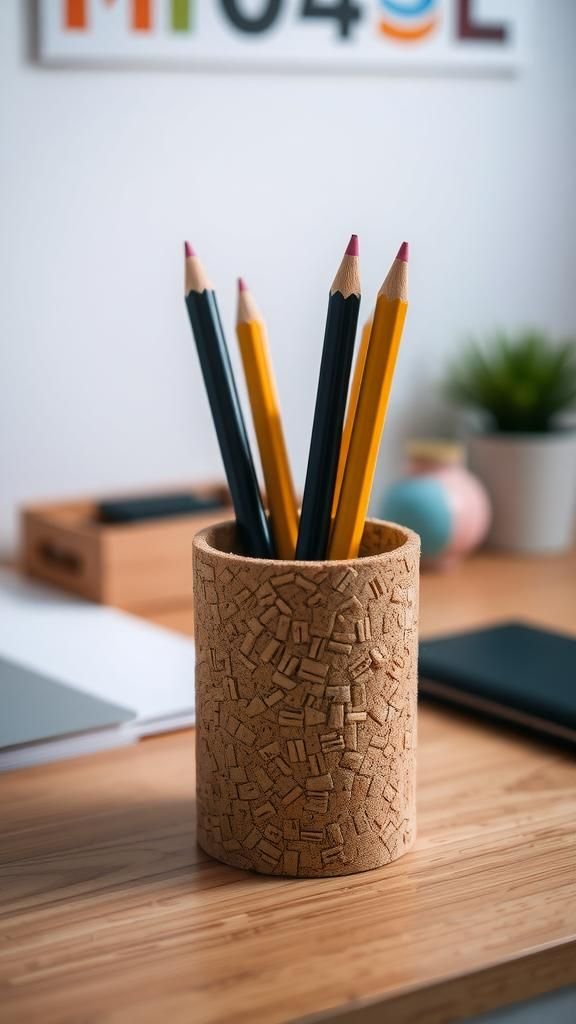
A pencil holder formed from upright corks feels pleasantly lightweight yet sturdy on a desk. The tops of the corks create a soft, irregular skyline where pens nestle, and the material buffers the harder edges of metal and plastic writing tools.
I like how the natural tones mute bright office supplies and make the workspace feel calmer. The holder keeps essentials close without appearing stiff, and the cork’s texture offers a reassuring grip when fingers reach in for a favorite pen during a late-night jotting session.
Steps
- Stand corks vertically in a circular layout on a solid base to form the holder walls.
- Secure corks together to build a rigid cylinder that supports writing tools without collapsing.
- Trim the base as needed and add a felt or rubber bottom to protect desktop surfaces.
Small backsplash tiles with cork warmth
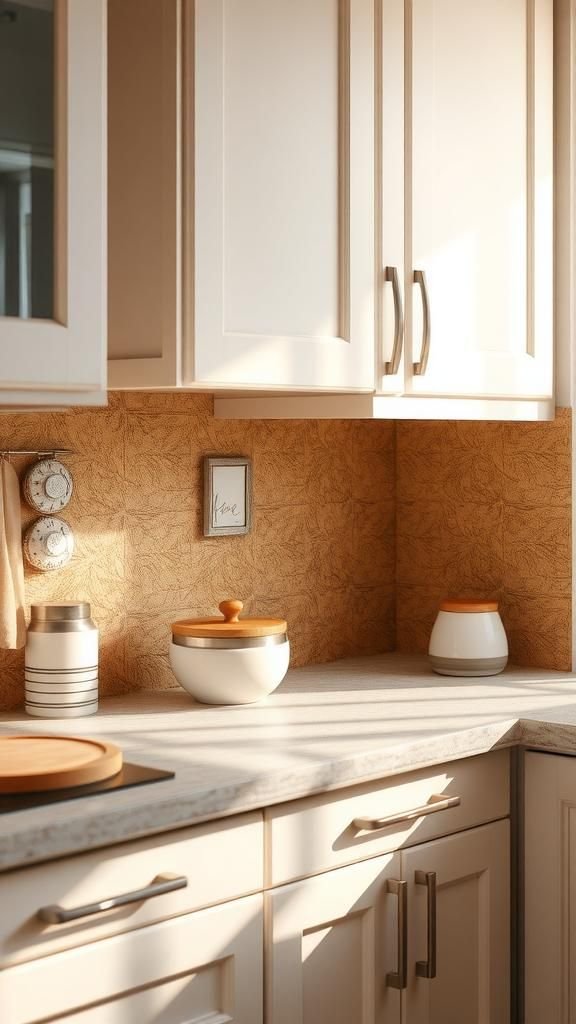
Cork tiles on a small backsplash bring an unexpected warmth to kitchen nooks, their matte surface absorbing harsh reflections and offering a soft visual field. The texture reads like a natural fabric against glass or ceramic appliances, and the faint scent of cork can be oddly soothing while cooking.
I’ve noticed that the tiles soften the overall room acoustics, dampening small kitchen noises. The pattern of seams and grains feels handcrafted and lived-in, turning a functional area into something quietly tactile and comforting.
Steps
- Cut cork tiles to size and plan an arrangement that complements surrounding surfaces and grout lines.
- Adhere tiles to a clean, stable backing suitable for kitchen environments, ensuring consistent spacing.
- Seal the tiled area with a water-resistant finish to protect against splashes and cooking humidity.
Table of Contents