I have a soft spot for tiny handmade things that change the mood of a room. Afternoon projects that begin with a cup of tea and a scatter of scraps often turn into the kind of wreaths that get nudged into place on an entry hook with a smile.
Over time those quiet afternoons produced dozens of playful approaches to heart-shaped decor.
These ideas for DIY Valentine Heart Wreath Ideas grew from those experiments, each one a little mix of texture and color that felt right on a door or over a mantel. They read like friendly prompts for cozy, handcrafted accents.
A Rustic Burlap Heart Wreath with Buttons

Burlap carries a comforting roughness that I always find grounding, its natural fibers catching flecks of light and shadow. Buttons scattered across the heart bring a cheerful clink when the wreath moves in a breezy hallway, and the muted palette feels quietly warm against winter light.
I remember sitting by a window, the burlap under my fingers, delighted by how plain materials read as homey. The contrast between coarse fabric and glossy buttons made the piece feel lived in and happily imperfect, a welcome nod at a front door.
Steps
- Shape a heart form from a stiff wire or pre-cut cardboard base.
- Layer burlap strips around the form, overlapping edges and securing with hot glue.
- Arrange a selection of buttons across the front and adhere them with glue to form clusters or a scattered pattern.
- Add a simple hanging loop at the back and trim any stray fibers for a tidy edge.
Soft Felt Hearts on a Fluffy Hoop

The plushness of felt has always felt like a little comfort blanket for craft projects. Rows of small felt hearts create a soft silhouette that looks cozy even from across a room.
The hoop peeks through in places, offering a subtle frame that keeps the shape honest. Touching those felt hearts reveals a slight fuzz and the tiny give of sewn edges, and different color mixes can feel playful or quiet.
I enjoyed pairing gentle pastels with deeper jewel tones to balance sweetness and visual weight on the wall.
Steps
- Cut multiple heart shapes from felt in coordinated colors and sew two layers together with a running stitch for slightly puffy hearts.
- Thread a strong needle and string to anchor hearts along a lightweight embroidery hoop, spacing them evenly.
- Secure ends of the string inside the hoop and add a small bow or loop at the top for hanging.
- Fluff each heart gently to even out stitches and create a welcoming texture.
Paper Rosette Heart Wreath: Charming and Light

Paper rosettes bring a sunny, accordion-like rhythm to a heart shape, their crisp edges catching light like tiny sails. When arranged close together they form a layered surface that reads both delicate and lively.
I recall a Saturday afternoon where the sound of folding paper became oddly meditative, each little rosette stacking into a gentle chorus of color. The finished wreath felt featherlight compared with fabric versions, and its shadow on the wall created a quiet, lace-like echo that was unexpectedly satisfying.
Steps
- Fold strips of decorative paper accordion-style and bring ends together to form rosettes, securing the center with glue or a brad.
- Prepare a heart-shaped base from sturdy cardstock or thin cardboard.
- Glue the rosettes in overlapping rows across the heart base, creating a dense, textured surface.
- Allow the paper to dry flat and attach a ribbon loop for hanging.
Pom-Pom Confetti Heart Wreath for Playful Vibes

Pom-poms introduce a playful bounce that feels almost celebratory, like confetti captured in a shape. A field of tiny, fuzzy balls produces a tactile surface that begs a light touch, and the array of colors can shift the mood from sweet to exuberant.
From time to time I find myself smiling at the sight of those little round puffs, remembering birthday parties and cozy living room gatherings. The overall effect reads cheerful, and the texture absorbs light softly, giving a friendly, approachable look to an entryway.
Steps
- Create an assortment of pom-poms in complementary colors using yarn or a pom-pom maker.
- Prepare a heart-shaped base and cover it with a layer of craft glue.
- Press pom-poms into the glue across the base, filling gaps to create a dense, fluffy surface.
- Let the glue set completely before trimming stray fibers and adding a hanging loop.
Yarn-Wrapped Heart with Tassel Accents and Loops

The slow rhythm of wrapping yarn around a form feels almost like knitting without the needles, a meditative repetition that ends in a snug, cozy surface. Tassels add a little swing, catching light and creating a casual silhouette.
I remember the quiet satisfaction of an even wrap, the yarn slipping under fingers until the heart looked knitted even though it was simple. The combination of matte yarn and occasional metallic thread gave a subtle shimmer, making the piece feel handmade and warmly personal on a tabletop or wall.
Steps
- Form or select a heart-shaped base from foam board or cardboard.
- Anchor a tail of yarn and wrap tightly around the form until fully covered, tucking ends under wrapped layers.
- Create small tassels and attach at the bottom edge for decorative movement.
- Add a loop of matching yarn at the top for display and trim any loose strands.
Cinnamon Stick Heart Wreath with Warm Spice Notes

Cinnamon sticks lend a rustic, aromatic presence that invites a slow breath; the scent becomes part of the room. The rough, woody texture of the sticks gives the heart a natural edge, and small gaps let background colors peek through for a handcrafted look.
I remember the moment I first lifted the wreath and felt a mellow, cozy scent trail, like autumn folded into winter. The palette leans earthy and the overall feel reads like a kitchen memory, warm light and simmering spice in the air.
Steps
- Arrange cinnamon sticks side by side on a sturdy heart-shaped base, trimming ends as needed for a neat outline.
- Secure the sticks in place with hot glue or strong craft adhesive.
- Fill any visible gaps with smaller sticks, twine, or dried orange slices for added texture.
- Create a hanging loop with natural twine and let the piece air out to enhance its fragrance.
Ribbon and Lace Heart Wreath, Soft Vintage Feel

Layers of ribbon and lace weave a romantic, vintage mood that reads like a found heirloom. Ribbons fold into gentle ridges, while lace adds a translucency that lets light play through.
I often held pieces up to the window, watching sunlight reveal tiny patterns and the way edges softened against each other. The combination felt feminine without being fussy, and the palette of cream, blush, and muted rose created a nostalgic warmth that settled comfortably above a mantel or over a mirror.
Steps
- Select a mix of ribbons and lace trims in coordinated colors and textures.
- Wrap or loop the trims around a wire or foam heart base, layering to create depth.
- Tuck in decorative accents such as small silk flowers or pearl pins for added vintage character.
- Secure ends discreetly at the back and add a soft ribbon for hanging.
Candy Heart Cluster Wreath for Sweet Nostalgia
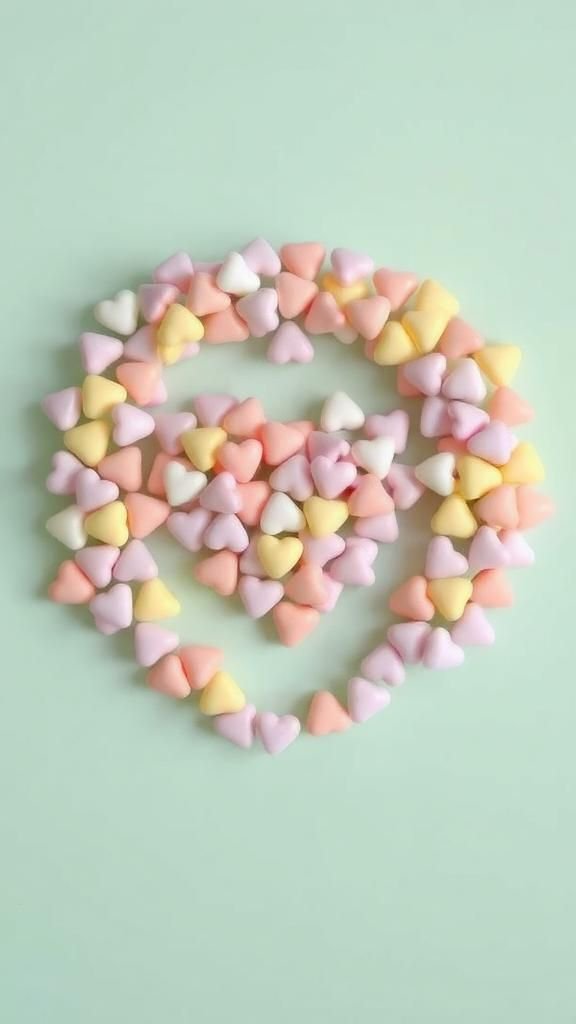
Clusters of pastel candy hearts evoke that particular childhood flutter of handwriting on tiny sugary pieces. The matte finish and rounded edges create a playful mosaic that catches a casual glance and holds it for a moment.
I smiled the first time a guest read the tiny phrases and laughed; the wreath felt like a shared wink. The color palette leans sugary and light, and the small, tactile tiles give the piece a joyful presence that brightens an entry niche or kitchen corner.
Steps
- Collect candy heart candies or candy-like resin shapes for durability and color consistency.
- Arrange the candies on a heart-shaped base and adhere them with strong craft glue in tight clusters.
- Fill the center and edges for a full, mosaic look, adjusting colors for playful balance.
- Allow the glue to cure fully before displaying on a protected surface to avoid melting.
Succulent Heart Wreath: Green, Textured, Unexpected

Succulents bring a sculptural, living quality that feels surprisingly grounding for a heart shape. Their plump leaves and varied tones create a tactile quilt across the surface, with light glancing off waxy skin.
I found the arrangement soothing, a small living landscape that invited quiet inspection. The contrast between compact rosettes and trailing stems added dimension, and even in low light their forms read as compact sculptures.
The finished wreath carried a calm, organic presence that felt modern but gentle.
Steps
- Prepare a heart-shaped foam or moss base that can retain moisture for live succulents.
- Position larger succulent rosettes first and press smaller cuttings into the base to create a dense surface.
- Tuck in trailing stems around edges for variation and visual flow.
- Mist lightly and place in a bright spot away from direct harsh sun to help the succulents settle.
Twig Heart Wreath with Winter Bark Texture

Twigs provide a breathy, linear texture that reads like a field of tiny branches frozen into a shape. The bark whispers of walks in the cold air, and the slight irregularity of each twig gives a hand-collected charm.
I remember gathering sticks on a blustery afternoon and later arranging them into a spiky, rhythmic surface that caught highlights and shadows. The resulting wreath felt woodsy and honest, its silhouette crisp against a pale wall while the bark texture invited a closer look from guests.
Steps
- Collect straight twigs and trim them to similar lengths for a uniform edge.
- Attach the twigs side by side onto a heart-shaped base using hot glue or wire to hold them in place.
- Fill in gaps with smaller twigs or moss for a cohesive look.
- Add a simple hanging loop made from twine or thin wire at the back.
Book Page Heart Wreath for Literary Lovers

Pages folded into tiny cones or petals create a delicate, papery bloom that feels quietly bookish. The faint print shows through like a whisper of stories, and the creamed edges hold a gentle patina that reads as thoughtful.
I once made one from a paperback I loved, and placing it near a reading chair felt like a small tribute. Its faint rustle in a draft and the soft, aged scent of paper made it a particularly intimate piece for a study or a cozy nook.
Steps
- Remove pages from an old book and fold them into cones or petals for texture.
- Attach the folded pieces tightly to a heart-shaped base in overlapping rows to conceal the backing.
- Continue until the surface is fully covered and the heart shape reads clearly.
- Optionally add a small ribbon or tag referencing the book for a personal touch.
Cookie Cutter Heart Wreath with Rustic Metal Charm

An arrangement of metal cookie cutters turned into a wreath felt playful and a little nostalgic, like holiday baking memories shaped into décor. The cool gleam of metal contrasts with warm room light, and each cutter holds a tiny reflection that shifts as you move.
I enjoyed the way the shapes nested and overlapped, creating little negative spaces that read almost like abstract windows. The overall impression felt industrious and homey, a subtle nod to kitchens, family recipes, and the small rituals of sharing baked goods.
Steps
- Gather a mix of heart-shaped cookie cutters in varied sizes and finishes.
- Arrange the cutters on a heart-shaped backing or layer them directly into a heart outline, overlapping for visual interest.
- Secure each cutter with a strong adhesive or thin wire wrapped discreetly at the back.
- Optionally add a ribbon loop for hanging and polish any fingerprints from the metal surfaces.
Fabric Scrap Braided Heart, Colorful and Tactile

Braiding strips of leftover fabric produced a heart with a lively, woven personality. The stitched textures and frayed edges read as comfortable and earnest, and the braided ridges caught highlights in an inviting way.
I liked the resourceful aspect of using scraps that otherwise lingered in a basket, the color play turning remnants into a coherent pattern. The piece felt like a cozy patchwork of memories, each strip carrying a hint of where it originally came from, and the surface invited a friendly, tactile interaction.
Steps
- Cut fabric scraps into equal-width strips and knot or secure them at one end.
- Braid sets of strips together until long, then form and glue or sew the braids onto a heart-shaped base in concentric or woven patterns.
- Tuck and secure braid ends neatly at the back of the base.
- Add a small hanging loop and trim any stray threads for a tidy finish.
Doily Lace Heart Wreath with Soft Pastel Hues
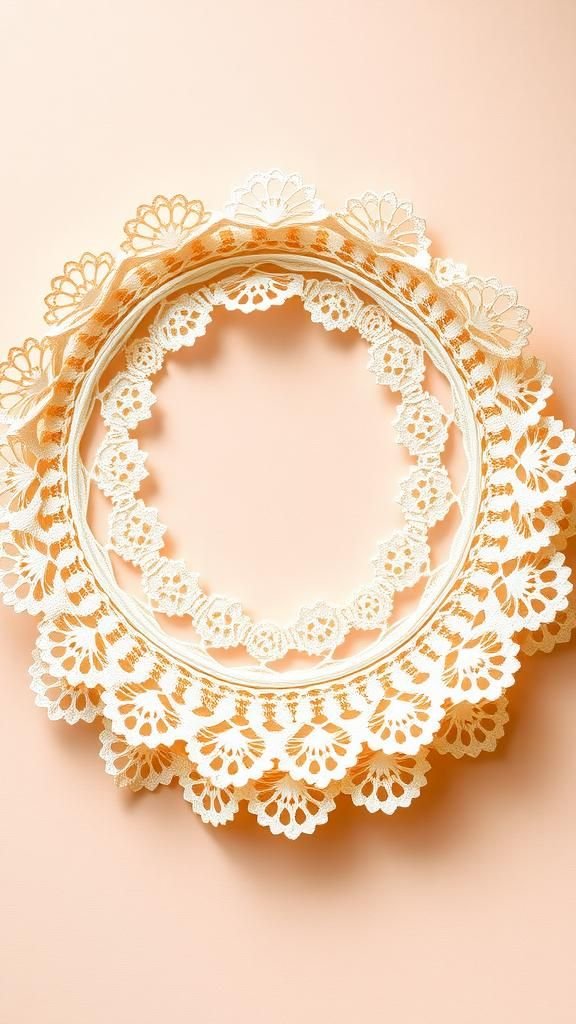
Doilies layered gently over one another read like delicate snowdrifts of lace, their tiny cutwork catching and holding light. The resulting heart feels airy and feminine, a little like a pressed memory of tea and soft chatter.
I often arranged them so the patterns hinted at floral forms, letting a faint pastel peek through for gentle contrast. The piece felt whisper-soft on a door, and the lace edges cast lacey shadows that changed with the day, adding a quiet, elegant movement to an otherwise still wall.
Steps
- Collect paper or fabric doilies in coordinated sizes and pastel tones.
- Layer and overlap the doilies on a heart-shaped backing, arranging them so edges form an appealing pattern.
- Secure layers with small dabs of glue at overlapping points.
- Attach a delicate ribbon for hanging and press gently to set the composition.
Beaded Wire Heart Wreath that Shimmers Subtly
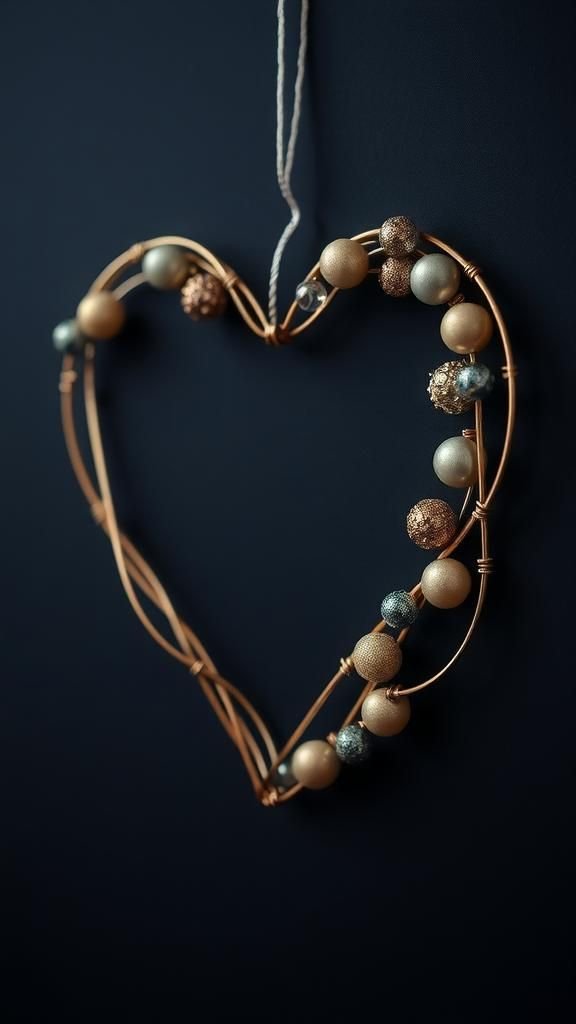
Thin wire threaded with beads creates a light, airy framework that sparkles when it catches a passing ray. The beads slide into small clusters, offering a gentle tinkling sound when handled.
I assembled a similar piece while listening to a slow record, and the tiny reflections felt like little musical notes against the wall. The composition can read modern or romantic depending on bead choice, and the open structure allows the background to become part of the design, creating a refined, delicate presence in a room.
Steps
- Shape pliable wire into a heart outline, reinforcing where needed with wrapping wire.
- Thread beads onto thinner wire and wrap these beaded strands around the heart frame in decorative patterns.
- Secure ends of beaded strands neatly at the back to prevent slipping.
- Add a small loop for hanging and adjust bead spacing for a balanced shimmer.
Sequin Glam Heart Wreath for Sparkly Displays
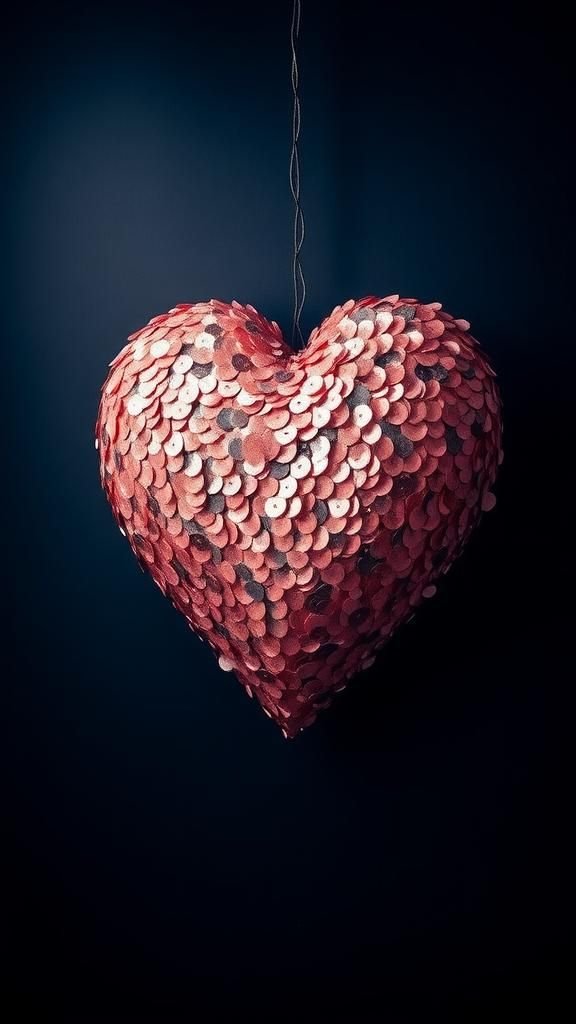
A field of sequins creates a lively, reflective surface that seems to move with ambient light. Each tiny disc adds a pinpoint of sparkle, and together they can read festive or modern depending on color choices.
I remember holding the wreath under a lamp and watching it shift from subtle shimmer to a near-sparkle as the angle changed. The texture felt sleek under my palm, smooth with a hint of the catch where sequins overlapped.
The overall look brings a flair that feels playful and celebratory.
Steps
- Choose sequins in a cohesive color palette and prepare a heart-shaped backing.
- Glue or sew sequins onto the base in overlapping rows for dense coverage.
- Continue until the entire heart is covered and trim any excess backing.
- Attach a discreet hanger and check the surface for uniformity.
Pressed Flower Heart Wreath with Vintage Fragrance

Pressed flowers lie flat yet carry a fragility that feels like a preserved sigh. Their faded hues and papery texture evoke old letters and seasonal walks, and the surface reads intimate and thoughtful.
I once pressed wild blooms over a summer and later arranged them into a heart that smelled faintly of dry grass and sun. The wreath felt like a small, botanical snapshot of a day, its petals layered like fragile ornaments that rewarded careful, quiet viewing and lent a gentle, floral hush to a room.
Steps
- Press fresh flowers between heavy books or a flower press until fully dried and flat.
- Arrange the pressed blooms on a heart-shaped backing, overlapping edges for a collage effect.
- Adhere the flowers with archival glue and seal gently with a clear, matte medium if desired.
- Allow to dry fully and mount in a protected spot away from direct sunlight.
Mini Ornament Heart Wreath for Festive Continuity

Tiny ornaments clustered into a heart create a reflective, celebratory surface that hints at both holidays and everyday cheer. The little bulbs catch fragments of surrounding color, painting the wreath in highlights.
I found a quiet joy in sorting ornaments by size and letting small mirrored pieces nestle together, the overall shape feeling like a compact festival. The mix of glass, matte, and metallic finishes added texture contrast, and the compact scale made it suitable for a mantel corner or as a playful kitchen accent.
Steps
- Gather a collection of small ornaments in harmonized colors and finishes.
- Arrange them on a foam heart base, pressing or gluing each ornament into place to form a dense cluster.
- Fill gaps with tiny beads or miniature accents for a full look.
- Secure a hanging loop at the back and handle the finished piece with care to avoid scratches.
Map-Pattern Heart Wreath for Wanderlust Sentiment
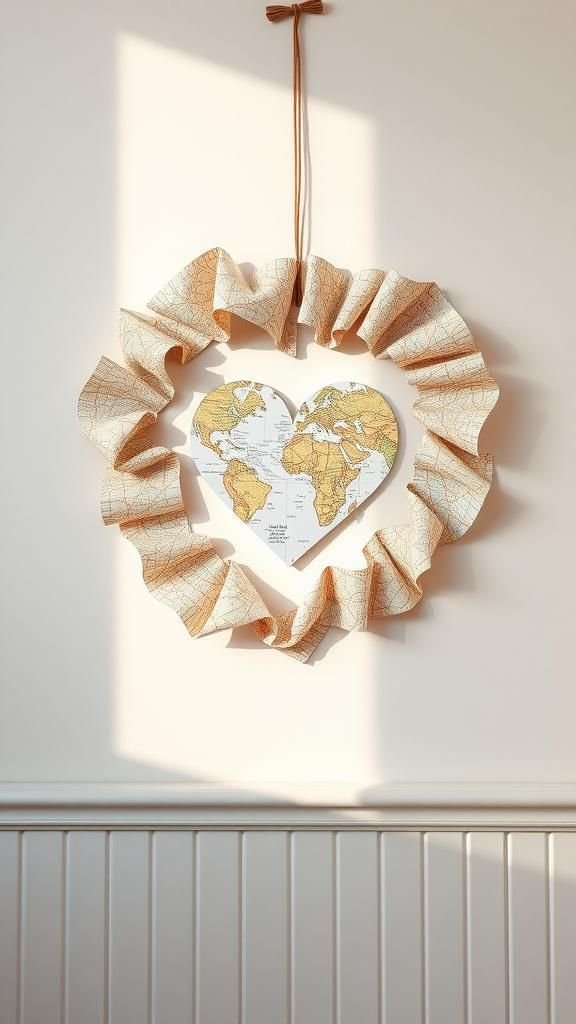
Torn strips of map paper bring a cartographic charm that reads like memories of places past. The thin, printed paper curls slightly at the edges, adding a weathered texture that is quietly adventurous.
I made a similar piece after a road trip and enjoyed how small city names peeked through, each fragment a tiny reminder of routes and detours. The palette tends toward pale blues and creams, and the collage-like surface feels personal, an understated nod to travel and the idea of home as a moving target.
Steps
- Cut or tear old maps into strips and roll or fold them into small tubes or petals.
- Attach the map elements to a heart-shaped base in overlapping rows to create coverage.
- Emphasize areas of maps that show meaningful place names for a personal touch.
- Seal lightly with a matte medium if desired and add a loop for hanging.
Origami Heart Wreath with Crisp Paper Geometry

Crisply folded origami hearts introduce a rhythmic geometry that feels tidy and satisfying. The sharp folds create a pattern of light and shadow that reads architecturally, while the small repeating units form a larger, harmonious heart.
I found the process calming, the tiny creases stacking into a single, precise silhouette. The surface has a quiet, mathematical beauty, and when a few patterned papers are mixed in the overall effect becomes unexpectedly warm, like a mosaic of little intentions bound by paper and patience.
Steps
- Fold multiple origami hearts from paper in coordinated colors and patterns.
- Arrange and glue the hearts onto a sturdy heart-shaped backing in tight rows for full coverage.
- Ensure consistent orientation for a clean geometric look or vary orientation for movement.
- Attach a ribbon or cord at the back for hanging.
Grapevine Heart Wreath with Twinkling Light Accents
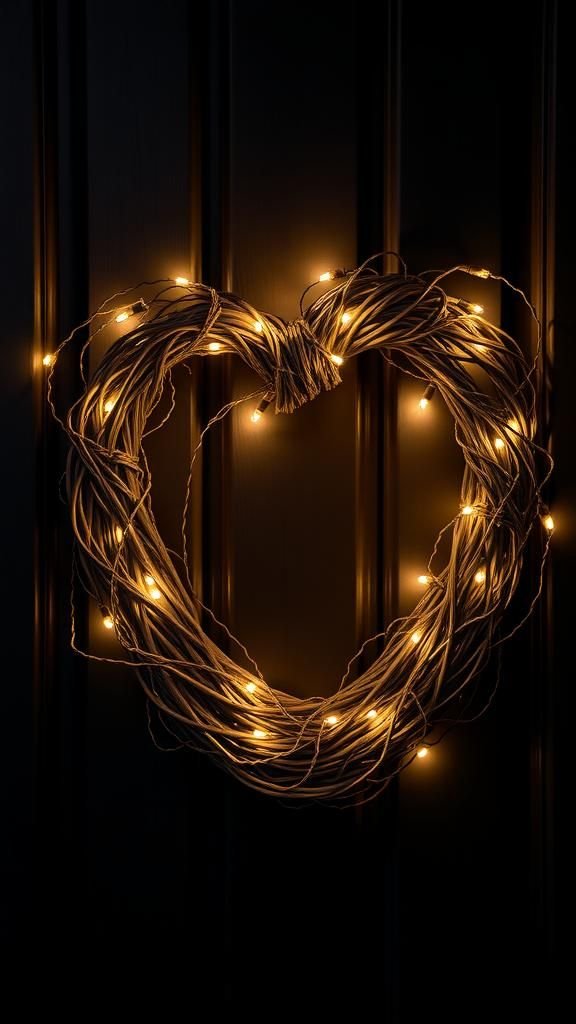
A grapevine base reads rustic and organic, its twisted loops catching soft highlights and lending an earthy backbone to any adornment. When tiny lights are woven through, the whole piece gains a gentle glow that feels intimate at dusk.
I remember the slow pleasure of tracing the vine with a strand of warm bulbs, the light settling into nooks and casting mottled shadows on nearby walls. The finished wreath had a natural silhouette that felt both outdoorsy and warmly domestic, perfect for low light moments.
Steps
- Form or select a grapevine heart base and inspect for loose ends.
- Weave a strand of battery-powered fairy lights into the vine coils, spacing them evenly.
- Add optional accents like dried flowers or ribbon tucked into the vine for texture.
- Secure the battery pack discreetly at the back and test the lights before hanging.
Table of Contents