I always end up with a pile of stray leaves, twine, and tiny pumpkins after Thanksgiving prep, and those bits turn into the best table moments. Making DIY Thanksgiving table decor crafts became my favorite quiet hobby, the kind that fills the kitchen with cinnamon and the table with personality.
There’s something cozy about hand-tied napkin bundles and candlelit jars that feel like tiny stories.
These DIY Thanksgiving table decor crafts are simple ideas I’ve tried and loved, each one bringing texture, scent, and little smiles to the meal.
Mini pumpkin name holders for each setting

I like the smallness of these pumpkins, the way their ridges catch candlelight and the subtle matte sheen of their skin. Sitting on a wooden table, they feel weighty yet delicate, a little natural sculpture that signals the season.
I remember a year when guests admired the tiny stems and joked about pumpkin spice, and that laughter has stuck with me. The round shapes pair well with linen napkins and the faint earthy scent blends with roasting bread and clove-scented candles.
Steps
- Hollow a tiny pumpkin lid with a small spoon to make a name-card slot.
- Write each guest name on a card and slide it into the slot.
- Place pumpkins at each setting and tuck a sprig of green behind the card.
Leaf-printed linen napkins with gentle texture
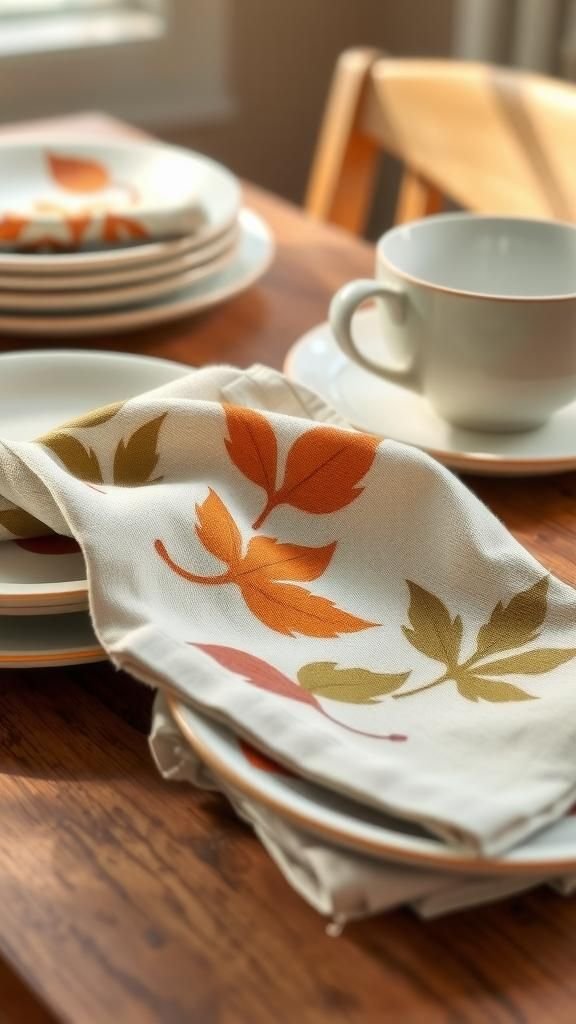
There’s a satisfying whisper when linen napkins brush together and leaf prints add visual warmth like a quiet echo of the yard. My favorite ones have slightly uneven ink edges and a faded look that feels lived-in.
The cool, textured fabric contrasts with a glossy ceramic plate and makes the table feel thoughtful rather than fussy. I imagine guests lifting them and noticing the tiny veins of the prints, commenting on how the pattern feels both seasonal and soft.
They bring an outdoorsy calm to the place setting.
Steps
- Lay a flat linen napkin and place a fresh leaf on top.
- Dab fabric-safe ink onto the leaf and press with a rolling motion to transfer the design.
- Lift carefully and allow the napkin to dry fully before placing on the table.
Mason jar candle centerpieces with fairy lights

Mason jars glow in that friendly, casual way that makes a large table feel intimate. There’s a soft hum when the fairy lights nestle inside glass, and the light scatters through little imperfections in the jar for a warm, vintage glow.
I like the contrast between clear glass and rust-colored leaves tucked around the rim, and the subtle clink of glass when someone shifts a jar closer. The scent nearby of wax and woodsmoke from other candles rounds out the atmosphere, making the whole table feel wrapped in warmth.
Steps
- Coil a short string of battery-operated fairy lights and place them inside a clean mason jar.
- Add a few dried leaves and small pine sprigs around the light string for texture.
- Close the jar and set it on a linen square at the table center.
Burlap runner intertwined with dried blooms
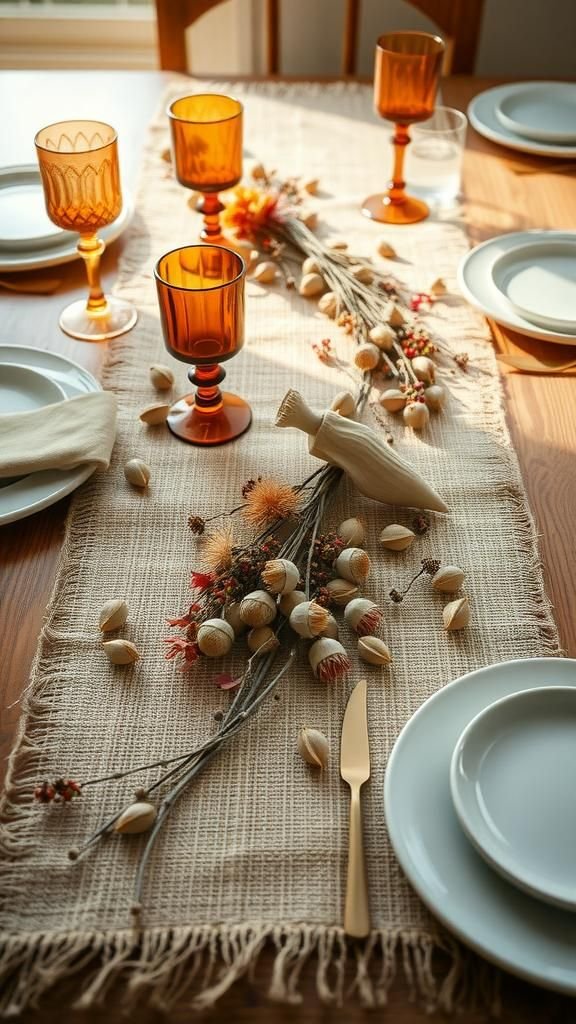
The burlap runner lays across the table with a grainy, tactile presence that makes everything feel a little more grounded. I like how dried blooms—tiny strawflowers and seed pods—add brittle rustles when the table shifts.
The runner smells faintly of hay and canvas, a rustic counterpoint to smooth ceramic bowls. When I lean close, the petals seem to hold stories of summer turned gentle, and the muted tones of dried flowers bring a soft, understated richness that pairs well with darker wood and amber glassware.
Steps
- Unroll burlap to the desired length and lay it along the table center.
- Scatter small clusters of dried flowers and seed pods along the runner.
- Tuck twine or thin ribbon around select bunches to hold them in soft clusters.
Cinnamon stick candle rings for cozy scent
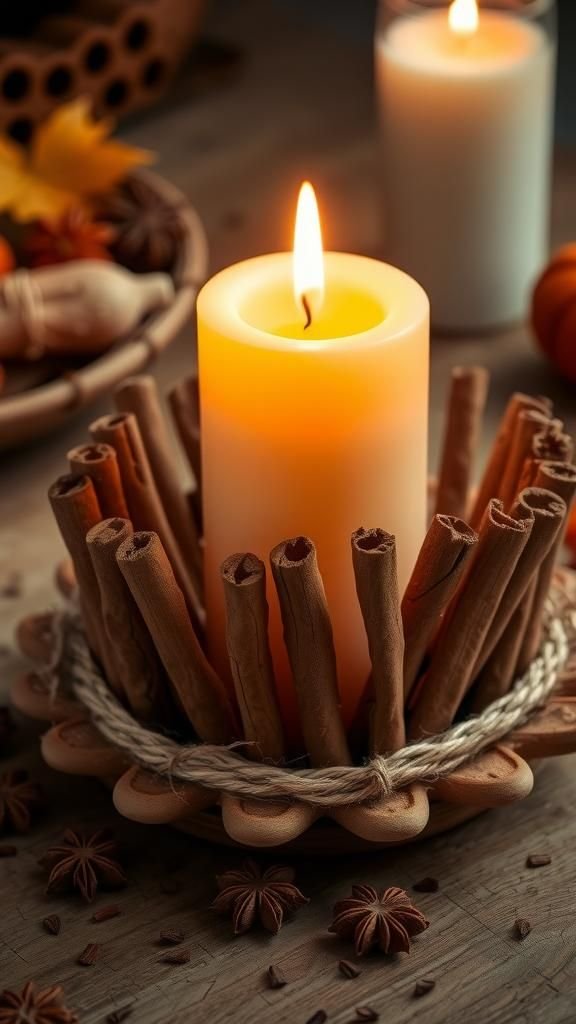
Cinnamon sticks bring an immediate warm spice that fills a room without shouting. Arranged around a pillar candle, the sticks have a knobby, woody texture and release whispers of baking memories each time a flame flickers.
I remember leaning over to inhale and feeling like the kitchen had become a spice cabinet from childhood. Their warm brown color and bundled look create a simple, almost herbal ornament that sits low enough to leave sightlines open while still gifting the air with gentle spice.
Steps
- Gather cinnamon sticks and arrange them upright around a pillar candle base.
- Bind the cluster with twine, wrapping snugly so the sticks hold together.
- Center the bound ring under a candle and trim excess twine for a neat look.
Apple tealight holders with glossy skin

Apples have a cool smoothness under fingertips and a glossy sheen that catches light in a friendly way. Hollowed slightly and fitted with a small tealight, they send a tiny halo of light through red or golden skins.
The scent is subtly sweet and sharp at once, a gentle contrast to heavier spices nearby. I liked how guests paused to admire the flicker trapped inside a fruit, and how the table felt a little brighter and juicier with those small glowing orbs scattered between plates.
Steps
- Trim the top of an apple to create a shallow bowl for a tealight.
- Place a small tealight into the hollow, ensuring it sits stable.
- Arrange apples along the table, keeping them away from flammable items.
Corn husk napkin wraps with soft grain
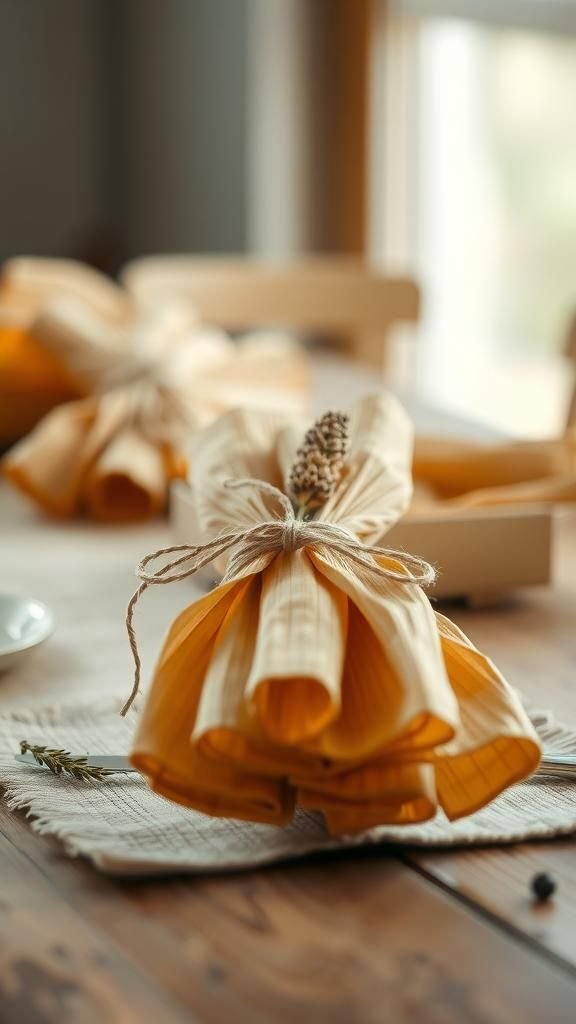
Corn husks have a papery grain that rustles when handled, a texture that feels both fragile and homey. Wrapping a cloth napkin in a husk introduces a prairie note to each setting that pairs nicely with earthenware.
The pale straw color warms up white linens and echoes the harvest outside the window. I can almost hear the husks whispering when they move and remember a day when an older relative smiled at the nod to simpler feasts.
The look is gentle and quietly seasonal.
Steps
- Soak husks briefly to make them pliable, then pat dry with a towel.
- Wrap each napkin with a single husk and secure with thin twine.
- Tuck a small dried flower or herb into the twine for contrast.
Acorn and pinecone scatter for natural charm
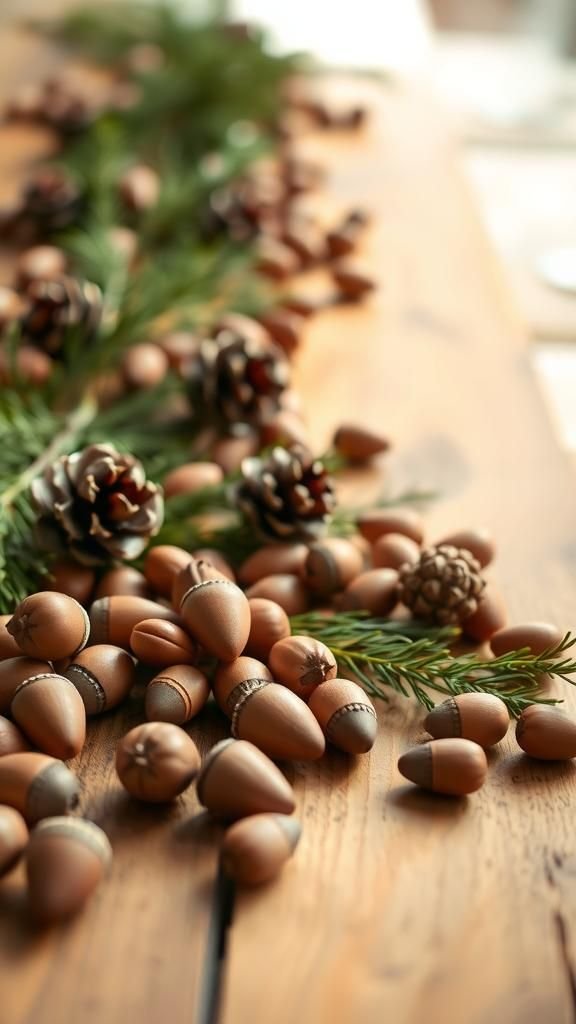
Scattering acorns and tiny pinecones across a table adds a playful woodland element that crunches softly under hands and plates. Their hard shells and woody textures contrast with smooth glass, and the tiny caps of the acorns are almost like miniature hats.
I like the way light glints off a glossy acorn next to a matte ceramic plate, and how the scent of pine seems to ride the air without overpowering. Guests often reach to pick one up and admire the small imperfections that make each piece unique.
Steps
- Collect clean acorns and small pinecones, brushing off debris.
- Arrange them loosely along the table center, mixing sizes for interest.
- Add a few sprigs of evergreen for color and keep walkways clear.
Wheat stalk bundles tied with rustic twine
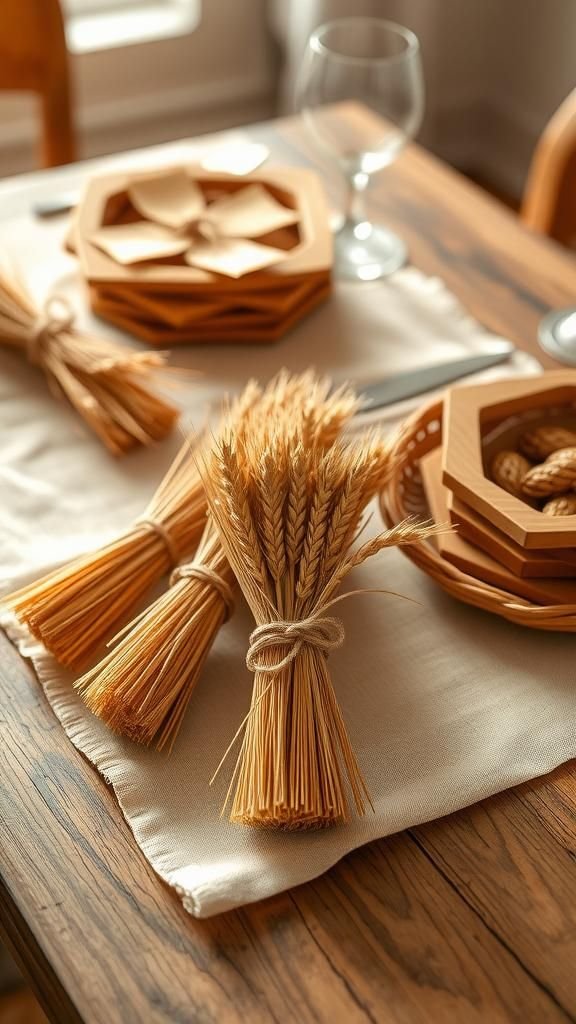
Wheat stalks are thin and whispery, their heads like miniature golden brushes that catch light in a mellow way. Bundles tied with coarse twine feel like a shorthand for harvest, lightly swaying when the table bumps.
The dry, grainy scent is faint but grounding, and the slender silhouettes add vertical interest without demanding attention. I remember a year when the bundles lined a long farmhouse table and everyone commented on the simple elegance; they made the meal feel rooted and calm.
Steps
- Gather a small handful of wheat stalks and align the heads evenly.
- Wrap coarse twine around the stems and knot securely.
- Trim the ends for even height before laying them along the runner.
Pressed leaf chargers for a flat, earthy layer
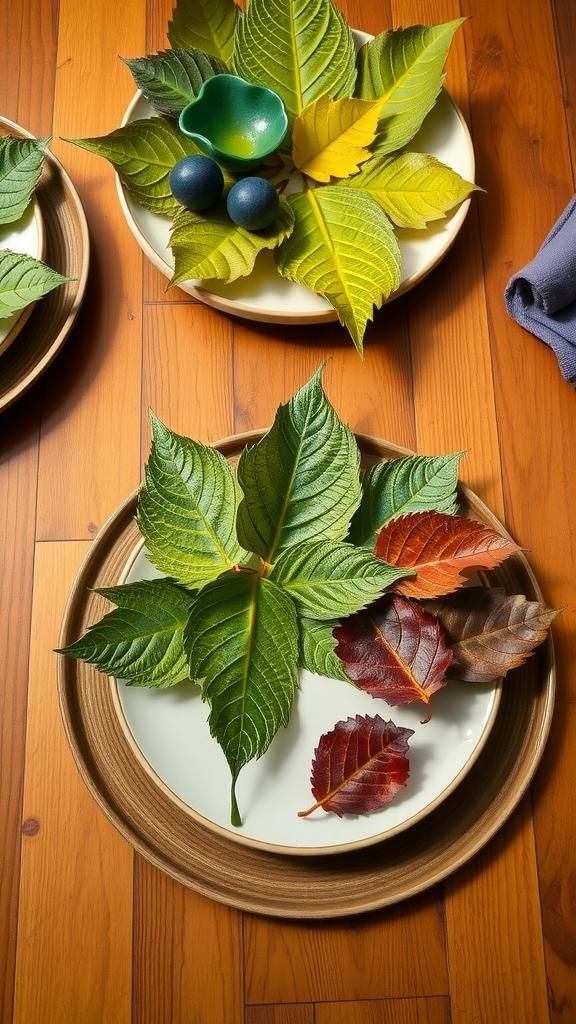
Pressed leaves become thin, papery layers that rest flat against a charger and bring quiet color without volume. When arranged under a plate, their muted veins and brittle edges show as gentle silhouettes, like maps of summer.
I enjoy the way the leaves soften the bluff of ceramic and make each plate look like it belongs to the forest. The touch is delicate under fingertips, and the visual effect is both seasonal and refined, offering a small, personal nod to the trees that were part of the year.
Steps
- Select fresh leaves and press them between heavy books for a couple of days.
- Once flat and dry, position leaves on chargers under each plate.
- Replace any brittle leaves and keep them away from spills.
Twig candelabra centerpiece with forest mood
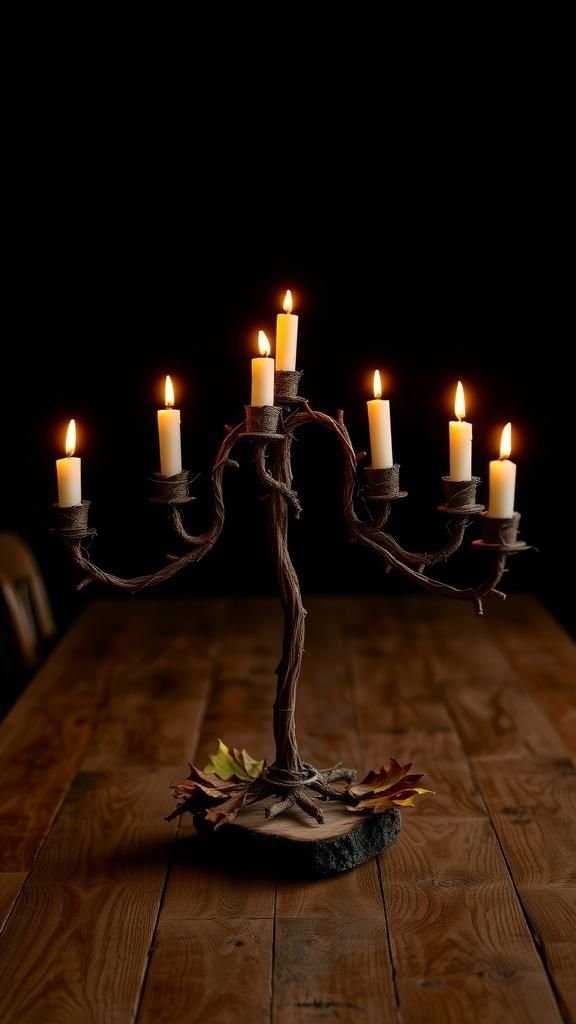
A twig candelabra has a quiet, branching silhouette that feels almost architectural but very natural. The rough bark catches the soft glow of multiple taper candles, and shadows braid across the table in a playful way.
I remember finding a cluster of twigs on a rainy walk and watching them become the focal point, their angular forms offset by round plates. The scent of warmed wood mingles with candle wax, and the whole setup brings a slightly wild, woodland rhythm to a domestic dinner.
Steps
- Select sturdy twigs and arrange them into a stable candelabra shape with a base.
- Secure intersections with floral wire so the structure holds steady.
- Insert taper candles into the sturdy spots and light carefully when ready.
Wine cork napkin rings with rustic charm

Wine corks have a satisfying density and a muted tan color that reads as cozy and approachable. Clustered as napkin rings, they bring a hint of evening conviviality to daylight meals.
I like the scent that lingers faintly of wine cellars and old bottles, and how the rough cork texture contrasts with smooth napkin folds. They feel like a tiny conversation starter, especially when a cork has an imprint or logo.
The little circles sit easily at each place setting and make linen napkins feel a touch more personal.
Steps
- Slice corks lengthwise to create ring sections for napkins.
- Smooth any rough edges with fine sandpaper and clean off dust.
- Secure cork halves together around a rolled napkin with craft adhesive or thin wire.
Pinecone salt and pepper shakers with personality
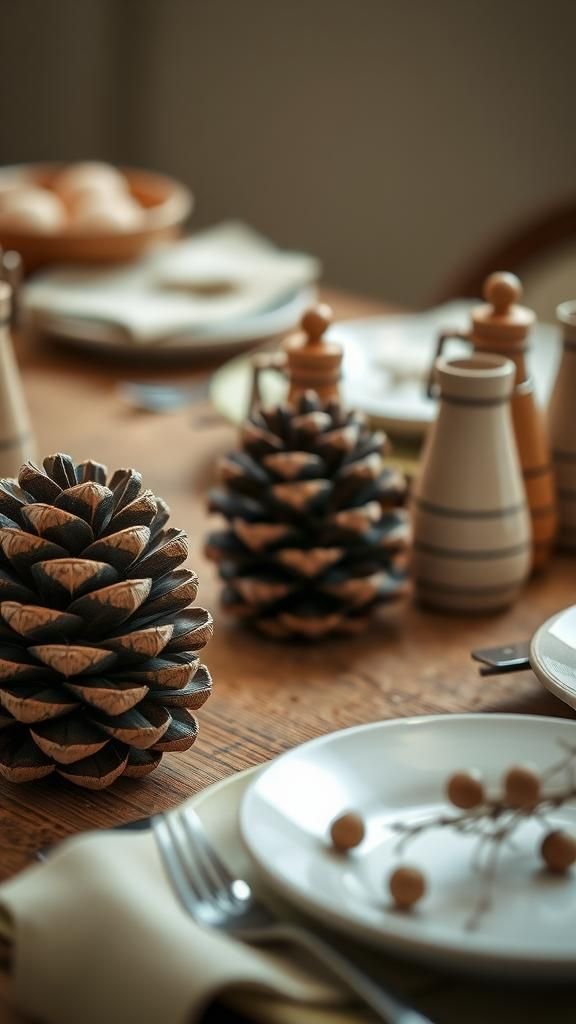
Pinecones have a layered, almost floral structure that seems to whisper woodland secrets. Repurposed as salt and pepper shakers, their scales catch light and shadow, creating a tactile focus at the center of the table.
There’s a dry, resinous scent nearby that reminds me of trails and cool air. Guests often lift them to shake a speck or two and smile at their novelty.
They lend a playful, handmade note without feeling gimmicky, and their matte browns sit well against white plates and brass flatware.
Steps
- Clean and dry pinecones thoroughly to ensure no debris remains.
- Glue or fasten small containers to the base that can hold salt and pepper.
- Label or mark each container so guests know which is which.
Air-dry clay turkey placecards with tiny wings
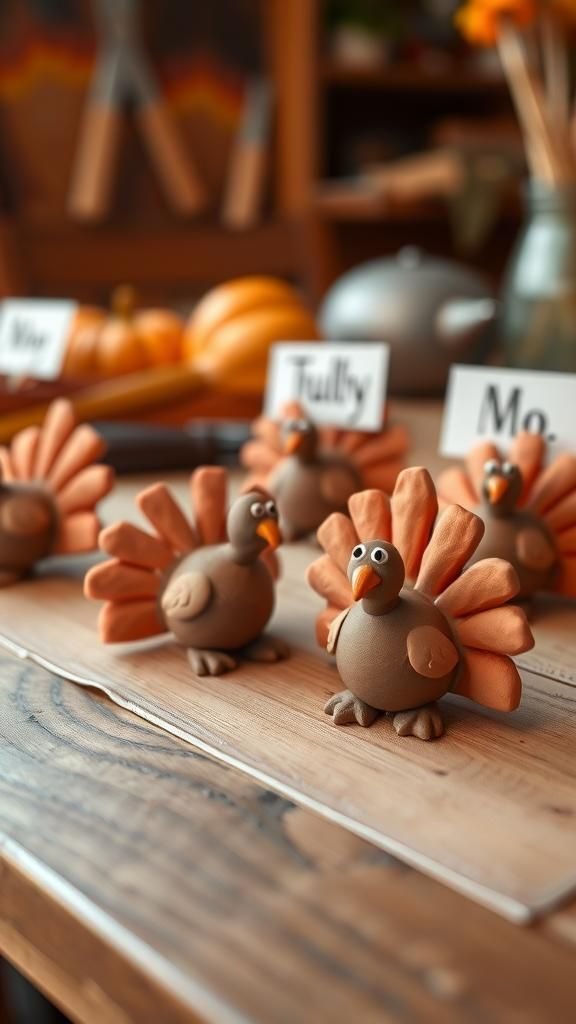
Air-dry clay yields soft, matte shapes that feel like little handmade tokens. Tiny turkey placecards with pinched beaks and feathered tails sit cheerfully at each plate, their surfaces warm under fingers.
I made a batch one afternoon while listening to soft music and enjoyed the quiet repetition of molding small forms. The clay takes ink well, so names look settled and personal.
Those small animals bring a wink to the table, a handmade contrast to polished silverware that often sparks a chuckle from friends.
Steps
- Roll small clay balls and flatten them to form a turkey body.
- Pinch a tail and add a small beak, then press a folded card into the back as a name holder.
- Allow pieces to dry fully and write names with a permanent pen.
Fresh herb favors tied with kitchen twine
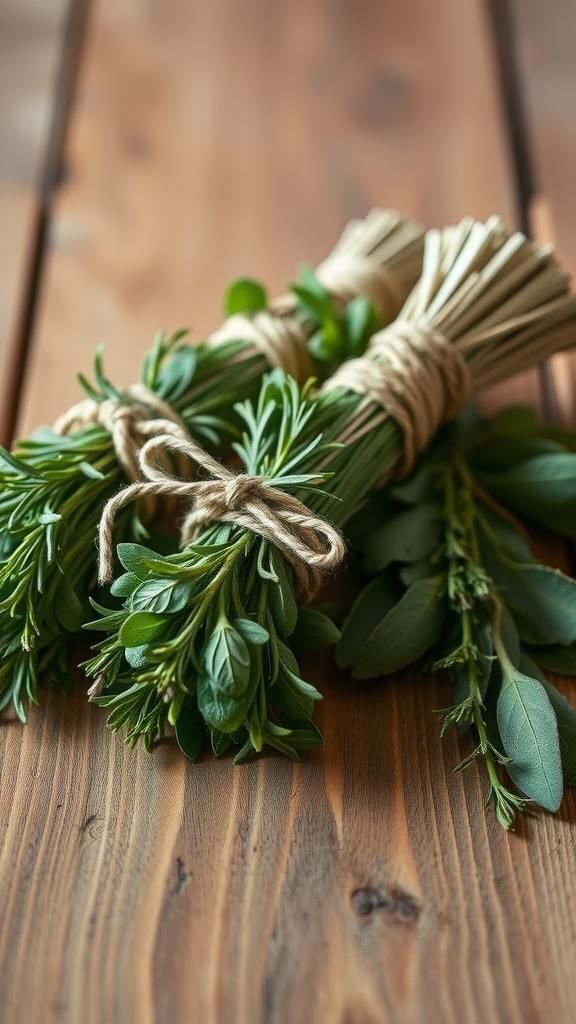
Bundles of fresh herbs smell green and alive, a burst of rosemary, thyme, and sage that lifts the air. Tied with thin twine, they look like tiny gifts that hint at the flavors of the meal.
I remember brushing my fingers against one and feeling the oils release beneath my nails, the scent following me like a memory. These small favors feel generous and practical at once, offering a fragrant take-home that keeps the dinner’s aroma lingering a little longer in pockets and kitchens.
Steps
- Gather small sprigs of herbs and align the stems neatly.
- Wrap kitchen twine around the stems and knot securely.
- Trim stem ends for even length and place a bundle at each seat.
Patchwork fabric runner made from cheerful scraps

A patchwork runner stitches together mismatched fabric scraps into something warm and textural. My grandmother’s cottons sat beside modern linen and tiny checks, and the seams tell a story with soft ridges and thread shadows.
Running across the table, it scatters little pops of color and pattern that keep the eye moving. The fabric has a faint worn softness under hands and its uneven stitches feel homey rather than polished.
It’s a way to reuse cloth with a cozy, lived-in look that invites lingering conversations.
Steps
- Lay out fabric scraps in a pleasing arrangement and sew them edge to edge.
- Press seams flat and add backing fabric for stability.
- Hem the runner edges and lay it along the table center.
Painted gourd centerpiece with soft patterns

Gourds come in curious shapes that beg for attention, their ridges and bumps catching paint in ways that feel playful. A painted gourd with muted swirls or tiny dots transforms a humble object into a little sculptural accent.
I remember a rainy afternoon painting one with soft ochre and slate blue and how the dry brush strokes added a weathered charm. Their matte or slightly glossy finishes offer visual contrast to raw wood, and the colors can be tuned to the rest of the table for cohesion.
Steps
- Clean and dry gourds, then sand any rough patches lightly for a smooth surface.
- Apply base paint and allow to dry, then add accent patterns with a small brush.
- Seal the painted surface with a clear matte finish once fully dry.
Chalkboard place tags for handwritten warmth
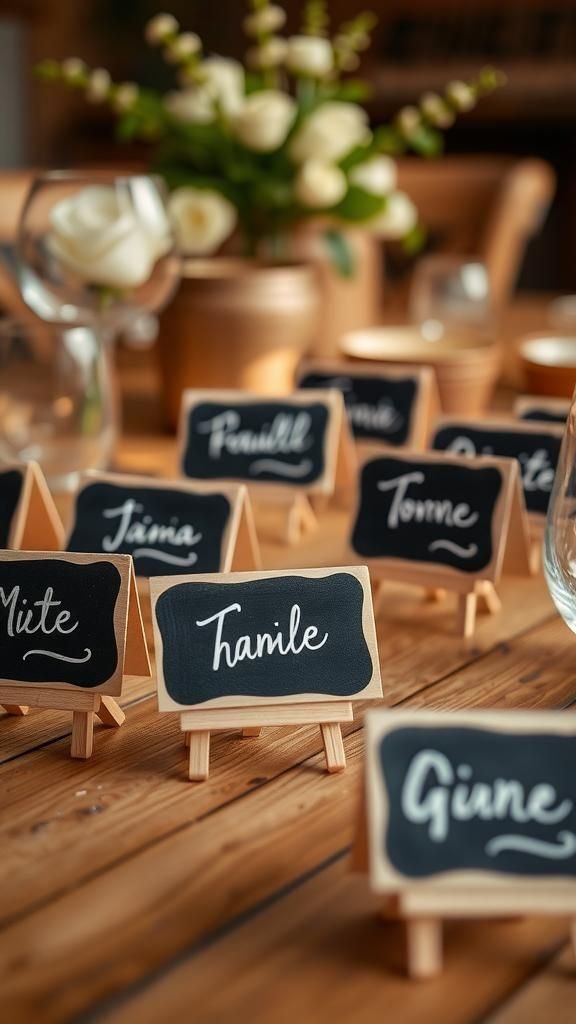
Mini chalkboards have a matte depth that highlights white or colored chalk in a cozy way. Handwriting on them feels immediate, personal, and slightly nostalgic, like a small message left on a kitchen counter.
The texture of chalk against slate produces a soft dust that echoes the feel of flour on a countertop, and the little easels let the tags sit upright without fuss. Guests enjoy seeing their names rendered in unique lettering, and the boards can be wiped and reused for an ever-changing table mood.
Steps
- Cut small rectangles from chalkboard material and sand edges smooth.
- Mount each rectangle on a tiny wooden easel or stand.
- Write names with chalk or a chalk marker and refresh as needed.
Dried orange and cinnamon garland strung across
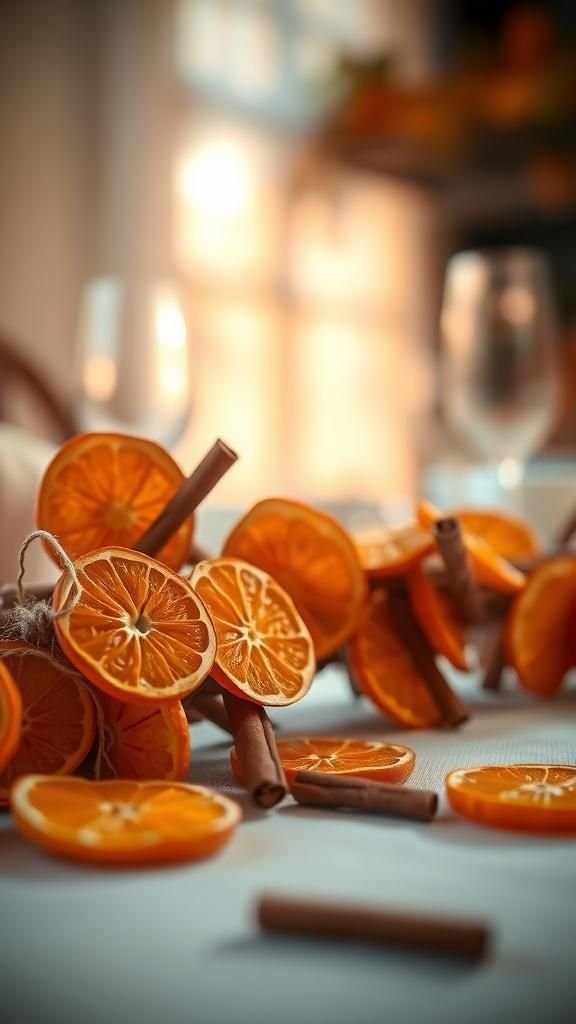
Dried orange slices have translucent centers that glow when light passes through, and cinnamon sticks add linear brown tones with a warm, spicy perfume. Together they create a garland that drapes softly across the table like a fragrant necklace.
The oranges crackle lightly if handled, and the scent of citrus and spice feels celebratory and familiar. I like how this garland brings a bright color contrast to darker linens and how the smell seems to travel across the room, nudging conversations toward fond memories of baking and family.
Steps
- Dry orange slices in a low oven until translucent and slightly leathery.
- Thread a needle with twine and string oranges and cinnamon sticks alternately.
- Hang the garland along the table runner or napkin rings for scent and color.
Feather and leather place settings for texture mix
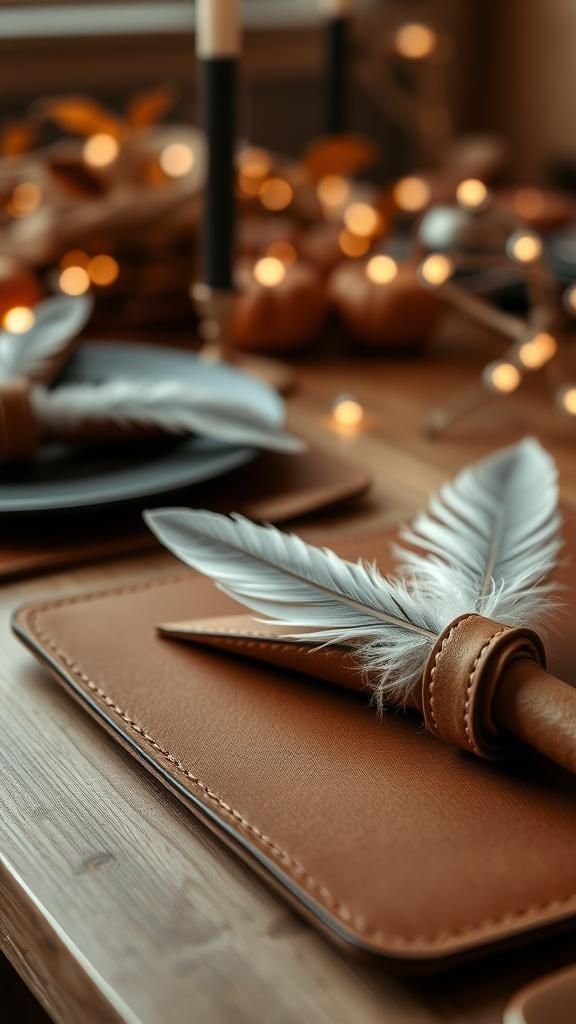
Feathers introduce a soft, airy touch against denser materials like leather, which offers a warm, smooth counterpoint. A leather mat with a tucked feather feels both tactile and unexpected, the soft down contrasting with the firm edge of the hide.
I found that a single feather can lend a playful lightness to a heavy plate and invites fingers to linger. The colors—muted browns, creams, and occasional iridescence—catch low light in subtle ways, giving the setting an artful but relaxed feel.
Steps
- Cut leather into small placemat shapes and edge them neatly.
- Tuck a clean feather under the top edge of each leather piece.
- Position the plate atop and adjust the feather for visual balance.
Mini cornucopia napkin pockets overflowing gently

Tiny cornucopia cones hint at abundance without overwhelming the place setting. When filled with dried berries or a few toasted nuts, they feel like miniature harvests that guests can admire before the main course.
The woven texture of the cones is a soft, repeatable pattern that plays nicely with linen folds, and the small spill of color from contents adds a lively note. I like the quiet whimsy they introduce, how the cones look both festive and modest, inviting hands to reach and smile.
Steps
- Form small cone shapes from craft paper or thin woven material and secure the seam.
- Fill each cone with a few dried berries, nuts, or tiny blooms.
- Slide the cone into a folded napkin pocket at each place setting.
Table of Contents