I have a soft spot for tiny rabbit silhouettes strung across a mantel or window. Making a DIY Bunny Garland felt like an easy way to bring a bit of whimsy indoors; I remember the quiet satisfaction of choosing textures and watching a string slowly fill with little characters.
Over time I tried paper, felt, pom poms and clay, and every variation carried its own charm.
These DIY Bunny Garland craft ideas grew out of playful afternoons, last-minute seasonal decor experiments, and a habit of turning scraps into conversation pieces.
Felt bunnies with soft whisker details

I love the way thick felt feels against my fingertips when a string of felt bunnies hangs in a doorway. Each bunny has a plush, slightly fuzzy surface and the edges keep a cozy, hand-made vibe.
The whisker threads catch the light in a friendly, understated way, and the combination of muted pastels and a few bold pops creates a rhythm that makes me smile. There’s a gentle weight to the garland that keeps it from flapping wildly, and it always manages to look both casual and thoughtfully put together.
Steps
- Trace bunny shapes onto felt and cut along the outlines.
- Stitch edges of two felt pieces together, leaving a gap for stuffing.
- Add a small amount of stuffing, finish stitching, then attach whisker threads and eyes.
- Space bunnies along a length of twine with tiny knots or drops of adhesive.
Paper silhouette bunting for a light touch
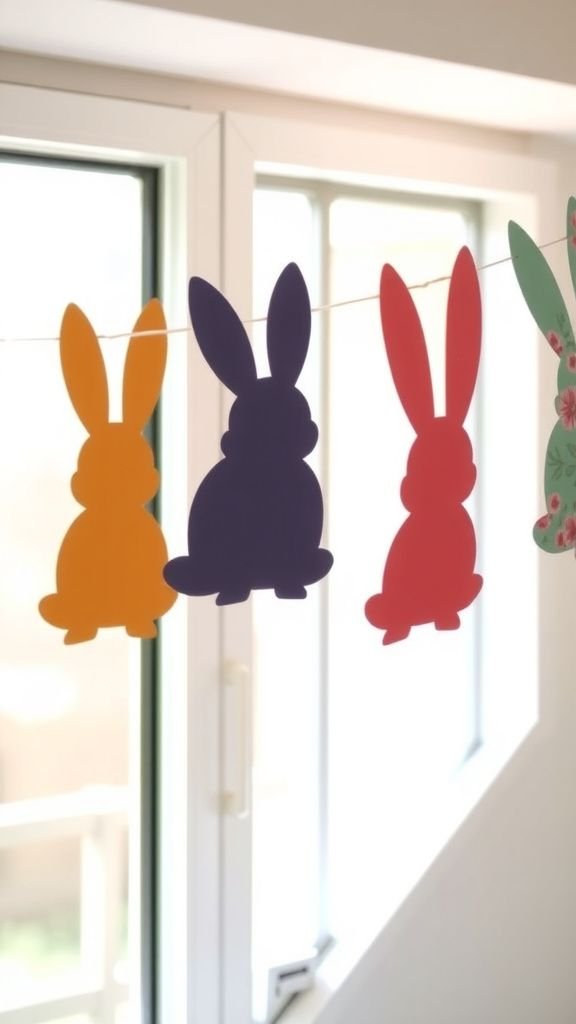
Cut paper bunny silhouettes have a light, airy presence that makes a room feel celebratory without being loud. I remember folding delicate cardstock and watching a string grow into a rhythmic parade of ears and tails.
The crisp edges create a pleasing contrast against textured walls and the way sunlight filters through thinner paper gives an almost stained-glass effect in the morning. Color choices shift the mood from playful to elegant, and a scatter of patterned sheets adds a mischievous energy that always draws a comment from visitors.
Steps
- Fold cardstock and trace a bunny silhouette along the fold line.
- Cut shapes carefully and unfold to reveal mirrored bunnies.
- Punch small holes near the top of each bunny for threading.
- Thread onto baker’s twine, spacing to achieve a balanced rhythm.
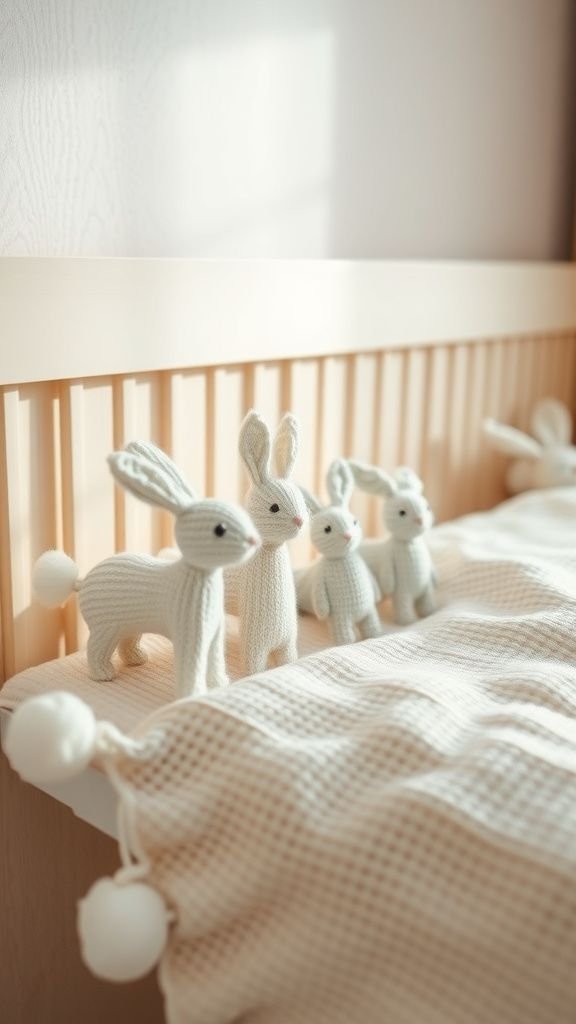
Pompom rabbits with fluffy tails and ears
Pompom bunnies feel like tiny cloud buddies strung together. The tactile, squishy nature of each pompom brings a playful energy; squeezing one elicits a small, silly grin.
Ears made from felt or folded paper add a contrasting texture that keeps the whole garland visually interesting. Light catches the fibers in unexpected ways, giving each bunny a slightly different halo depending on how the pompom was made.
The overall effect reads fun and a bit whimsical, the kind of thing that brightens a shelf or nursery with a soft, tactile charm.
Steps
- Create pompom bodies in chosen colors using yarn and a pompom maker or cardboard.
- Cut ear shapes from felt or stiff paper and secure them to the pompoms.
- Add tiny tails from small white pompoms and glue or stitch in place.
- Thread a strong cord through each pompom grouping, spacing evenly.
Fabric scrap bunnies with mismatched charm
Using fabric scraps gives every bunny a personality. Tiny prints, linen, and velvet sit side by side, each bringing a different sheen and weight.
When sunlight hits a velvet ear it darkens slightly, while cotton prints keep a crisp presence. The mismatched nature feels comforting, like rummaging through a beloved drawer of odds and ends.
There’s a gentle nostalgia to these garlands, as if each bunny holds a memory from another project. The texture mix invites fingers to linger and guests to ask where the pieces came from.
Steps
- Trace bunny patterns onto fabric scraps and cut pairs for front and back.
- Sew around the edges, leaving a small opening for stuffing.
- Add light stuffing and finish stitching, then add simple facial details.
- Secure each bunny along a length of ribbon or cord with small stitches.
Mini clay bunny charms with glazed finish
Baked clay bunnies bring a ceramic quality to a garland that feels a bit more permanent. The cool, smooth surface of glazed pieces contrasts with softer string materials and the gentle weight gives the line a steady drape.
Subtle brush marks in the glaze and faint fingerprints left in the clay speak to hands-on making and lend personality. When light hits a glossy glaze it makes tiny highlights that animate the faces, and grouped together they have a gallery-like presence that still reads homey and low-key.
Steps
- Roll air-dry or oven-bake clay into thin bunny silhouettes and refine shapes.
- Smooth surfaces, add tiny facial indentations, then bake according to clay instructions.
- Apply glaze or acrylic finish after cooling and let dry fully.
- Thread through small holes or wrap thin wire around each charm to secure on twine.
Wooden bunny silhouettes with rustic grain
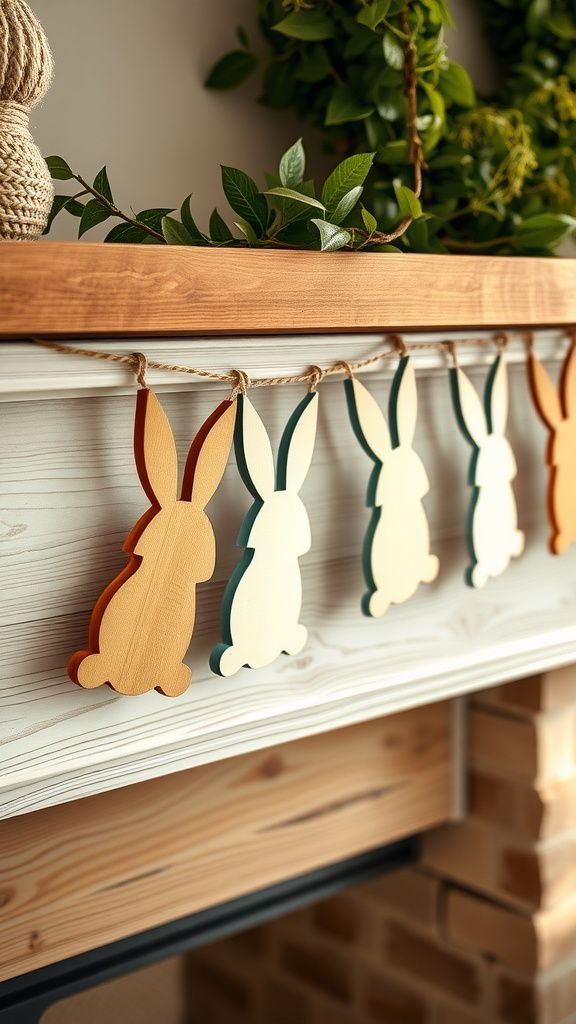
Wooden bunnies have a natural gravitas thanks to grain and weight. The roughness of cut edges paired with sanded faces creates a pleasant contrast I often find myself running a fingertip along.
Each silhouette holds unique patterns in the wood that feel cozy and organic, and a natural oil or light stain warms the tone. Suspended along a thick jute, the garland reads as rustic and grounded, perfect for a farmhouse shelf or a front entry.
There is an evergreen quality to wood that keeps this garland feeling steady through changing seasons.
Steps
- Trace bunny shapes onto thin plywood or reclaimed wood and cut with a scroll saw.
- Sand edges and faces until smooth and apply a light stain or oil for warmth.
- Drill small holes near the top of each silhouette for threading.
- Thread onto jute or twine and tie off ends securely.
Pressed flower bunnies for an earthy look
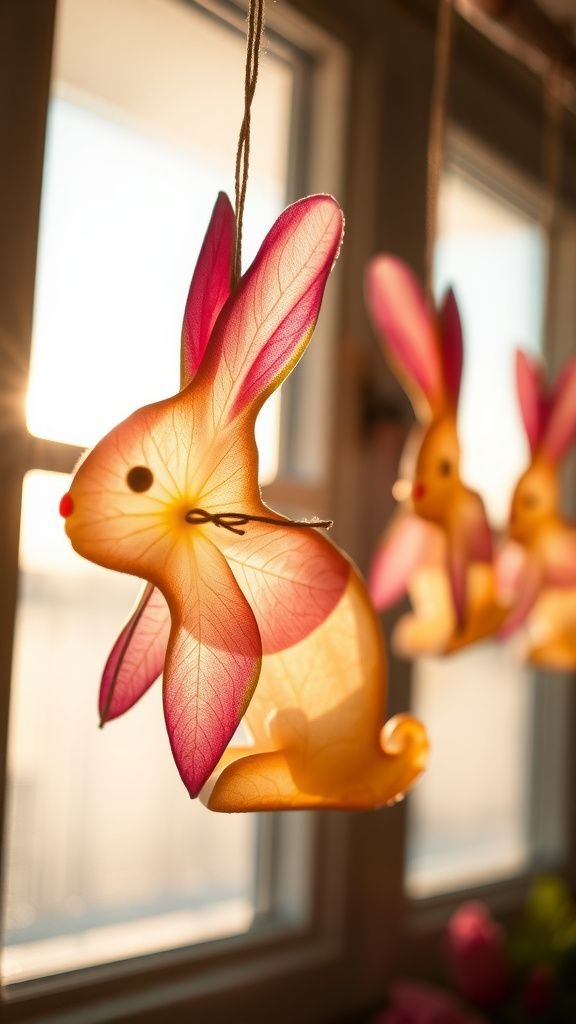
Incorporating pressed flowers into bunny shapes brings a fragile, botanical feel. Thin translucent paper shows the veins of tiny blooms and petals, giving each bunny a quiet, organic pattern.
There’s a fragile hush to the garland that makes me handle it more gently, and a faint dried-sweet scent lingers if the flowers are recent. The light passing through delicate petals creates jewel-like highlights, and the contrast between plant matter and string gives the display a poetic, almost paper-press cabinet feeling that pairs well with sunlit windowsills.
Steps
- Choose and press small flowers and leaves until fully dried and flat.
- Sandwich pressed blooms between two sheets of clear contact film or laminate inside a bunny cutout.
- Trim edges and punch small holes for threading.
- String together with thin twine and hang near a light source.
Watercolor bunny cards strung like postcards
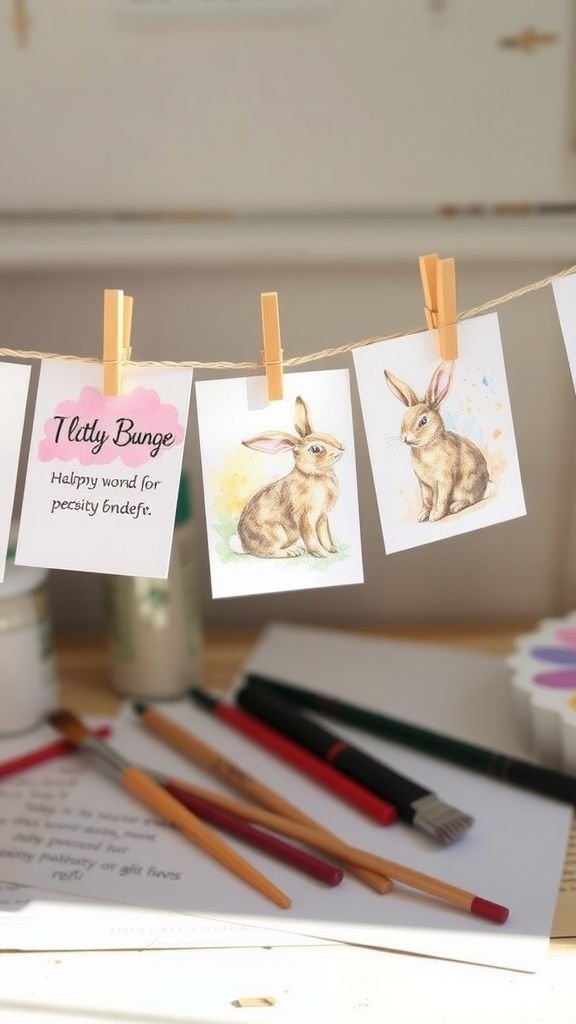
Watercolor bunnies read like tiny works on paper, each one carrying brushy edges and watery gradients. The pigment blooms give ears and cheeks a soft fade that feels painterly and intimate.
When clipped or strung loosely, the cards sway slightly and the irregular paper deckle adds a handcrafted elegance. Sometimes I tuck a tiny handwritten note behind a card, which makes the garland feel like an evolving conversation.
The subtle color variations and paper texture invite a close look and reward a slow appreciation of small, painted details.
Steps
- Paint bunny silhouettes on thick watercolor paper, letting pigment bloom for soft gradients.
- Let papers dry fully, then trim to consistent shapes or leave natural edges.
- Punch small holes or use mini clothespins to attach each card to twine.
- Hang across a shelf or between nails with gentle tension.
Crochet bunny garland with chunky stitches
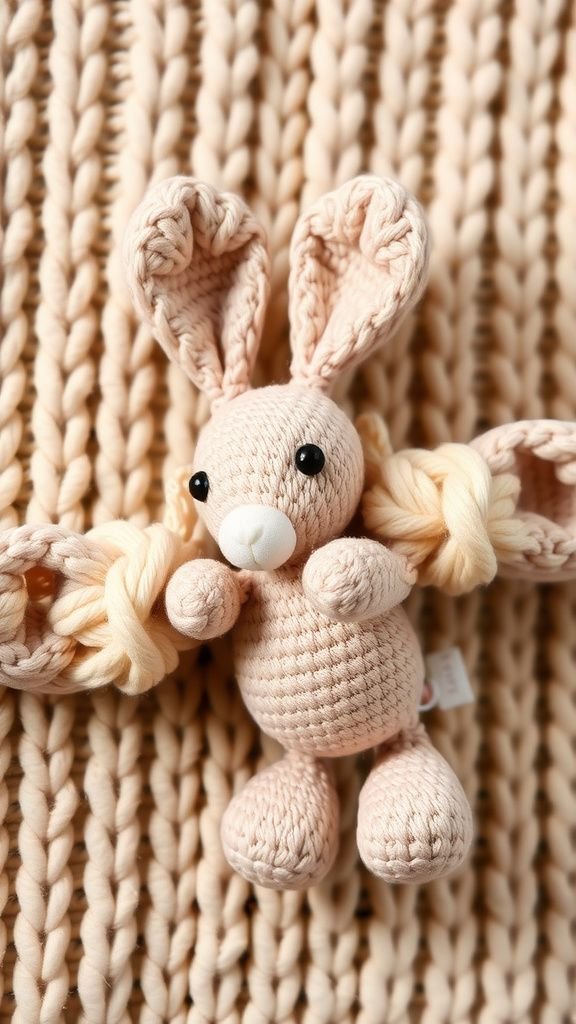
Crocheted bunnies have a knitted warmth that feels like a hug in miniature. The chunky stitches catch light and shadow, making small curves more pronounced.
Each loop and stitch tells of time spent working slowly and the overall result has a comforting handmade rhythm. Yarn color shifts create a pleasing cadence across the length of the garland, and the soft, slightly springy feel makes it child-friendly.
The garland settles into a space, absorbing ambient sounds and giving a room a quieter, hand-crafted presence that drifts between playful and nostalgic.
Steps
- Crochet small bunny motifs using a simple amigurumi or flat pattern in chosen yarn.
- Add embroidered eyes and tiny noses for expression.
- Connect bunnies by crocheting a chain or sewing them onto a long cord.
- Block lightly to set shape if needed and hang where fabric can breathe.
Knitted mini bunnies on a thin garland
Tiny knitted rabbits have a softer, more detailed texture than some other techniques. The subtle ridges of knit and purl give bodies a tender, fabric-like movement, and little stitch imperfections add to the charm.
Held up against light, wool shows a faint halo and a hint of fluff, which makes these bunnies feel lived-in. The garland lays gently over a shelf edge, and the stretch in natural fibers allows it to drape gracefully.
There’s a quiet domesticity to knitted elements that makes rooms feel lived-in and cared for.
Steps
- Knit small flat bunny shapes or tiny stuffed bunnies following a simple pattern.
- Finish edges neatly and add embroidered facial features.
- Secure bunnies at intervals along a length of fine cord by sewing or crocheting ties.
- Drape the garland where the knit can soften with ambient humidity.
Origami rabbit chain with crisp folds
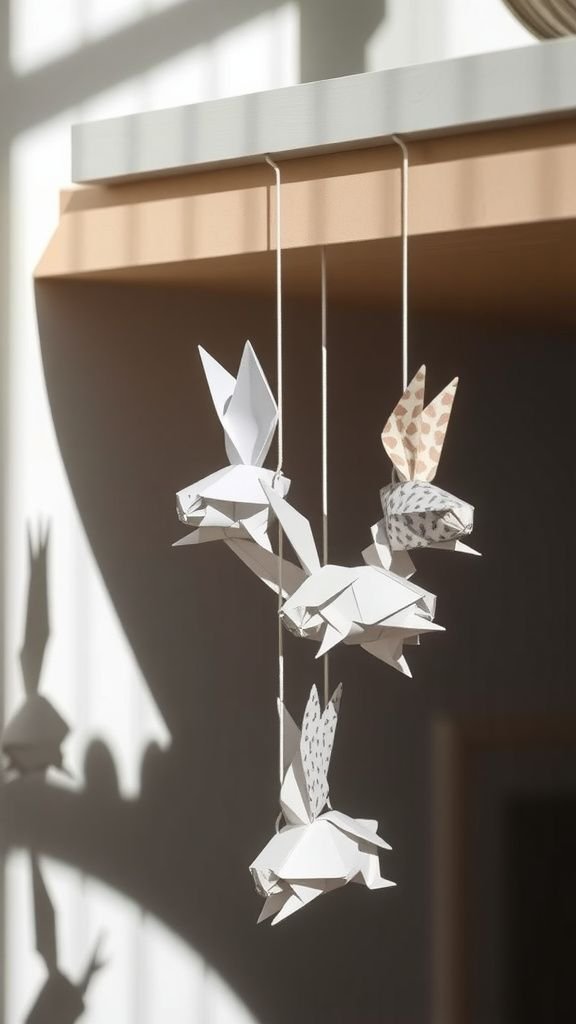
Origami rabbits bring precision and geometry to a garland, each fold creating a crisp ear or tail. The paper’s clean creases respond to light with sharp shadow edges, giving the line a modern, almost architectural look.
I enjoy the quiet discipline of shaping a whole string with a steady hand; the uniformity of folds can be meditative. Patterned paper introduces playful surprises and metallic sheets add a festive gleam.
Hung close to a lamp, the angles cast tiny dancing shadows that make the whole arrangement feel lively and a touch sophisticated.
Steps
- Fold squares of paper into origami rabbit shapes using a consistent folding sequence.
- Ensure creases are sharp and shapes are flattened for neat silhouettes.
- Create small holes or tiny loops in each rabbit for threading.
- Thread onto thin cord or thin chain, spacing according to visual preference.
Nature-inspired twig and moss bunnies
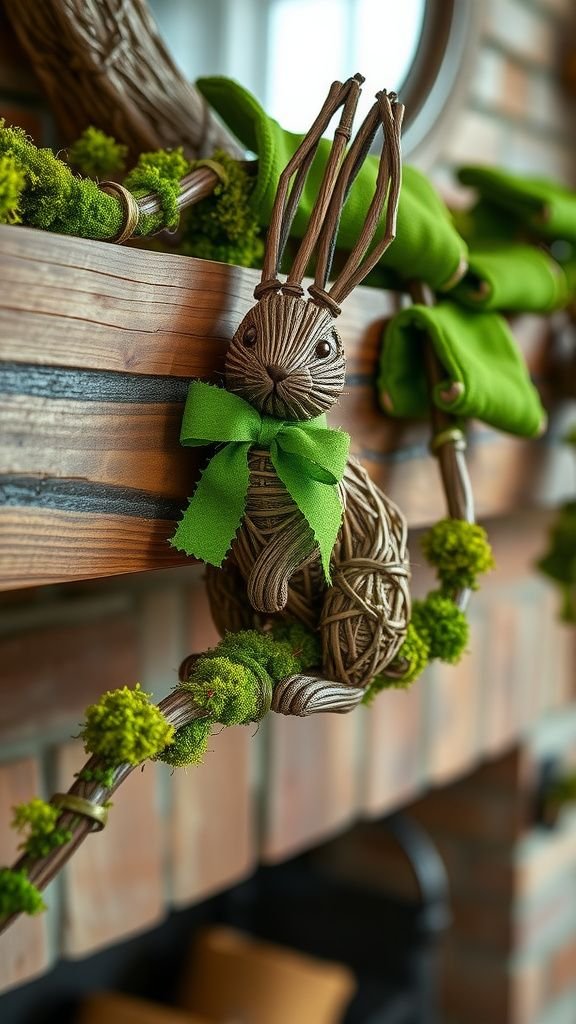
Bunnies built from twigs and moss feel like they wandered in from a woodland corner. The rough texture of twig frames juxtaposed with soft green moss creates a pleasing tactile contrast.
A faint earthy scent tags along on breezy days, and the little irregularities in twig curvature lend each rabbit an almost animated posture. The garland reads as an outdoor find that’s been repurposed for indoor display, bringing an organic, slightly wild energy into a room.
It pairs well with stone or clay planters for a cohesive natural vignette.
Steps
- Form small twig frames into bunny silhouettes and bind joints securely with thin wire.
- Press preserved moss onto frames with craft adhesive or wire wraps.
- Trim stray pieces for a tidy profile and let dry fully.
- Thread lightweight cord through frames to create the garland and hang in a shaded spot.
Beaded bunnies with shimmering accents
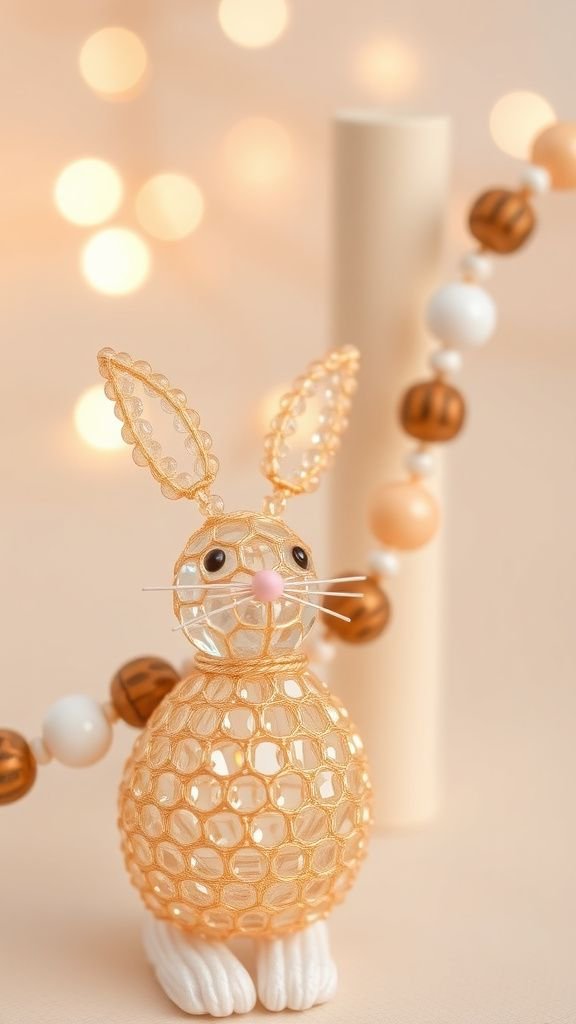
Beaded bunny garlands have a sparkling, delicate presence that catches the eye without shouting. Glass seed beads wink when they catch a stray beam of sunlight and metallic accent beads add a subtle flash.
The tactile sensation is smooth and cool, and the string makes a faint clinking sound when shifted. Color combos can swing from muted and elegant to playful and bright, making the garland flexible for different moods.
Strung along a narrow cord, the line shimmers like a tiny jewelry display, bringing a refined yet whimsical touch to any shelf.
Steps
- Create bunny shapes using bead weaving techniques on thin beading thread.
- Secure thread ends and reinforce key connection points for durability.
- Add metallic accent beads for ears or tails as desired.
- String beaded bunnies onto a strong cord and knot between each piece.
Lace and doily bunnies with vintage vibe
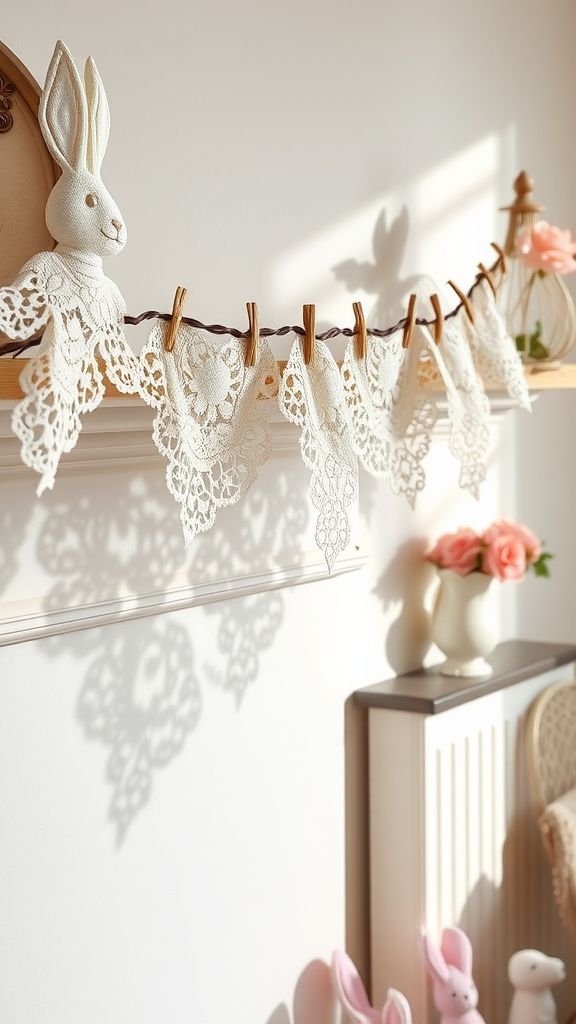
Lace bunnies feel like heirlooms, their delicate patterns reminiscent of vintage linens. The openwork of doilies creates a lacy silhouette where light and shadow play across intricate motifs.
There’s a faint papery smell and a crisp texture that contrasts nicely with a soft ribbon or chain. When hung, the lace flutters ever so slightly, casting filigree shadows onto the wall.
The overall impression leans romantic and nostalgic, the kind of garland that makes a reading nook feel like a quiet, storied corner of a house.
Steps
- Cut bunny shapes from vintage doilies or lace fabric, preserving pattern integrity.
- Back each lace piece with a thin stabilizer for support if needed.
- Add small loops at the top for threading using needle and thread.
- String onto a satin ribbon and space to let lace patterns breathe.
Old book page bunnies with printed texture
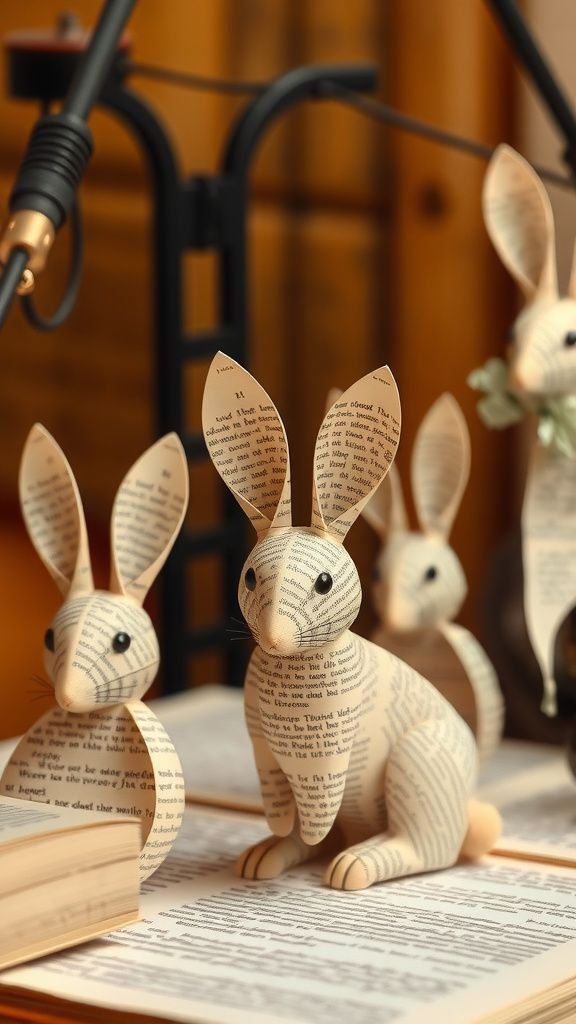
Bunnies cut from book pages carry faint type and margin marks that give the garland a literary personality. The thin paper curls subtly at the edges, and the muted sepia tones have a comforting, faded charm.
When a breeze moves through, the pages whisper against one another, producing a soft, paper-on-paper sound that I find soothing. Tiny differences in print density and paper weight make each piece feel like a fragment of a story, and the overall line reads like a tiled narrative across a mantle or in a study.
Steps
- Select gently aged book pages and trace bunny silhouettes onto them.
- Cut shapes carefully and reinforce with thin cardstock if extra strength is needed.
- Punch holes at the top and thread onto twine, using small knots to space.
- Hang where the pages can breathe without direct sunlight to preserve tone.
Button bunnies with colorful, tactile details
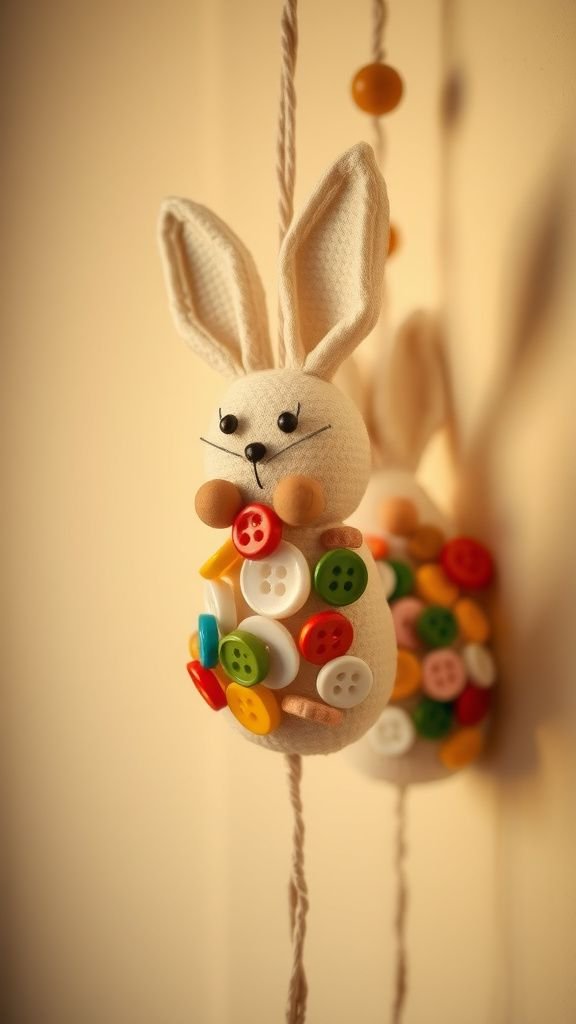
Button bunnies feel playful and tactile, each button bringing a different sheen and curve to the silhouette. Sewing buttons into clusters forms a bumpy, tactile surface that invites fingers to explore.
The iridescence of some mother-of-pearl buttons contrasts with matte wooden ones, adding a visual rhythm. The garland makes a faint metallic clink where small metal shank buttons meet, and the overall impression is both crafty and charming.
It’s the kind of project that rescues old buttons and turns them into a small parade worth smiling at.
Steps
- Arrange button groupings on a strong fabric or felt bunny cutout and sew them securely in place.
- Reinforce backing and trim excess fabric for a neat edge.
- Add small embroidered eyes or bead accents for features.
- Stitch or tie each button bunny onto a durable cord, spacing evenly.
Coffee filter bunnies with soft, pleated texture

Coffee filter bunnies have an airy, translucent quality that feels unexpectedly elegant. The thin tissue-like material gathers gently into soft pleats, and the way it diffuses light makes each bunny glow slightly when backlit.
There’s a faint, familiar scent of paper and brew left in fresh filters that somehow feels domestic and comforting. The tactile sensation is almost tissue-soft, and the whole garland reads as lighthearted and ephemeral.
It’s the sort of small delight that flutters in a draft and leaves a trail of soft motion across a room.
Steps
- Shape coffee filters into bunny silhouettes and pleat or gather for volume.
- Secure gathered areas with small stitches or thin wire hidden inside.
- Add tiny facial accents with marker or small paper cutouts.
- Thread through a lightweight string and hang where soft light can pass through.
Jute twine rustic bunnies for outdoor charm
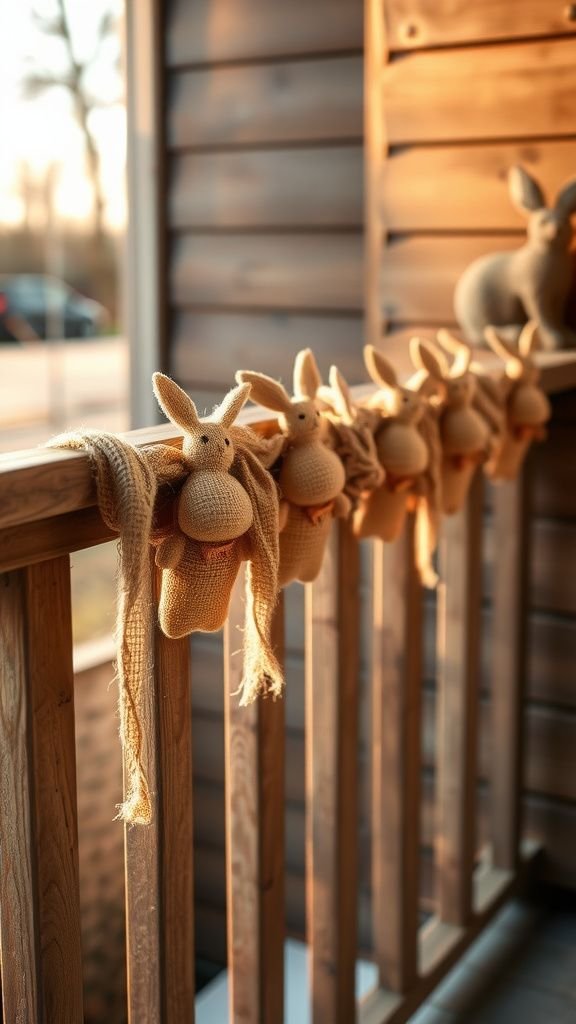
A jute-twine bunny garland brings an earthy, outdoorsy presence that feels at home on a porch or patio. The coarse fibers have a satisfying roughness that contrasts with smoother materials nearby.
When small wooden or burlap bunnies hang from the twine, the combination reads rugged and approachable. There’s a faint scent of natural fiber and a tactile honesty that feels less fussy than finer materials.
The garland settles well in breezy, open-air spaces, and it brings a casual, relaxed energy that suits weekend gatherings and lazy afternoons.
Steps
- Cut jute twine to desired length and knot ends to prevent fraying.
- Prepare bunny shapes from burlap or thin wood and add small loops for hanging.
- Slide or tie each bunny onto the twine at chosen intervals.
- Hang outdoors where natural weathering will enhance the rustic look.
Leather charm bunnies with clean modern lines
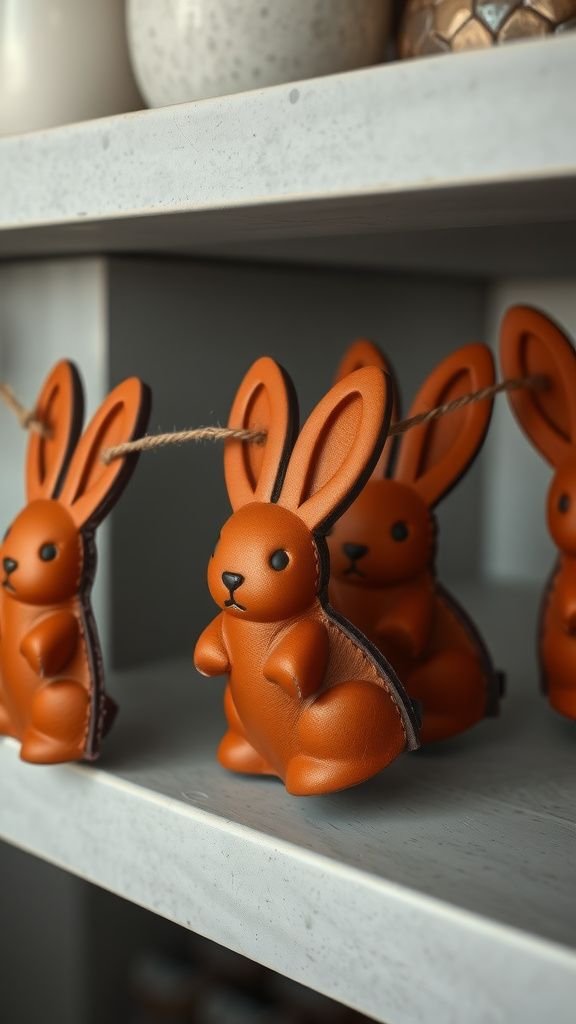
Leather bunnies offer a sleek, modern take with a warm, tactile surface that darkens slightly around edges. The supple material has a quiet weight and a refined finish that contrasts nicely with lighter cords or metal hardware.
Over time the leather softens and gains a subtle patina that gives the garland a lived-in sophistication. The smell of leather is warm and slightly sweet, adding an extra sensory layer.
Strung on a thin leather thong or metal chain, these charms read as minimalist and slightly upscale without losing a handcrafted feel.
Steps
- Trace and cut bunny silhouettes from vegetable-tanned leather, beveling edges for a polished look.
- Punch small holes near the top for threading and lighten edges with burnishing if desired.
- Dye or oil the leather pieces and allow to cure.
- Thread onto a leather thong or metal chain and space evenly.
Chalkboard tags shaped like bunnies for notes
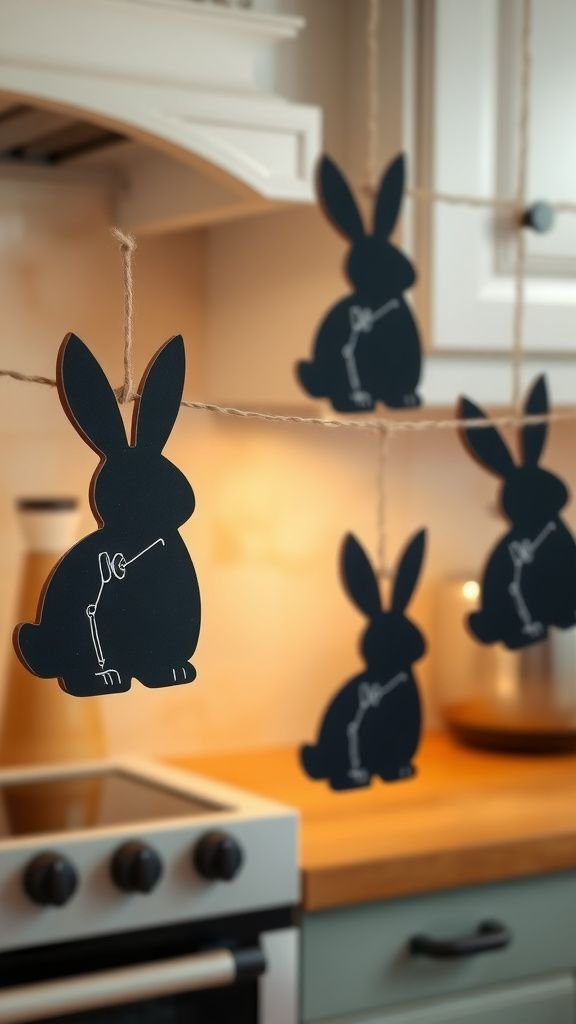
Chalkboard bunny tags are playful and practical, bringing a slate-like texture that begs for little scrawled messages. The matte surface absorbs light and frames chalk marks with a friendly contrast.
When hung as a garland, the tags become a rotating bulletin where short words or tiny sketches give personality to a space. Smudges and erasures leave a faint residue that feels lived-in, almost conversational.
The overall effect is both decorative and interactive, and I find guests often leave a small doodle or greeting when passing by.
Steps
- Cut lightweight wood or chalkboard sheet into bunny shapes and sand edges smooth.
- Paint surfaces with chalkboard paint if needed and cure fully.
- Punch holes for hanging and thread onto twine or ribbon.
- Use chalk to add temporary messages or drawings and erase as desired.
Glow-in-the-dark bunnies for night whimsy
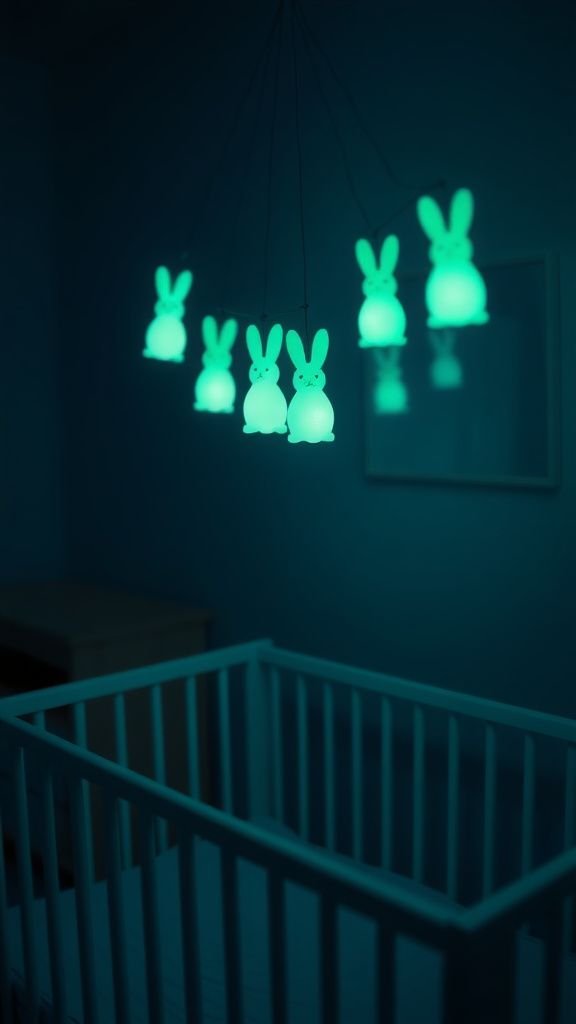
Glow-in-the-dark bunnies add a bit of nocturnal charm that transforms a room after lights out. During the day their pale, almost cream surfaces feel neutral, but at night they emit a soft, greenish glow that reads like tiny lanterns.
The glow is gentle rather than harsh, creating a soothing, almost storybook atmosphere. There’s a playful surprise in seeing the garland wake up at dusk, and it tends to be a hit in a child’s room or a dim hallway.
The tactile surface of glow paint retains a matte finish that feels slightly velvety under a fingertip.
Steps
- Cut bunny shapes from thick cardstock or thin wood and sand edges if wooden.
- Apply glow-in-the-dark paint in thin, even coats and allow to charge in sunlight or bright light.
- Add small hanging holes and thread onto cord.
- Test glow in darkness and recharge as needed with bright light exposure.
Table of Contents