DIY Advent Calendar Ideas bring back the magic of counting down the days, and these advent calendar inspirations turn tiny surprises into a tradition. I still remember an old advent calendar on Nana’s mantel; each pocket held cocoa packets, jokes, and shiny stickers.
Those calendar ideas sparked my love for handmade details and cozy rituals.
These DIY Advent Calendar Ideas range from rustic garlands to modern wall grids, with advent calendars that match minimal, whimsical, or glittery moods. An advent calendar becomes a small daily pause, with pockets, boxes, tins, and tags waiting on shelves and branches.
These calendar ideas invite small treats, love notes, and little moments of wonder.
Kraft Envelope Grid With Wax-Sealed Numbers
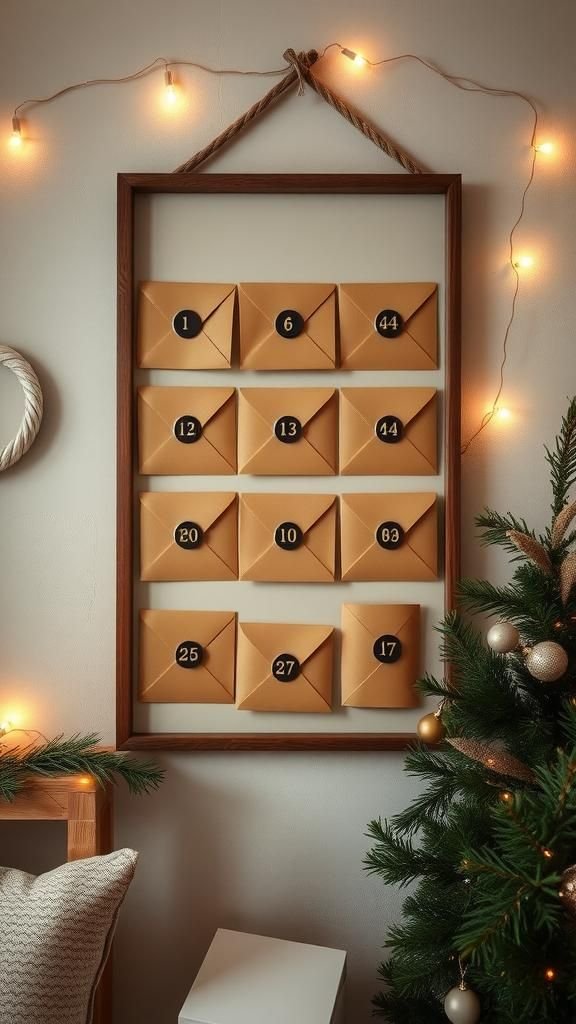
A wall of kraft envelopes forms a graphic grid that blends postal charm with modern order. Thick envelopes, number stickers, and wax seals create a tactile mix of matte paper, glossy wax, and a hint of metallic glint.
The palette leans natural with kraft brown, black numerals, and muted cords, though a foil seal in gold or copper adds festive polish. Each pocket suits tea bags, stickers, seed packets, or handwritten riddles.
The whole grid rests nicely on a bulletin board or framed cork, and fits a hallway or office nook. Small sprigs of pine tucked between rows give a woodland note.
Steps
- Arrange 24 kraft envelopes into a clean grid on a cork board or large foam core.
- Number each envelope with stickers or stamps, keeping spacing even.
- Melt sealing wax and stamp closures after slipping treats or notes inside.
- Mount the grid to the wall with picture strips or set within a frame.
- Add pine sprigs and a title banner reading Countdown to Christmas.
Matchbox Tower Drawers With Glittered Pulls

Stacked matchboxes form tidy drawers that feel like a tiny apothecary. The texture of matte cardstock covers and small brad pulls gives a subtle boutique vibe.
Color stories range from monochrome black and white to burgundy and forest green, while a dusting of fine glitter on the pulls adds a twinkle. The drawers welcome chocolate squares, beads, pins, or miniature figurines.
Arranged in a tower or wide console layout, the structure sits on a mantel or bookshelf. A ribboned topper and a simple date tag finish the presentation like a gift that lasts all month.
Steps
- Empty matchboxes and cover sleeves with decorative paper cut to size.
- Pierce fronts and insert brads or eyelets as drawer pulls.
- Arrange boxes into a tower and glue sleeves to a backing board.
- Number each drawer and slide in treats or notes.
- Dust pulls with glitter glue and let dry.
Foraged Branch Garland With Numbered Paper Bags

A found branch brings outdoor calm indoors, hung with petite paper bags and twine. The materials feel organic: kraft bags, jute string, hand-lettered numbers, and a scattering of winter greenery.
Soft whites and browns form a quiet base that welcomes metallic ink or a ribbon pop in scarlet or navy. Each bag fits tea lights, wrapped candies, or folded jokes.
The branch hangs over a sofa or window and casts gentle shadows. Little star charms or dried orange slices sway among the bags, turning the countdown into a woodland vignette that suits farmhouse or Scandinavian décor.
Steps
- Clean a sturdy branch and seal with a clear matte spray.
- Tie lengths of twine along the branch for hanging points.
- Fill mini paper bags, fold tops, and punch holes for hanging.
- Add numbered tags and hang bags at varied heights.
- Secure the branch to wall hooks with strong cord.
Wooden House Village With Numbered Windows

A tabletop village of wooden houses turns the countdown into a winter street. Smooth sanded blocks, tiny windows, and stamped numbers pair with bottle-brush trees and faux snow.
The palette favors natural wood grain, white roofs, and accents of charcoal or sage. Each house hides notes or tiny sweets beneath removable roofs or within hollow bases.
The village lines a windowsill or console table, lit by warm micro-lights snaking between doors. A mix of roof heights and chimney details creates a quaint skyline that glows at dusk and invites curiosity with each day’s reveal.
Steps
- Cut or source small wooden house blocks with removable roofs.
- Drill or carve cavities for treats and sand surfaces smooth.
- Apply whitewash to roofs and stamp numbers on facades.
- Arrange houses with bottle-brush trees and sprinkle faux snow.
- Thread micro-lights around the village and hide the battery pack.
Chalkboard Cube Boxes On A Holiday Mantel
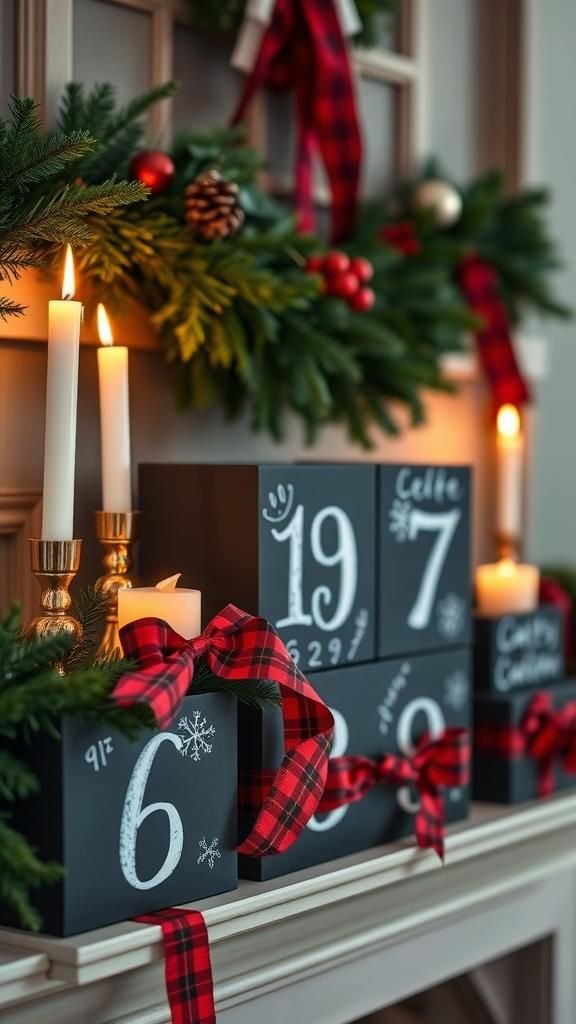
Matte black chalkboard boxes invite playful doodles and evolving art throughout the month. The surface carries chalk dust softly, creating a cozy café vibe.
White chalk numbers pop against dark sides, while ribbons in red, plaid, or gold add contrast. Each cube stores bath bombs, tiny ornaments, or mini craft kits.
Arranged in a neat row or pyramid, the set frames greenery and candles on a mantel. Seasonal drawings and messages change daily, transforming the calendar into interactive décor that feels fresh even as the days pass.
Steps
- Assemble small cardboard cube boxes and coat with chalkboard paint.
- Prime surfaces with chalk, then wipe to create a writable base.
- Number each box and add simple doodles or borders.
- Fill with gifts and tie contrasting ribbons around them.
- Arrange on the mantel with garland and candles.
Tin Can Countdown With Magnetic Numbers

Repurposed cans turn into industrial-chic containers with clean lines and a glossy or satin finish. Magnetic numbers snap onto smooth surfaces, lending a playful, changeable look.
The color scheme ranges from silver and black to enamel shades like pine green or snowy white. Felt pads beneath each can protect shelves while preserving the metallic theme.
Small cookies, caramels, or tiny stationery items tuck neatly inside. Arranged in staggered stacks or a long ledge row, the set pairs well with Edison-style string lights and a modern, loft-inspired backdrop.
Steps
- Remove labels and sand can rims smooth; wash and dry thoroughly.
- Spray-prime and finish cans in chosen colors.
- Create magnetic number discs from adhesive numbers on metal blanks.
- Fill cans, add lids or fabric covers, and place magnets on fronts.
- Arrange on shelves with lights and greenery.
Embroidery Hoop Banner With Quilted Pockets

An oversized embroidery hoop stretches linen like a canvas, dotted with small quilted pockets. The mix of textures—linen, cotton prints, and stitched seams—feels heirloom-worthy without fuss.
Colors lean warm with cranberry, sage, and cream, though indigo and mustard add a modern spin. Each pocket receives a number tag and a tiny bow, holding brooches, buttons, or wrapped truffles.
The hoop hangs in a foyer or kitchen and frames the countdown as fabric art. A trailing ribbon and a sprig of eucalyptus finish the soft, handmade scene.
Steps
- Wrap an embroidery hoop with ribbon for a finished edge.
- Sew miniature quilted pockets from fabric scraps and lining.
- Hand-stitch or glue pockets onto stretched linen inside the hoop.
- Add number tags to pockets and tuck in treasures.
- Hang the hoop with a wide ribbon loop.
Felt Mitten Garland With Cozy Nordic Patterns

Tiny felt mittens sway along a ribboned garland, each pair stitched with snowflakes, chevrons, or hearts. The palette draws from alpine sweaters—cherry red, winter white, charcoal, and icy blue.
Soft felt makes a plush base for embroidery floss details and petite pom-poms. Each mitten holds coins, chocolate foils, or tiny charms.
The garland drapes across a window or bedframe and frames fairy lights beautifully. A felt star at each end and a central wooden number plaque bring balance.
The result reads like a storybook ski lodge in miniature form.
Steps
- Cut mitten shapes from felt and blanket-stitch edges, leaving openings.
- Embroider simple patterns and add small pom-poms or buttons.
- Attach clothespins to a ribbon and clip each mitten in order.
- Slip treats inside and add number tags to the cuffs.
- Hang the garland across a window or mantel.
Wrapped Book Stack Countdown For Family Reading

A stack of wrapped books turns reading time into a nightly event. Kraft paper, newsprint, or fabric wraps create harmony, while numbered tags and twine finishes add rustic charm.
Color accents in plaid ribbons or metallic cord weave through the pile. Each parcel reveals a picture book, comic, or short story, promoting quiet evenings and shared laughter.
The stack nestles beside a chair with a throw blanket and a lantern-style lamp. A simple wooden crate keeps the pile tidy and ready for the next page.
Steps
- Select 24 books across lengths and interests for the month.
- Wrap each book in paper or fabric and tie with cord.
- Add numbered tags and vary ribbon colors for rhythm.
- Stack in a crate near a reading chair.
- Open one each night for story time.
Mason Jar Shelf With Countdown Lid Toppers

Clear mason jars line a shelf, showing candy canes, tea sachets, and tiny trinkets through glass. Lids feature numbered toppers made from cardstock circles, fabric disks, or stamped wood rounds.
The palette remains crisp and classic with red, white, and touches of green, though monochrome black-and-white feels modern and graphic. Ribbon collars, baker’s twine, and snow-like epsom salt add wintry drama.
The jars sit on a narrow picture ledge, turning treats into a colorful display that catches afternoon light beautifully.
Steps
- Fill mason jars with treats and add cotton or tissue for cushioning.
- Create numbered lid toppers from cardstock or wood rounds.
- Glue toppers to lids and tie twine or ribbon around necks.
- Arrange jars in order on a shelf or ledge.
- Add faux snow along the shelf for a frosty effect.
Cookie Sheet Magnet Calendar With Mini Tins
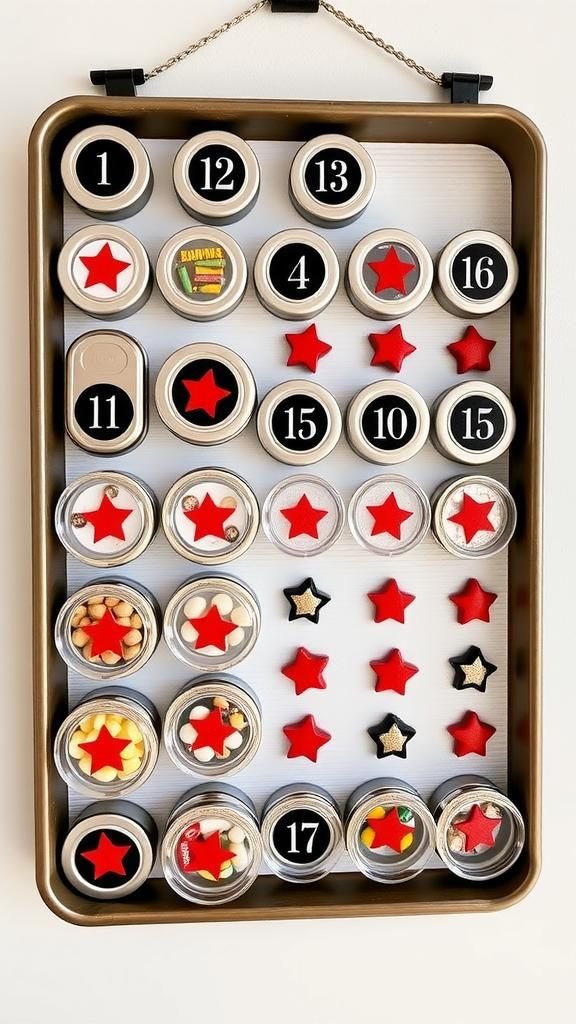
A baking sheet transforms into a metallic canvas for small magnetic tins. Round tins with clear windows reveal wrapped sweets and confetti.
The color plan works with matte black numbers, silver metal, and a sprinkle of red stars. Washi tape borders and a banner at the top set the holiday tone.
The tray hangs like wall art and slides behind a door when the season ends. Each magnet clicks neatly into place, delivering a satisfying snap with every day’s reveal.
Steps
- Prime and spray a cookie sheet in a festive color or leave metal bare.
- Create numbered magnets for tin lids with stickers or stamps.
- Fill tins, press on lids, and attach small magnets to tin bottoms.
- Arrange tins on the sheet and add a header banner.
- Hang with ribbon or command hooks.
Pillow Box Tree Pyramid With Metallic Accents

Pillow boxes stack into a triangular tree that reads festive but sleek. The curved silhouettes and soft folds create a gentle rhythm, while metallic cardstock and satin ribbon add shimmer.
Colors swing from evergreen and gold to blush and champagne for an elegant palette. Each box holds hair clips, nail wraps, or wrapped toffees.
A star topper and a dusting of faux snow complete the look on a console table. The pyramid format turns a classic shape into a sculptural centerpiece that invites a closer look.
Steps
- Score and assemble pillow boxes from cardstock.
- Number fronts with stickers or stamps and add ribbon bands.
- Fill boxes and close edges securely.
- Stack in a tree shape with adhesive dots holding layers.
- Add a star topper and sprinkle faux snow at the base.
Paper Cup Forest With Mini Evergreen Cones

Upside-down paper cups become a forest of tiny trees, each crowned with a number tag. Matte cups in shades of green, teal, and white create a gradient hillside.
Subtle patterns like stripes and tiny dots add variety without crowding the scene. Hidden beneath each cup rests a wrapped treat or a rolled note.
Scattered wooden stars and felt snowflakes nestle among the trees. The forest spans a mantel or windowsill, echoing snowy woodlands while feeling light and friendly.
Steps
- Decorate paper cups with stickers, washi tape, and number tags.
- Place small treats on the surface and cover with cups.
- Secure a small star or pom on each tip with hot glue.
- Arrange in a staggered forest across a mantel.
- Add felt snowflakes and fairy lights between cups.
Mini Bucket Ladder With Evergreen Garland Accents

Tiny metal pails hang from the rungs of a rustic ladder, bringing farmhouse warmth to the countdown. Galvanized buckets, kraft tags, and sprigs of cedar feel sturdy yet charming.
Color stays muted with zinc gray and natural greens, while red ticking ribbon adds a country pop. Each bucket hosts wrapped caramels, small tools, or stamps.
The ladder leans against a wall near the entry, greeting passersby with clinks and twinkles. A strand of micro-lights weaves along the side rails like starlight.
Steps
- Sand and stain a small wooden ladder or leave raw.
- Drill small hooks beneath each rung and hang metal pails.
- Tie numbered tags to bucket handles and fill with goodies.
- Drape an evergreen garland and weave in micro-lights.
- Lean the ladder safely and secure at the top if needed.
Crate Of Brown Bags With Vintage Stamps

A wooden crate brims with rolled-top brown bags, each stamped with a number and a retro holiday motif. The tactile mix includes ribbed kraft, hemp twine, and aged postage marks.
The palette embraces sepia tones with pops of red ink and forest sprigs. The bags hold cocoa packets, trail mix, or tiny puzzles.
Set on the floor beside a tree or under a console, the crate invites hands to rummage for the day’s parcel. A small chalkboard sign gives the display a market-stall feel.
Steps
- Fill small kraft bags and fold tops neatly.
- Stamp numbers and vintage motifs on bag fronts.
- Tie with twine and tuck a sprig of greenery in knots.
- Arrange bags inside a wooden crate with tissue padding.
- Place a chalkboard sign reading Daily Treats.
Origami Star Pockets On A Winter Branch

Folded paper stars form shallow pockets that glint under fairy lights. Metallic foil and vellum mingle with matte pastels, bringing contrast between shine and soft opacity.
Each star bears a tiny sticker numeral and a delicate thread hanger. Inside waits a thin note, confetti, or a flat charm.
Hung on a clean white branch or minimalist dowel mobile, the stars float like a celestial chorus. A snowy backdrop and glass ornaments amplify the light, turning the countdown into a dreamy sky.
Steps
- Fold origami stars with one open pocket from square papers.
- Slip flat treats or notes into each pocket.
- Add number stickers and thread hangers through tips.
- Suspend stars from a painted dowel or foraged branch.
- String fairy lights around to highlight the folds.
Reusable Muslin Bags On A Festive Clothesline

Numbered muslin drawstring bags hang from a cotton clothesline with mini wooden pegs. The natural fabric and soft weave bring a calm, eco-friendly look.
Stamped numbers in charcoal or rust pair with gingham ribbon ties and eucalyptus sprigs. Color accents remain gentle, inviting the eye to the subtle textures of linen, wood, and greenery.
The bags welcome tea tins, lip balms, or spice sachets. Hung across a hallway or above a buffet, the line becomes a quiet daily ritual that stores away compactly after the season.
Steps
- Stamp numbers on muslin bags and heat-set if needed.
- Thread small ribbons through drawstrings for color accents.
- Clip bags to a cotton line with mini clothespins.
- Fill with gifts and add greenery sprigs at intervals.
- Mount the line on removable wall hooks.
Wax-Sealed Envelope Advent On Antique Frame

An antique frame becomes a showcase for envelopes with elegant wax seals. Cream, blush, and slate envelopes carry calligraphed numbers and glossy stamped crests.
Satin ribbon strands stretch across the frame like harp strings, with petite clips holding each envelope. The mix of aged gilding, smooth paper, and shiny wax sets a romantic tone.
Slipped inside are tickets, quotes, or photo prints. Leaned on a sideboard with candles and dried roses, the arrangement whispers old-world charm while tracking the days with ceremony.
Steps
- String ribbons across an empty vintage frame and secure at the back.
- Prepare envelopes with calligraphy numbers and wax seals.
- Clip envelopes to ribbons in a balanced layout.
- Insert notes, tickets, or photos inside each envelope.
- Set the frame on a sideboard and add candlelight.
Lego Minifigure Shadow Box Countdown Display

A shadow box with grid shelves spotlights a lineup of minifigures and tiny builds. The interior backing features bold paper or a cityscape print, while each cubby carries a clean number label.
Color bursts from bricks, balanced by a neutral frame in black, white, or oak. Daily reveals might include accessories, printed tiles, or micro-vehicles.
Placed on a desk or hung near a play area, the display doubles as art and collection storage. Fairy lights tucked around the frame cast a playful glow.
Steps
- Add a patterned paper backing to a shadow box with grid dividers.
- Label each compartment with numbered stickers.
- Pre-pack small bags of bricks and accessories for each day.
- Place a minifigure or build in each cubby behind the number.
- Mount or display the box with soft lighting.
Magnetic Spice Jar Rack With Countdown Lids
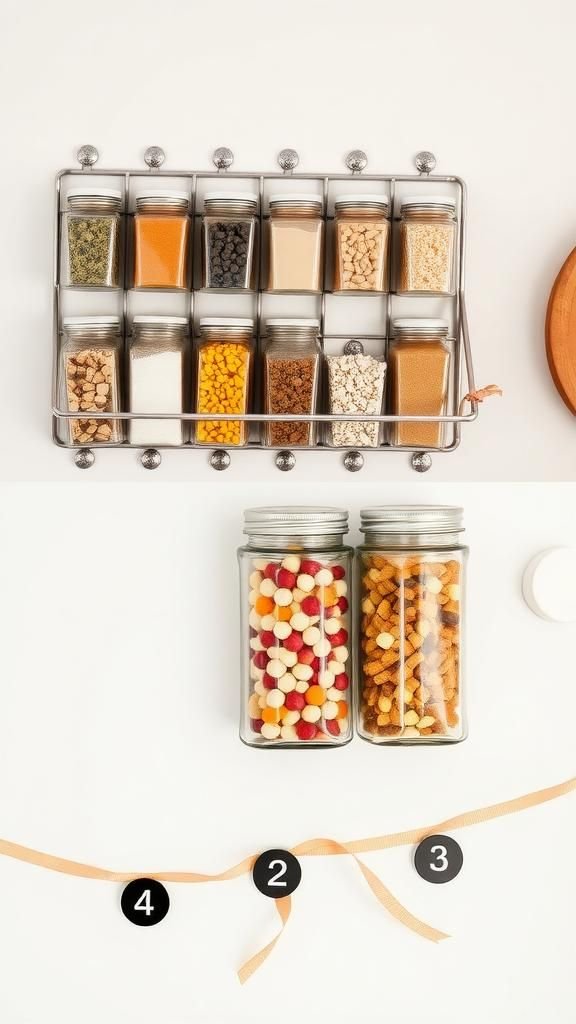
A metal spice rack hosts clear-lidded jars that reveal sprinkles, tea, and tiny craft bits. Number decals on the lids keep order while the contents add color and texture.
A monochrome rack with black numbers reads modern; brushed steel with red numerals brings diner flair. Jars line up along a kitchen wall or pantry door, turning everyday storage into a festive ritual.
Small recipe cards or tea pairings slip behind the rack, inviting cozy sips each evening.
Steps
- Mount a magnetic spice rack to a wall or pantry door.
- Apply number decals to jar lids and fill with treats.
- Arrange jars in rows and snap into place on the rack.
- Slide recipe or tea pairing cards behind the rack.
- Wrap a ribbon garland over the top edge.
Chalkboard Tag Advent On Greenery Garland

A full, fragrant garland becomes the stage for numbered chalkboard tags and tiny parcels. The contrast between dark matte tags and glossy evergreen needles feels classic and dramatic.
Tied-in elements might include pinecones, dried citrus, velvet bows, and warm lights. Each tag corresponds to a hidden parcel tucked into the garland or hanging just below.
The palette draws on forest green, charcoal, and touches of amber from the citrus slices. Draped over a banister or mantel, this design merges décor and countdown seamlessly.
Steps
- Cut chalkboard tags and write numbers with a chalk pen.
- Weave fairy lights into a fresh or faux garland.
- Tie tags evenly along the garland with thin ribbon.
- Hide small parcels among the branches with discreet ties.
- Hang the garland over a banister or mantel.
Table of Contents