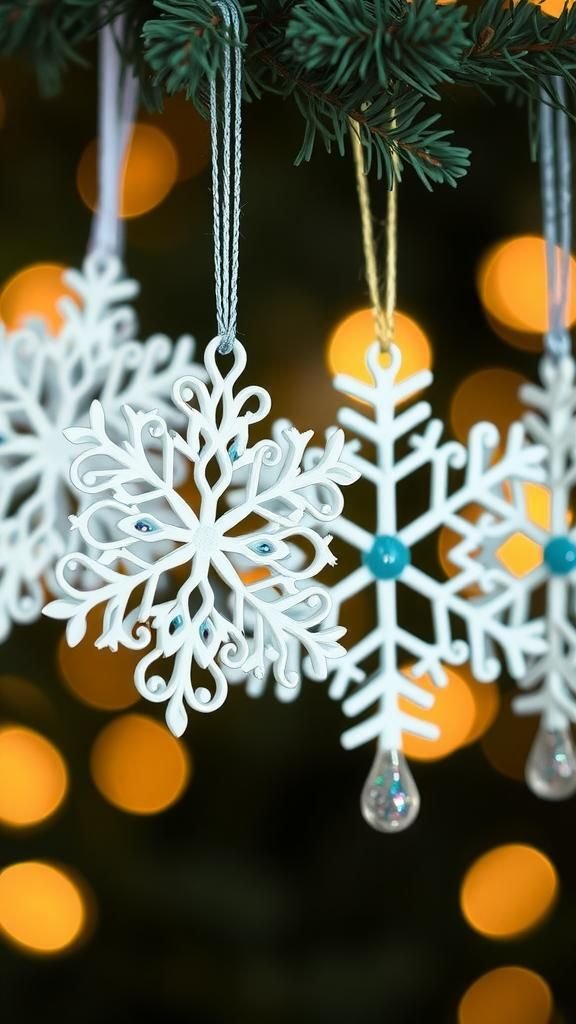
Cozy Winter Snowflake Crafts bring a hush of glittering calm to any room, echoing frosty windowpanes and quiet evenings by the fire. I reach for snowflake crafts each December, layering textures, soft light, and icy motifs as a comforting ritual.
From paper sparkles to stitched patterns, winter snowflakes add warmth while nodding to crisp air outside.
My first Cozy Winter Snowflake Crafts began with scraps from a holiday bin and a spool of silver thread. Those early snowflake crafts still hang near a worn mug shelf, catching candlelight like tiny crystals.
Each winter snowflakes project becomes a keepsake, carrying cocoa-scented memories forward.
Plush Felt Snowflake Garland For Mantels

A plush garland of felt snowflakes brings gentle texture to a mantel or headboard, pairing soft wool blends with hints of shimmer. Thick felt in ivory, oatmeal, and pale blue balances cozy warmth with a frosty theme, while a strand of twine or velvet ribbon adds rustic charm.
Embroidered edges, seed beads, or tiny buttons introduce sparkle without overpowering the quiet palette. The garland drapes gracefully across shelves, mirrors, or bed frames, and tucks neatly into gift boxes for a homespun present.
Displayed with evergreen sprigs and candles, the snowflake shapes echo winter skies in a welcoming, fireside mood.
Steps
- Cut multiple snowflake shapes from felt using a template for consistency.
- Blanket stitch edges and add beads or buttons to highlight points and centers.
- Thread the snowflakes onto ribbon or twine, spacing them evenly along the length.
- Tie loops at the ends and hang across a mantel, mirror, or window.
Quilled Paper Snowflake Tree Ornaments
Paper quilling lends delicate dimension to snowflake ornaments, creating airy filigree that feels light as frost. Strips in crisp white, silver, and icy teal form coils and teardrops that cluster into symmetrical patterns.
A satin loop finishes the ornament while a dusting of iridescent glitter reflects holiday lights. The look suits both minimalist trees and vintage glass displays, resting beautifully on a mantle branch or tucked into a gift box as a keepsake.
Framing a single quilled snowflake under glass turns it into wall art, preserving those swirled lines like frozen breath on a window.
Steps
- Cut quilling strips or prepare pre-cut strips in desired colors.
- Roll tight coils and shape teardrops and marquise forms, securing ends with glue.
- Arrange the pieces into a symmetrical snowflake and glue onto a cardstock base.
- Add a ribbon loop and sprinkle a light layer of glitter to finish.
Embroidered Snowflake Hoop Wall Art
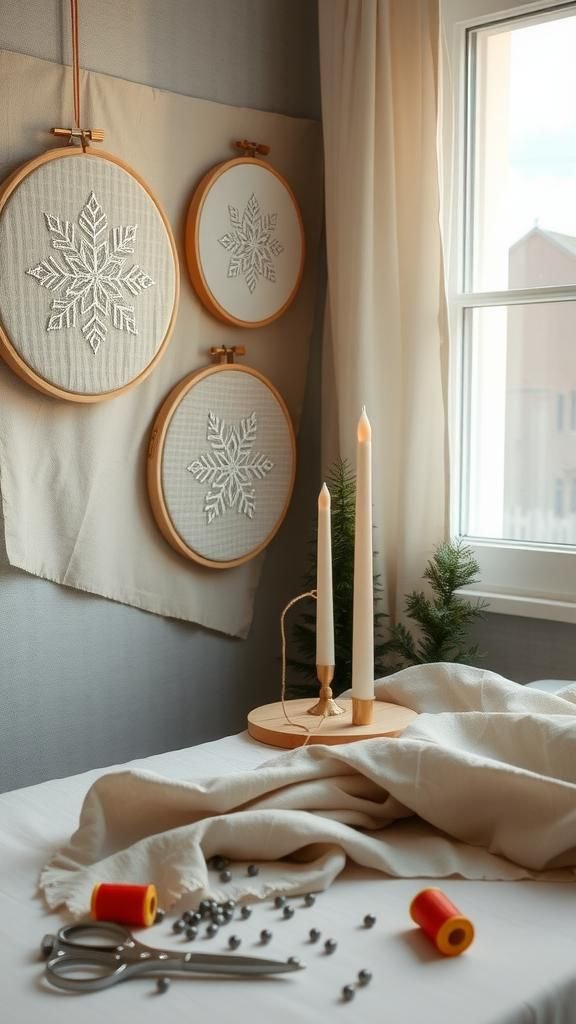
Embroidery hoops turn snowflake motifs into heirloom wall pieces, blending linen’s natural weave with glossy cotton floss. White-on-white designs create a quiet, Scandinavian mood, while metallic thread or seed beads bring gentle sparkle.
A neutral hoop frame suits farmhouse shelves and gallery walls, and deeper indigo or charcoal fabric shifts the mood toward midnight skies. A cluster of hoops in different sizes forms a winter vignette over a console table.
Wrapped in tissue and tucked into a kraft box, the hoop becomes a thoughtful gift that marks the season with soft texture and handworked detail.
Steps
- Stretch linen or cotton fabric tightly inside an embroidery hoop.
- Draw a snowflake pattern lightly with a fabric-safe pencil.
- Stitch the lines with backstitch or stem stitch, adding beads at key points.
- Secure the back with felt or fabric and trim excess material.
Clay Snowflake Trinket Dishes With Frosted Edges
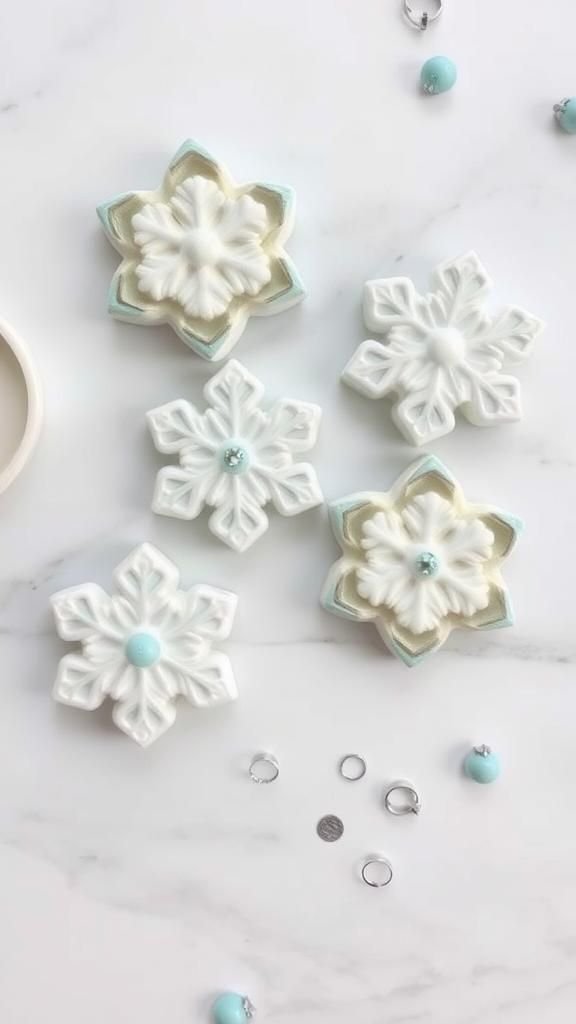
Small clay dishes shaped by snowflake cutters deliver both function and charm, catching rings and charms on an entry tray. Air-dry or polymer clay creates smooth, porcelain-like surfaces that welcome pearly finishes or brushed metallic rims.
Embossed lace or knit textures echo winter knits without heaviness, and pale glazes in ice blue or dove gray enhance the crystalline silhouette. A cluster on a vanity or nightstand feels like scattered flakes on cool stone, while one nestled in tissue makes a sweet stocking stuffer.
Grouped on a dresser, these dishes keep sparkle contained yet close at hand.
Steps
- Roll clay to an even thickness and press a snowflake cutter through.
- Drape the cut shape over a small bowl to form a shallow dish.
- Smooth edges, add texture with a lace imprint, and let the clay dry or bake.
- Brush the rim with metallic paint or pearl finish and allow to cure.
Rustic Wood Snowflake Coasters With Burned Motifs
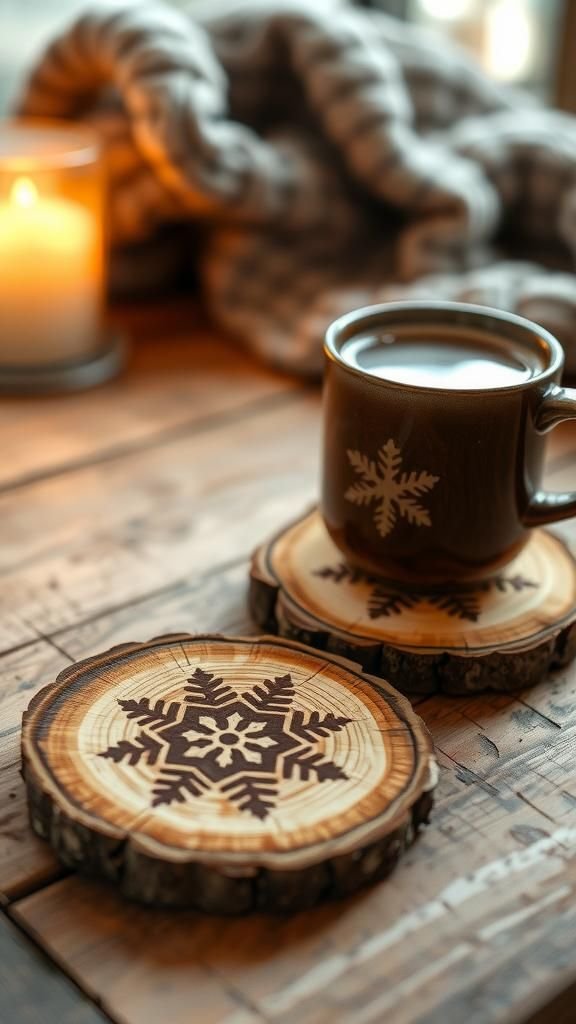
Wood slice coasters feature crisp snowflake lines burned into warm grain, pairing alpine cabin style with winter iconography. Natural bark edges bring earthy charm, while pale wash or clear finish shows off rings and knots.
A set tied with twine suits host gifts, and a mixed pack of different snowflake patterns creates visual rhythm on a coffee table. Felt backing protects surfaces, and a small caddy makes storage pleasing.
The contrast of dark lines against honeyed wood feels cozy beside stoneware mugs and knit throws, lending a glow to morning cocoa and evening tea.
Steps
- Lightly sketch snowflake designs on sanded wood slices.
- Burn along the lines with a pyrography tool to define the pattern.
- Wipe away residue and add a clear protective finish to the surface.
- Adhere felt circles underneath and tie sets with twine for gifting.
Crochet Snowflake Mug Cozies With Nordic Flair

Crocheted cozies wrap mugs in warmth, featuring stranded snowflake motifs inspired by Nordic sweaters. Soft acrylic or wool blends in cream and stormy blue create clean contrast, while coconut shell buttons add a natural note.
The pattern rests easily against stoneware, protecting hands and keeping drinks warm. A pair looks charming in a breakfast nook beside a small evergreen and a jar of cinnamon sticks.
Packaged around a favorite mug, the cozy becomes a heartfelt gift that hints at slow mornings and snowy windows, making every sip feel like a small winter retreat.
Steps
- Measure the mug and chain a foundation to match circumference.
- Crochet rows in a base color, working a stranded snowflake chart for contrast.
- Form a button loop and edge the top and bottom with simple border stitches.
- Sew on a button and test the fit around the mug.
Tissue Suncatcher Snowflakes For Frosty Windows
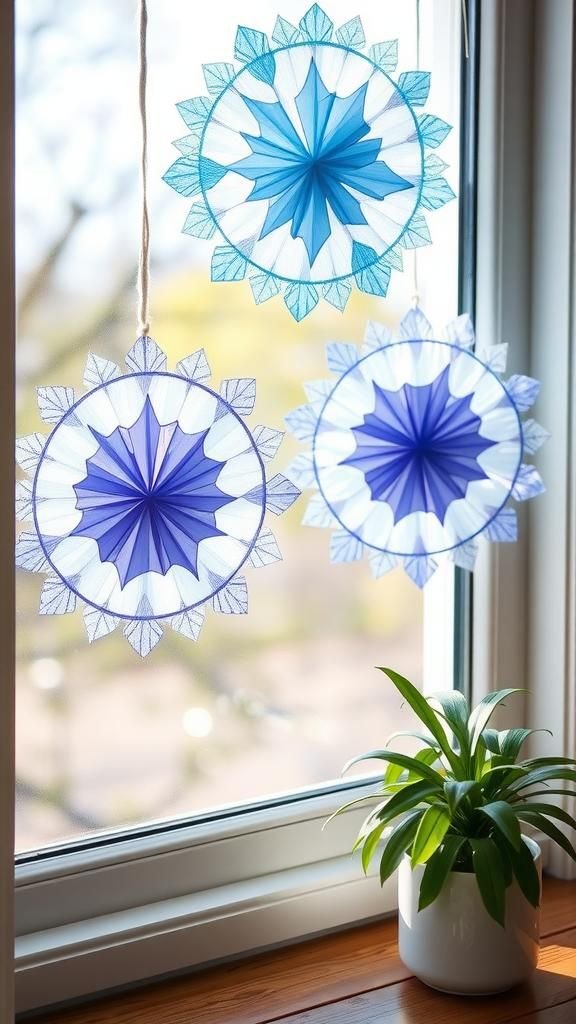
Translucent suncatchers capture the glow of winter daylight, casting colored shards across walls like icy prisms. Tissue paper in glacier blues, lavender, and pearl white sits within crisp cardstock frames, forming layered snowflake silhouettes.
The look suits kitchen windows, classroom corners, or craft room nooks, bringing cheer to short days. A cluster at different heights creates a gentle snowfall effect around plants and fairy lights.
Slipped inside flat mailers, these lightweight pieces travel well for seasonal greetings, arriving ready to brighten a pane and throw soft color onto a breakfast table.
Steps
- Cut snowflake frames from cardstock with a craft knife.
- Arrange tissue paper pieces behind openings and glue them flat.
- Seal the back with another cardstock frame to sandwich the tissue.
- Punch a small hole and string with clear thread for hanging.
Pressed Botanical Snowflake Candle Wraps
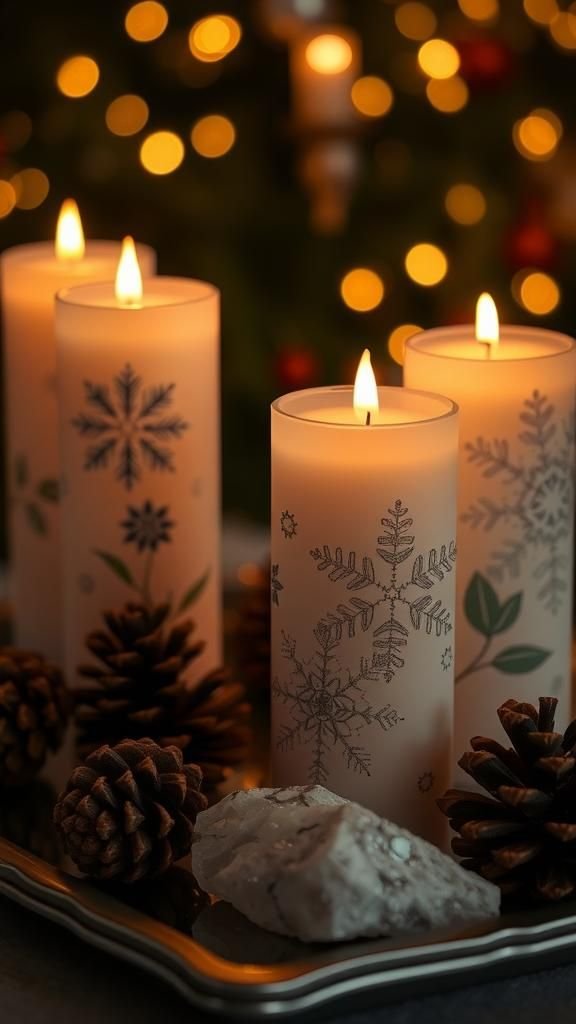
Delicate pressed botanicals arranged into snowflake patterns wrap around pillar candles, marrying nature with a winter motif. Fern tips, baby’s breath, and tiny blooms form starry points against vellum or rice paper, letting candlelight glow through.
The palette leans toward soft greens, cream, and faint blush, set off by twine or satin ties. Displayed on a tray with pinecones and quartz, the arrangement feels serene during long evenings.
Wrapped as a pair with matches and a note, these become thoughtful housewarming tokens that mingle floral charm with the quiet geometry of falling snow.
Steps
- Press small botanicals between absorbent sheets until fully dry and flat.
- Arrange pieces into snowflake shapes on vellum sized for the candle.
- Adhere botanicals with clear-drying glue and allow to set.
- Wrap the vellum around the candle and secure with twine or a ribbon.
Hand-Stamped Snowflake Kraft Gift Wrap

Kraft paper stamped with crisp snowflakes creates charming packages that look at home under a tree or on a doorstep. White pigment ink, pale blue, or metallic copper pops against earthy brown, while jute twine, velvet ribbons, and wax seals complete the scene.
Coordinating tags carry tiny snowflake bursts that tie gifts together visually. Rolled sheets store neatly in a basket for quick wrapping sessions, and scraps become matching bookmarks.
A stack of these parcels brings a calm, cohesive look to holiday corners, offering a handmade touch that feels both festive and grounded.
Steps
- Roll out kraft paper on a flat surface and secure edges with tape.
- Ink a snowflake stamp and press patterns in a scattered layout.
- Dust with fine glitter while the ink is damp for a frosted effect.
- Wrap gifts and finish with twine, ribbon, and a matching tag.
Macramé Snowflake Wall Hanging In Cream Cotton
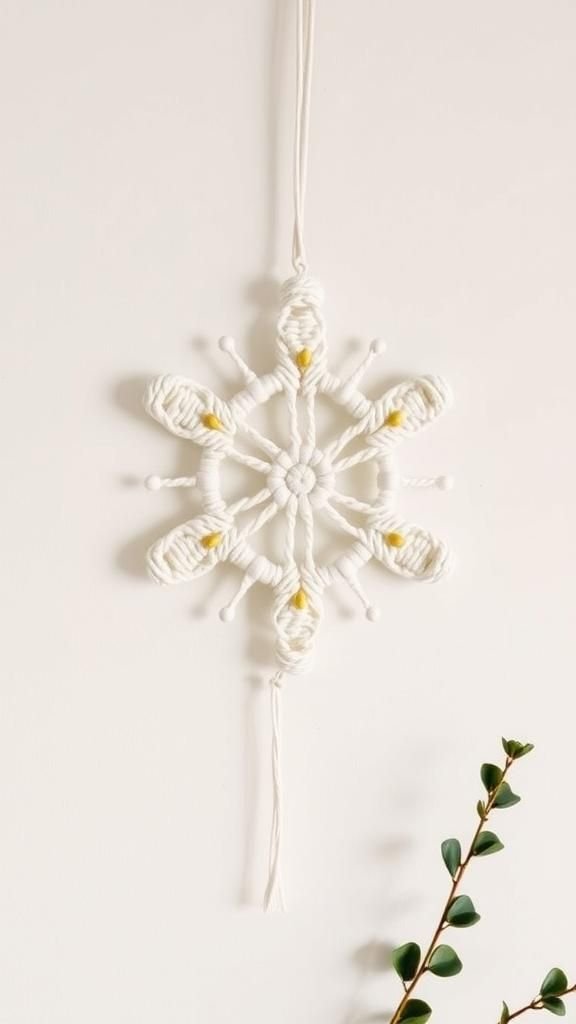
A macramé snowflake blends boho texture with winter charm, knotted from soft cotton cord on a wooden dowel. The natural cream palette echoes fresh snow, while small wooden beads or metallic accents highlight central points.
Fringe radiates like icy rays, creating sculptural depth on a gallery wall or above a bench. Paired with eucalyptus and wool throws, the piece sets a restful tone.
Wrapped with tissue and cord, the hanging travels well as a gift for neutral interiors, adding quiet interest through pattern, fiber, and shadow.
Steps
- Cut cords and mount them onto a dowel with lark’s head knots.
- Form a central star with square knots and half hitches to shape points.
- Add beads at intersections and trim fringe to a crisp outline.
- Steam the fringe lightly and hang with a length of cord.
Beaded Wire Snowflake Window Ornaments
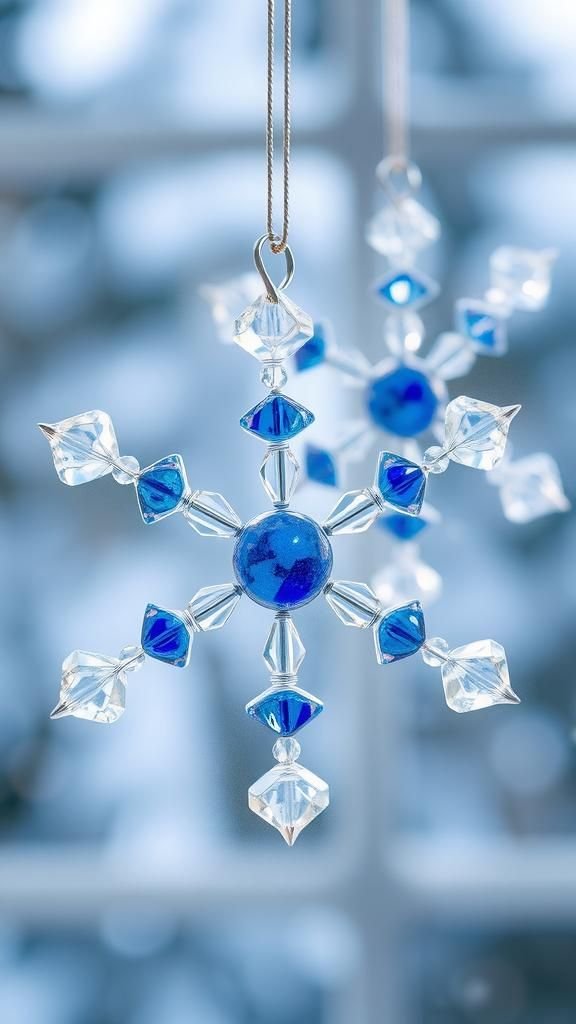
Wire snowflakes sparkle like ice crystals, with glass beads threaded along graceful arms. Silver or gunmetal wire frames offer clean lines, while clear, opal, and sapphire beads catch daylight.
Hung in a window, the ornaments scatter tiny rainbows across a sill, and grouped on branches they create a wintry vignette. Packed in small tins lined with tissue, these ornaments travel safely to friends.
The blend of metal shine and translucent beads feels delicate yet sturdy, echoing frosted mornings without chill.
Steps
- Cut wire lengths for a central hub and twist to form six arms.
- String beads in balanced patterns along each arm and secure ends.
- Add smaller cross wires to support added beads near the center.
- Attach a hanging loop of fishing line or ribbon and polish the wire.
Crystal Gel Snowflake Window Clings
Jelly-like window clings cast a glossy sheen across glass, forming snowflakes that feel playful and bright. Clear gels tinted with cool hues create translucent layers, while glitter adds frosted sparkle.
Arranged across a sliding door or bathroom mirror, the shapes bring cheer to short afternoons. Stored between sheets of plastic, they come back out each season for a quick refresh.
A set slipped into a card becomes a fun surprise for kids and grown-ups, turning windows into temporary winter galleries without any fuss.
Steps
- Outline snowflake shapes on a plastic sheet with window cling paint.
- Fill the interiors with tinted gel colors and sprinkle fine glitter.
- Allow the designs to dry completely until flexible and peelable.
- Lift gently and press onto clean glass, smoothing out bubbles.
Paper Bag Snowflake Luminaria Lanterns
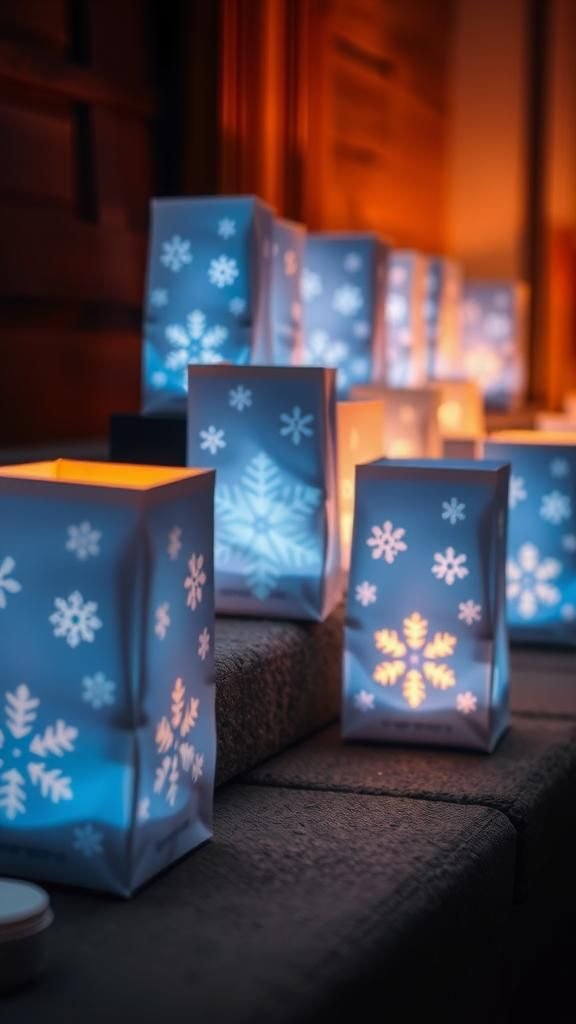
Simple luminaria become enchanting with snowflake cutouts, casting lace-like shadows along a walkway or mantle. Kraft or white bags paired with glass votives glow warmly, while punched patterns in symmetrical forms feel crisp and airy.
A trio on a dining table sets a soft mood for evening meals, and a cluster on steps greets guests with friendly light. Ribbon trims or washi borders add color without overwhelming the delicate patterns.
Folded flat, the bags store easily for the next season and stack neatly for gifting in sets.
Steps
- Lightly draw snowflake patterns on paper bags and punch holes along lines.
- Pour a layer of sand or rice into each bag for weight and stability.
- Place battery tea lights or votives inside glass holders within the bags.
- Arrange along a shelf or entry steps and dim the room lights.
Salt Dough Snowflake Keepsake Ornaments
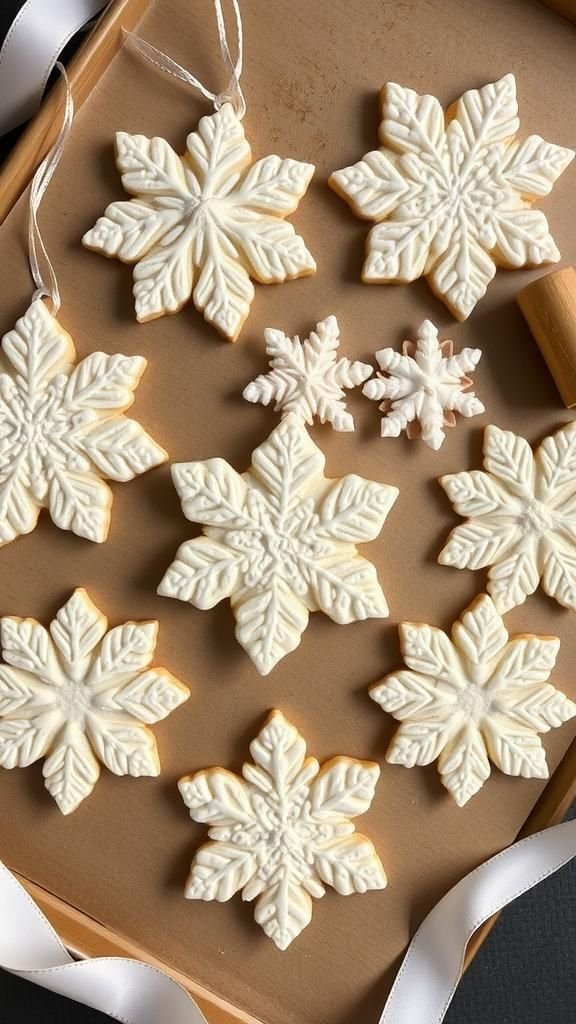
Salt dough ornaments hold the charm of childhood crafts with a refined winter twist. Snowflake cutters form clean silhouettes, and impressions from lace or knit textures add a cozy surface.
Soft white paint and a satin ribbon elevate the look, while a light dusting of mica gives frosted shimmer. The ornaments hang sweetly on trees, wreaths, or a branch display in a vase.
A date pressed into the back turns each into a time capsule, perfect for gifting to family and friends who love sentimental touches.
Steps
- Mix flour, salt, and water into a smooth dough and roll to even thickness.
- Cut snowflakes and press lace or knit for texture, adding a hole for hanging.
- Bake or air-dry until hardened, then sand rough edges lightly.
- Paint in soft tones, add mica powder, and tie on ribbon loops.
Epoxy Resin Snowflake Keychains With Sparkle
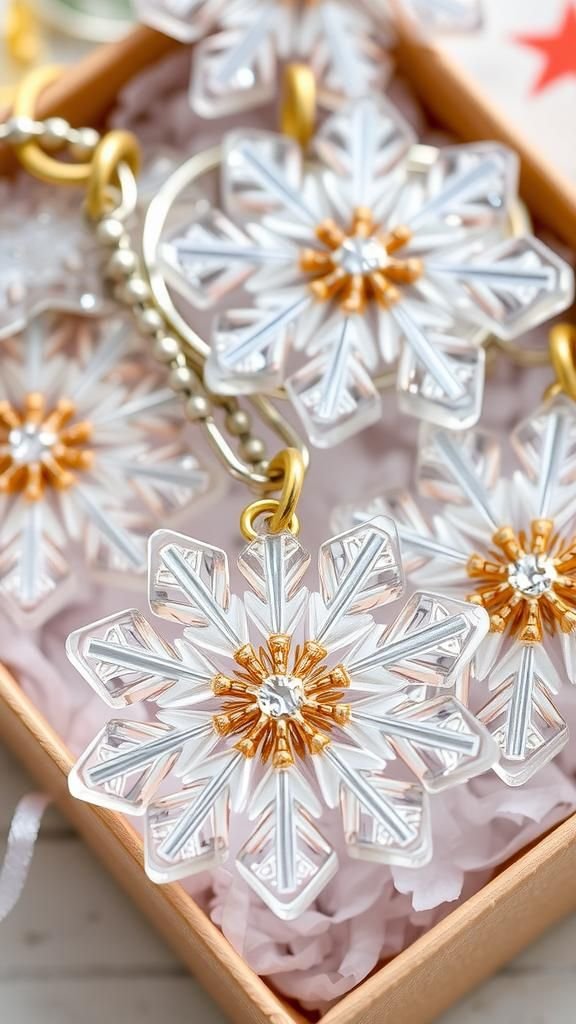
Resin keychains shaped like snowflakes bring winter flair to bags and keys, catching light with glitter and tiny confetti. Clear epoxy shows off suspended sequins or microbeads, while pastel pigments shift the vibe toward soft candy tones.
Gold or silver hardware adds polish without crowding the crystalline lines. Packaged in a small gift box with crinkle paper, the charm feels like ice captured midair.
A bowl by the door becomes a frosty landing pad, turning everyday errands into a hint of holiday magic.
Steps
- Prepare resin and hardener according to package ratios and mix until clear.
- Add glitter, confetti, or a drop of pigment and pour into snowflake molds.
- Pop surface bubbles with a heat tool and let the pieces cure fully.
- Drill small holes if needed and attach jump rings and keychain hardware.
Cozy Snowflake Appliqué Pillow Covers
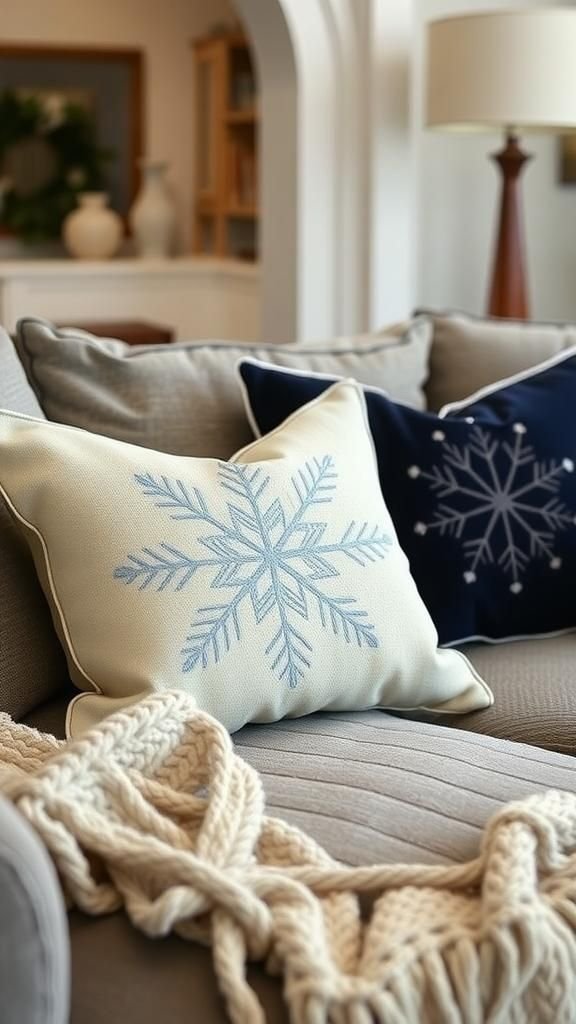
Throw pillows with snowflake appliqués invite lounging under blankets, adding seasonal charm to sofas and beds. Soft flannel or velvet backgrounds contrast with crisp cotton or felt snowflakes, and stitching around the edges creates a hand-finished look.
Neutral palettes keep the room calm, while navy or pine green transforms the cover into a bold accent. A pair on a window seat frames a reading nook, and a single cover bundled with cocoa packets makes a heartfelt housewarming treat.
Stored flat, these textiles return each year like familiar friends.
Steps
- Cut pillow cover panels from flannel or velvet to the desired size.
- Trace and cut snowflake shapes from felt or cotton fabric.
- Topstitch the snowflakes onto the front panel and add decorative stitching.
- Sew the cover with an envelope back and insert a pillow form.
Upcycled Sweater Stockings With Snowflake Patches
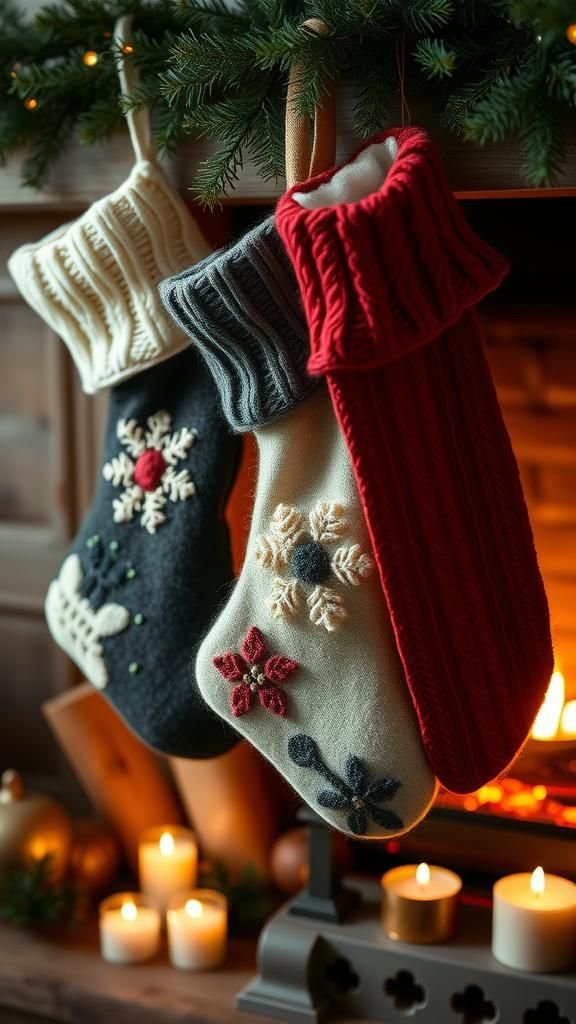
Old sweaters gain a second life as holiday stockings adorned with snowflake patches. Cable knits and ribbed textures create inviting surfaces, while felt or embroidered snowflakes add crisp definition.
A palette of cream, charcoal, and red nods to classic hearth scenes. Hung along a mantle, the set feels collected and storied, each stocking cut from a different sleeve or body section.
Lined interiors keep shapes tidy, and a woven loop hangs snugly from hooks. Paired with cinnamon sticks and citrus, the stockings become a scented, textile-rich focal point.
Steps
- Cut stocking shapes from sweater fabric, aligning ribbing and cables nicely.
- Sew fronts to backs with right sides together, leaving the top open.
- Turn right side out, add a fabric lining, and stitch in place.
- Stitch on felt snowflake patches and sew a sturdy hanging loop.
Snowflake Terrarium Jars With Faux Frost
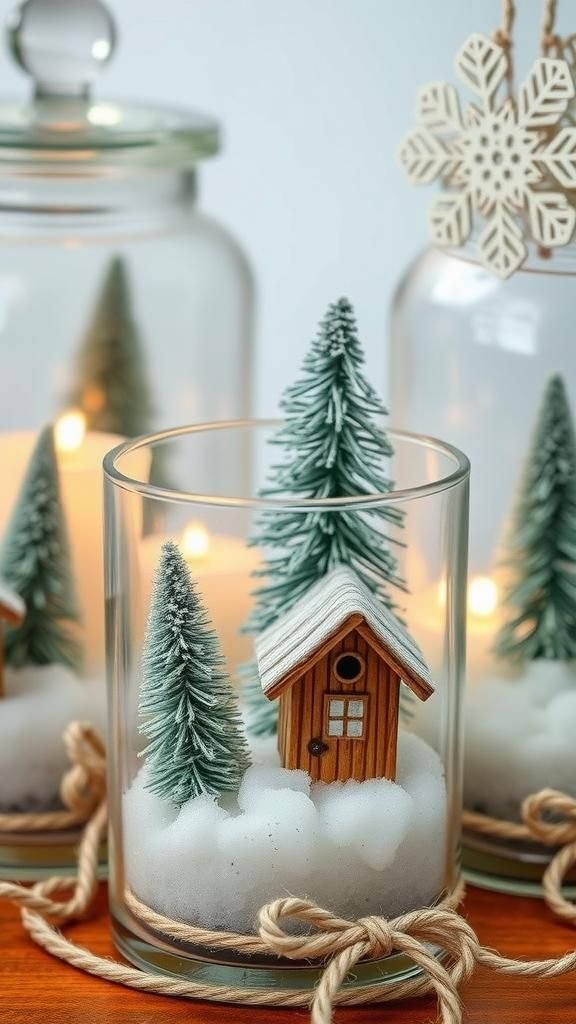
Terrarium jars turn into tiny winter worlds, where paper snowflakes hover above bottle brush trees and glittered moss. Glass jars catch stray sparkles like hoarfrost, and a dusting of faux snow settles around miniature cabins or pinecones.
Twine or velvet bows at the neck add softness, while tags mark dates or short messages. Lined on a windowsill, the jars glow beside tea lights, creating a calm storybook scene.
Wrapped carefully in tissue, a single jar becomes a charming gift that invites a closer look.
Steps
- Clean glass jars and add a layer of faux snow and glittered moss.
- Place mini trees, pinecones, or a tiny cabin inside with tweezers.
- Suspend a paper snowflake from the lid using clear thread.
- Tie twine or ribbon around the neck and add a date tag.
Wax-Sealed Letters With Snowflake Stamps
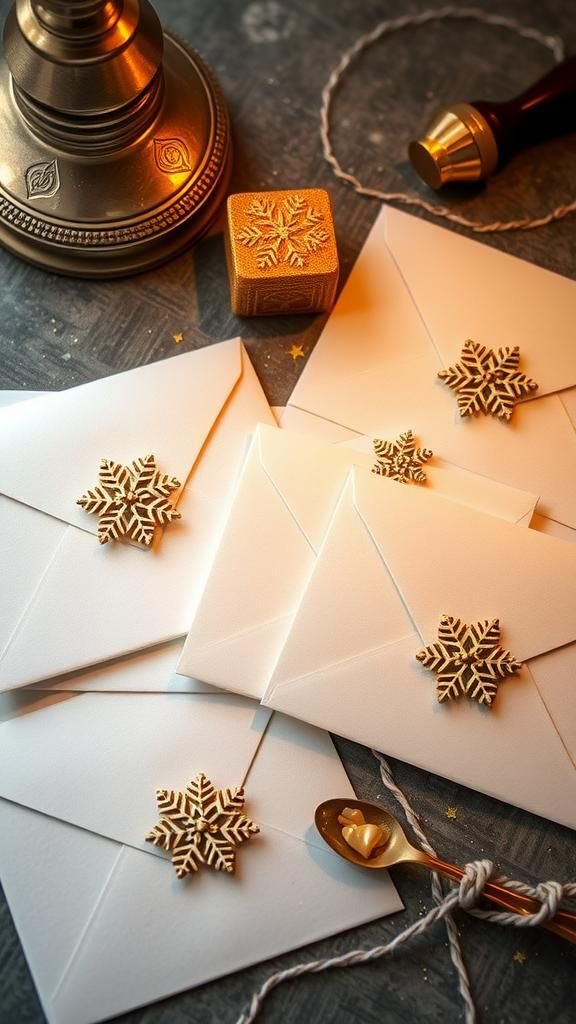
Letters sealed with snowflake wax stamps feel ceremonial and cozy, perfect for winter invitations, love notes, or thoughtful greetings. Glossy wax in pearl white, ice blue, or vintage gold complements thick envelopes and textured papers.
The seal’s crisp lines echo the geometry of frost, while a sprinkle of mica catches light. Bundled with baker’s twine and a sprig of rosemary, a stack of letters becomes part of the decor on a desk or entry table.
A small kit packaged for a friend inspires slow, handwritten moments during quiet evenings.
Steps
- Warm sealing wax and drip a small pool onto an envelope flap.
- Press a snowflake stamp into the wax and hold briefly.
- Lift the stamp straight up and let the wax cool completely.
- Dust the seal with mica powder for a frosted highlight.
Carved Snowflake Soap Bars In Winter Scents
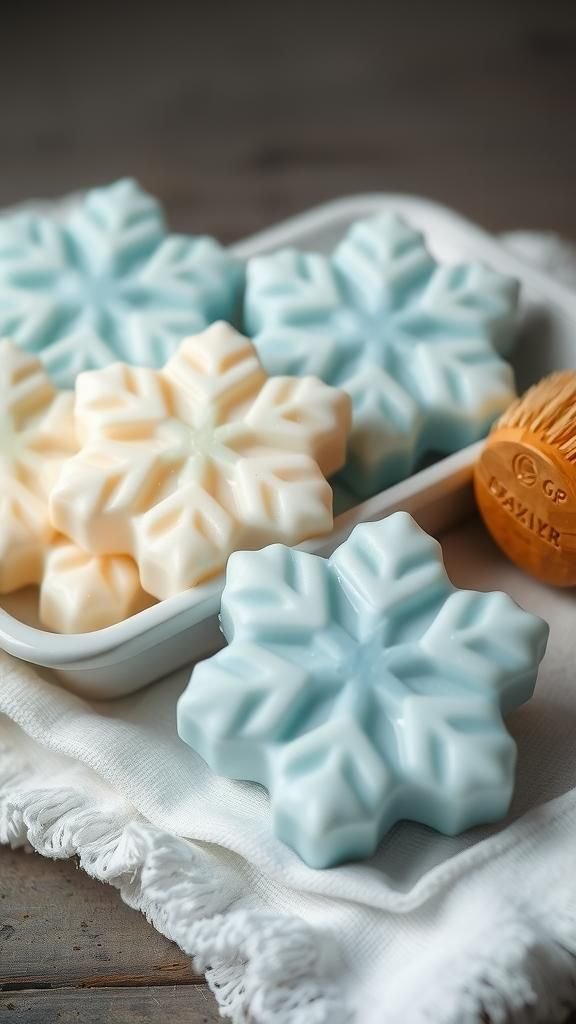
Soap bars carved or molded with snowflakes bring spa calm to sinks and bath trays. Shea or goat’s milk bases create a creamy canvas for evergreen, vanilla, or eucalyptus scents.
Swirls of pale blue or marbled gray add movement, while mica gives a subtle sheen. Stacked in a ceramic dish, the bars look like pressed ice, and wrapped in glassine with ribbon they become gracious guest gifts.
Set beside a cedar brush and linen towel, the soaps create a tidy, inviting corner that nods gently to winter.
Steps
- Melt soap base and stir in fragrance and a touch of color.
- Pour into snowflake molds and allow to set fully.
- Unmold carefully and refine edges with a carving tool if desired.
- Brush mica powder lightly over raised areas for shimmer.
Chalk Pastel Snowflake Art On Dark Paper

Chalk pastels against deep charcoal paper create dreamy snowflake compositions with soft halos and crisp centers. White and icy blue lines define geometry, while smudged edges suggest swirling air.
A single large flake framed in black carries gallery presence, and a grid of small studies reads like a scientific sketchbook turned poetic. Displayed on a shelf with glass jars and candles, the artwork brings a cool counterpoint to warm textiles.
Signed and dated, the piece becomes a personal winter memento, ready to slip into a mailer for a creative gift.
Steps
- Tape dark paper to a board and sketch snowflake guidelines lightly.
- Layer white and blue chalk pastel lines and dots along the structure.
- Blend gently around the outer edges to create a soft glow.
- Fix with workable spray and frame behind glass to protect the surface.
Table of Contents