I’ve always liked the small interruptions that handmade objects bring to a living room or kitchen counter. Playing with air dry clay at dusk became a quiet habit for me, a way to turn small ideas into textured bits of comfort.
Air Dry Clay Home Decor Crafts have a friendly, forgiving nature that invites experimentation without a kiln or much fuss.
Some pieces took shape in a single evening and then settled into daily life, catching light on a shelf or holding a few keys by the door. The tactile coolness of clay and the slow reveal of finishes made each little object feel personal and oddly grounding.
Tiny textured succulent pots that feel handmade

I keep a cluster of tiny pots on a sunny windowsill, each marked by fingerprints and soft ridges where the clay met my fingers. The surface carries a matte, stone-like memory that seems to soften with dust and light.
When morning sun slips across the rims, the speckled tones come alive and lend a quiet contrast to the green leaves tucked inside. Making these prompted a few evenings of trial and playful fingering, and the irregular rims and narrow bases always make me smile when I water the plants and admire the imperfect symmetry.
Steps
- Knead a small amount of clay until it becomes pliable and free of cracks.
- Flatten the clay into a round disc with palms, keeping the center slightly thicker.
- Lift the edges up and join them around the base, smoothing seams with a damp fingertip.
- Texture the exterior with a tool or fingertip patterns and allow to dry upright.
- After full drying, buff the rim and apply a thin coat of matte varnish if a water-resistant finish is desired.
Low-profile coasters with pressed botanical impressions
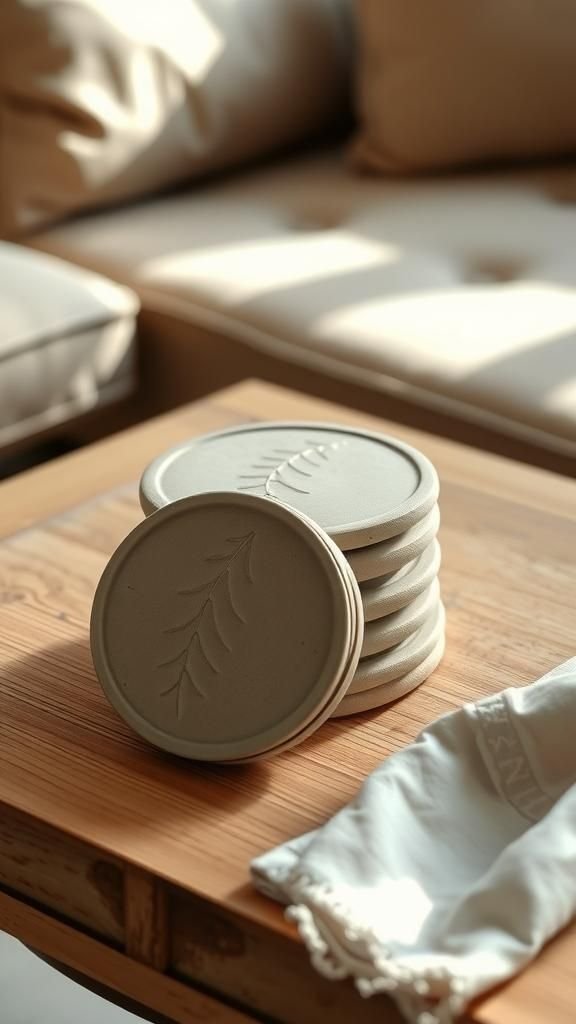
A stack of coasters sits on my coffee table, each carrying the ghost of a leaf or a delicate fern vein. The impressions feel like small time capsules of the afternoon I spent collecting snippets from the garden.
The clay captures that faint pulpy scent for a short while, and the cool, velvety touch against fingertips is oddly calming. When cups arrive, the color contrast between ceramic mugs and the warm clay tones becomes pleasingly familiar.
These coasters have an organic quietness that blends with chipped ceramics and woven throws.
Steps
- Knead clay until smooth and form a flat disc to coaster thickness.
- Press a leaf or fern gently into the surface to leave a clear impression.
- Trim the edges to a neat circle with a cutter or sharp tool.
- Allow to dry fully on a flat surface, flipping once if needed to prevent curling.
- Sand any rough edges lightly and apply a thin coat of clear varnish for moisture protection.
Sculptural wall tiles that catch evening light
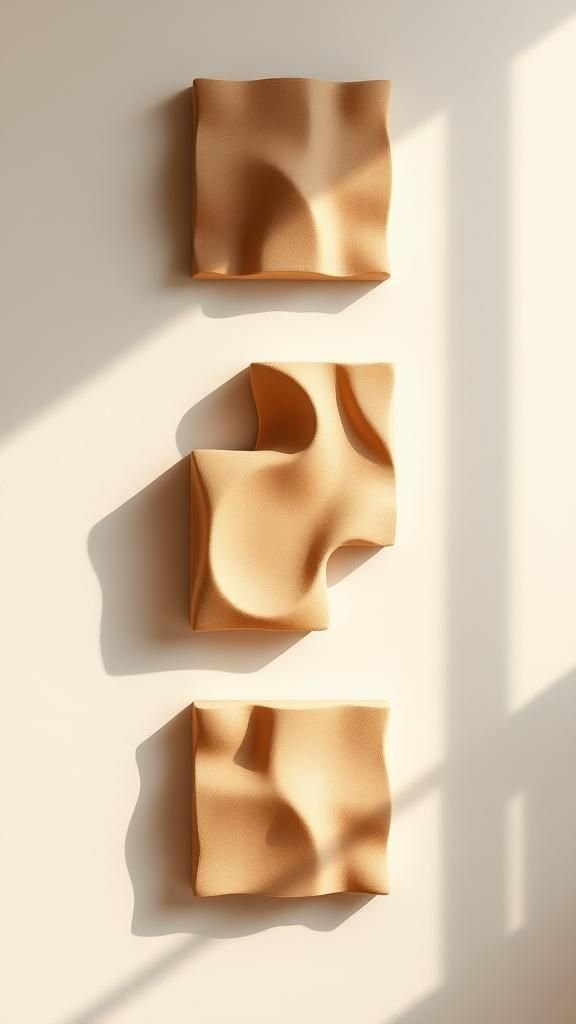
Mounted tiles break up a blank wall with soft, hand-formed rhythms. Each tile carries gentle concaves, tiny pits, and brushed ridges that call attention to light and shadow across the surface.
Walking past them in the evening, I notice how a single lamp casts small theatrical shadows that shift with the hour. The clay’s muted palette reads like driftwood or weathered stone, and the slight variation between pieces makes the whole feel like a quiet, handmade mural rather than a manufactured panel.
Steps
- Prepare slabs of clay to a uniform thickness with a rolling board or slab roller.
- Carve or impress texture onto each slab while the clay remains leather-hard.
- Cut tiles to desired shapes and smooth the edges with a damp sponge.
- Let tiles dry completely flat to avoid warping, then apply a thin protective varnish if desired.
- Attach mounting hardware to the back and arrange tiles on the wall in a composed pattern.
Rounded trinket dishes with marbled swirls

My bedside table hosts a rounded dish with soft marbled veins in muted cream and gray, where a watch and a couple of rings nestle each night. The marbling has a slow-motion quality that feels like watching cream ripple through coffee.
The edges are gently irregular, and the surface wears faint fingerprints that make it feel like an old small treasure. The dish’s weight is comforting without being heavy, and the coolness of the clay against metal jewelry seems to calm the morning scramble for keys.
Steps
- Prepare two or three small portions of different colored clays and knead briefly to soften.
- Twist and fold the portions together a few times to create marbled veins without overblending.
- Press the marbled lump into a shallow bowl mold and smooth the interior with a damp sponge.
- Allow the dish to dry fully, then lightly sand any rough spots for a soft touch.
- Finish with a thin protective coat of matte varnish if a slightly water-resistant surface is preferred.
Ceramic-like shallow bowls with speckled finish

I keep a shallow bowl by the entryway for loose coins and folded notes, its speckled surface catching pockets of light. The finish echoes aged ceramics with tiny darker flecks scattered across a pale base.
The rim has a hand-smoothed feel, slightly uneven in a way that reads as character rather than flaw. When fingers run along it, there’s the faint drag of the hand-finished surface that feels honest and quiet.
The bowl’s low profile allows glimpses of the tabletop texture beneath, which I rather enjoy.
Steps
- Soften a lump of clay until it holds together smoothly without cracks.
- Press the lump into a shallow mold or cup to create a bowl form.
- Refine the rim and exterior with a damp sponge for a hand-smoothed finish.
- Sprinkle a fine mica or iron-rich dust for speckling before the clay dries.
- After full drying, apply a matte varnish to protect small splashes and preserve the finish.
Minimalist candle holders with subtle ridges
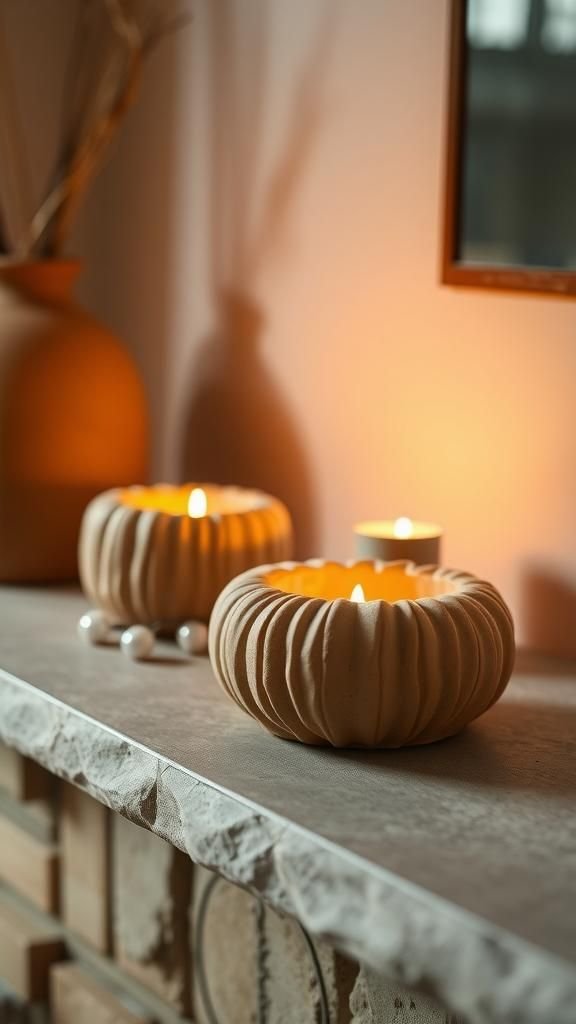
A pair of candle holders sits on a mantel, their low profiles and faint ridges catching firelight in a gentle way. The hollows cradle the base of tapered candles and the unglazed surfaces drink in the glow, softening the flame’s reflection.
There’s a tactile memory in the ridged pattern, like the echo of fingertips or a comb dragged across wet clay. When the candles burn, the warmth brings out deeper amber undertones in the clay, making the whole arrangement read as humble and quietly elegant.
Steps
- Knead clay until uniformly soft and form two cylindrical bases of desired height.
- Carve a shallow cavity in the center of each cylinder sized for candle fit.
- Add subtle ridges by drawing a comb or tool around the exterior while still pliable.
- Let holders dry upright until fully hardened to avoid distortion.
- Optionally apply a heat-resistant varnish or keep unvarnished for a raw matte look.
Textured drawer knobs that personalize furniture

Replacing bland drawer knobs with small clay rounds introduced a hint of handmade charm to an old dresser. Each knob bears shallow textures, tiny hammers and linear grooves that catch dust and polish differently with time.
The change felt like a gentle update rather than a renovation, and the tactile quality invites a pause while opening drawers. The finish is matte and slightly warm to the touch, contrasting pleasantly with a cool brass plate or painted wood.
Seeing them every day makes the dresser feel more intimate and quietly curated.
Steps
- Form small rounded knobs from clay, keeping consistent sizes for matching pieces.
- Impress textures onto the surface with small tools or stamps while pliable.
- Insert threaded hardware or create a hole through each knob for a screw before drying.
- Allow knobs to dry completely and then attach to furniture with appropriate screws.
- Seal lightly with a thin coat of varnish if added durability is desired.
Bohemian garland beads for an airy corner display

A string of neutral beads drapes over a curtain rod and softens the corner of a sunroom. Each bead is slightly varied in size and surface treatment—some smooth, some ribbed, one with tiny pits that catch a shadow.
When the breeze slips through the room, the beads sway and lightly click against each other, making a quiet, rhythmic sound that somehow reads as comfort. The matte clay contrasts with linen curtains and woven lampshades in a way that feels layered and relaxed.
Seeing them grouped together adds a handmade punctuation to an otherwise simple space.
Steps
- Roll several even small balls of clay and refine into bead shapes with fingertips.
- Pierce each bead through the center with a skewer to create a hole for stringing.
- Texture selected beads with stamps, combs, or carved lines while still soft.
- Dry beads fully, then string them onto cord, spacing to achieve the desired drape.
- Tie off ends securely and hang the garland in a light, breezy spot.
Wall-mounted key bowl that greets each return
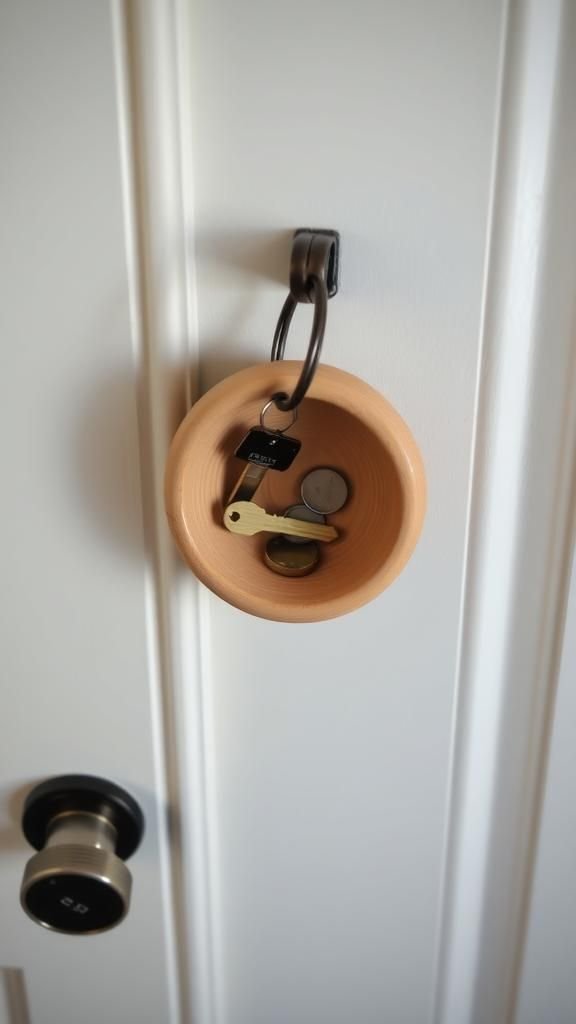
A shallow bowl mounted near the door became the habitual spot for stray keys and loose coins. The bowl’s interior carries faint tool marks that create subtle concentric rings, and the outer face wears a gentle mottled finish.
Dropping things into it is an oddly satisfying sound, a little hollow thunk that signals home. The piece blends into a collection of postcards and a coat rack, and it seems to anchor those daily comings and goings.
On rainy days the bowl takes on a cooler tone, which somehow feels appropriate.
Steps
- Form a shallow bowl that accommodates keys and small objects, keeping a slightly thicker base.
- Add a discreet hole or reinforced loop at the back for wall mounting hardware.
- Smooth the interior and texture the exterior lightly for visual interest.
- Allow to dry until fully hardened, then attach mounting hardware.
- Install by fastening to a wall near the entryway at a convenient height.
Delicate napkin rings with leaf imprints

A set of ring-shaped napkin holders sits in a shallow drawer, each bearing a crisp leaf imprint that brings a garden hint to the table. The ring edges are slightly irregular, catching candlelight in a subtle way.
Laying a napkin through one transforms a casual dinner into something that feels gently curated. The clay’s faint tooth against linen creates a small contrast that is pleasing to my fingers.
When these are out for guests, they often invite a short comment about the texture or the leaf pattern, which always makes me smile.
Steps
- Form small rings by rolling coils of clay and joining the ends smoothly.
- Press a leaf into the outer surface to leave a clear impression while pliable.
- Refine ring openings with a tool to ensure smooth napkin passage.
- Dry rings fully, then sand gently to remove sharp edges.
- Optionally wash lightly and apply a thin varnish for increased durability.
Statement bedside lamp base with organic curves

A lamp base shaped from clay gives an understated sculptural presence to my bedside. The curves are slightly exaggerated, and the surface bears tiny tool marks that create a rhythm under the hand.
When the lamp is lit, warm light pools around the base and highlights the subtle color shifts within the clay. It feels less like a manufactured object and more like a small form that has settled into the room.
Reaching for the switch now has a different cadence; the object asks for a brief moment of appreciation each evening.
Steps
- Sculpt a stable lamp base from clay, keeping the center hollow for wiring clearance if needed.
- Carve or impress textures and refine curves while the clay remains workable.
- Dry the base thoroughly, ensuring the interior cavity is fully hardened.
- Feed the lamp wiring through the cavity and secure a socket to the top.
- Test the lamp gently and place a compatible shade to complete the ensemble.
Compact incense holder with drip-catching lip

A narrow dish with a raised lip holds incense sticks and catches the tiny crumbs that fall as they burn. The lip curves gently upward, creating a little visual harbor for ash and scent.
The clay surface takes on a slightly darkened edge near the burn area, which reminds me of quiet evenings and slow breathing. When incense burns, the aroma hangs low, and the holder’s matte surface seems to absorb a trace of that evening mood.
It has the modest presence that disappears into ritual but reappears as something quietly familiar.
Steps
- Form an elongated shallow dish with a raised lip to contain ash and crumbs.
- Carve a small angled hole or notch to support an incense stick upright.
- Smooth the interior to prevent ash from catching on rough spots.
- Allow the piece to dry completely and test stability with a stick in place.
- Position on a heat-resistant surface away from drafts during use.
Charming magnets with tiny hand-stamped initials

Small circular magnets with hand-stamped initials live on the fridge and carry an unexpectedly warm presence. Each keeps a note or a child’s drawing in place while offering a small tactile reminder of the maker’s hand.
The stamps leave slight depressions that pick up shadow and dust in a way that changes over time. I enjoy arranging them into casual clusters, finding delight when an initial aligns with a scrap of paper.
They feel like little anchors for everyday life, the kind of things that accumulate gentle history through daily contact.
Steps
- Press small rounds of clay to a uniform thickness suitable for magnets.
- Stamp initials or tiny motifs into each round while soft.
- Smooth the edges with a damp fingertip and dry fully.
- Attach magnet discs to the back with a strong adhesive after drying.
- Arrange on metal surfaces to hold notes and photos.
Sculpted photo frames with soft hand-carved borders
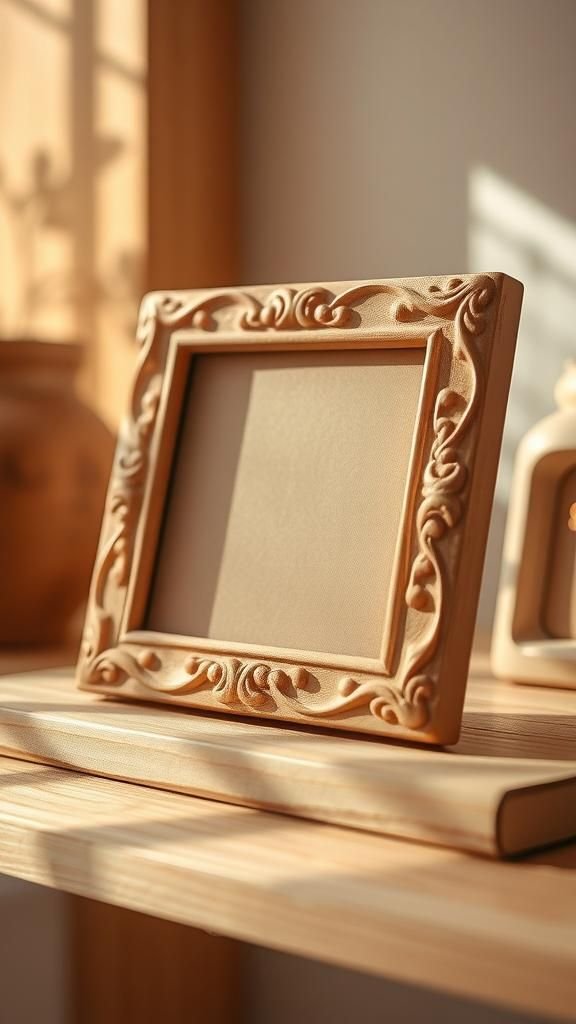
A frame with a carved border rests on a shelf, the grooves creating a small landscape that frames an old photograph. The carved edges catch dust and highlight, while the inner edge folds into the image like a gentle embrace.
The clay lends a warmth to the photo, as if the frame were an older friend slightly weathered by seasons. When I run a thumb along the carved border, the texture feels familiar and reassuring, adding a tactile way to reconnect with the captured moment each time I pass by.
Steps
- Roll a slab of clay and cut out a rectangular frame shape with an inner opening.
- Carve decorative borders and motifs around the outer edge while clay remains workable.
- Smooth the inner lip to safely cradle a photograph or backing.
- Dry the frame flat and attach a backing board once fully hardened.
- Insert the photo and display on a shelf or tabletop.
Hanging planters with braided cord detail

A hanging planter dangles in the kitchen, its belled shape catching the eye and softening the window area. The braided cord loops add a handcrafted accent that complements the clay’s matte surface.
When the morning light filters through leaves, the planter’s silhouette reads like a small living sculpture. The inner surface holds a faint reminder of water, and that small patina only deepens the sense of things lived with.
The planter seems to tie together plants, light, and line into a single graceful moment.
Steps
- Form a rounded planter vessel with a slightly thickened rim for strength.
- Create three or four small reinforced holes near the rim for suspension.
- Braid cords to desired length and thread through the holes, knotting securely.
- Dry the planter thoroughly before adding soil or a liner.
- Hang near a window and place a plant with moderate watering needs inside.
Delicate wall hooks with floral impressions

A row of small wall hooks with floral impressions holds scarves and lightweight bags near the hallway. The flower impressions are delicate, with petal veins and tiny pistil dots that catch light.
Each hook feels pleasant to the hand, with rounded edges and a slightly warm matte finish. The line of hooks created a small visual rhythm along the hall, and friends often notice the tactile detail when hanging coats.
Over time the impressions collect a hint of shadow that deepens the floral motif, making the wall feel like an intimate map of daily comings and goings.
Steps
- Create small flat forms with an extended lower tab to function as hooks.
- Impress floral designs into each form while the clay is still malleable.
- Dry fully and attach metal screws or mounting hardware through reinforced holes.
- Secure the hooks to the wall at evenly spaced intervals.
- Hang lightweight textiles, scarves, or jewelry as desired.
Modern napkin weights with geometric inlays
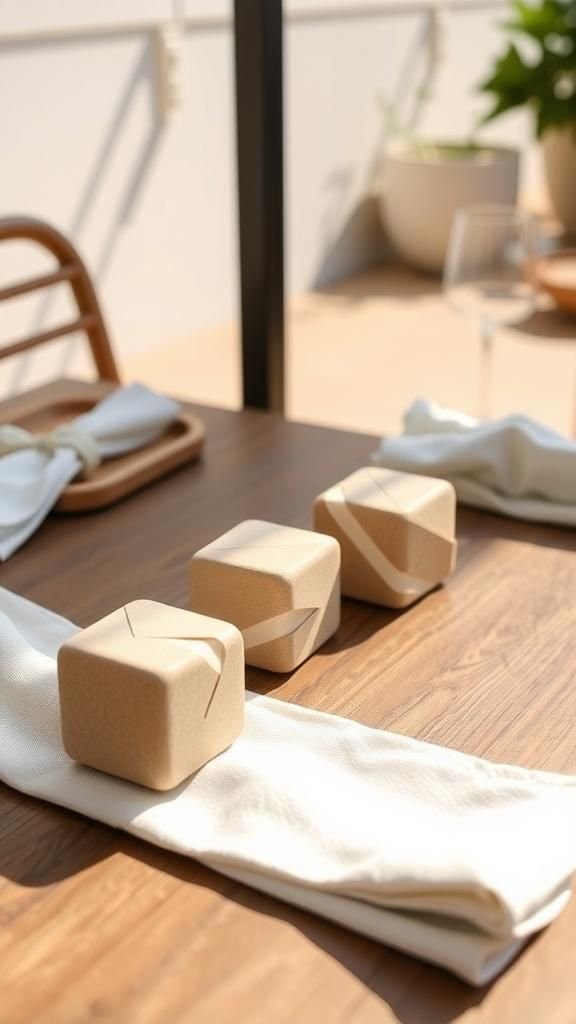
These neat napkin weights sit on the patio table to keep napkins from flying away on breezy afternoons. Each has a simple geometric inlay of contrasting clay that forms a calm, modern pattern.
The weight feels pleasantly solid in the hand, a balance between heft and smallness that suits relaxed outdoor meals. The contrast between smooth inset shapes and the slightly textured body produces a little visual tension that I appreciate.
They seem to belong in both casual and more arranged settings, quietly asserting a small design decision at the table.
Steps
- Form small compact shapes of clay that sit flat and provide adequate weight.
- Inset a contrasting clay piece into a shallow cavity to create geometric patterns.
- Smooth the joins carefully and refine the overall silhouette.
- Dry fully to ensure structural integrity before outdoor use.
- Store indoors when not in use to prolong the finish.
Small storage jars with cork lids and raw edges

A trio of small jars with cork lids lives on the kitchen shelf, their raw edges and slightly variegated surfaces lending a modest pantry charm. The clay’s neutral palette harmonizes with glass jars and wooden spoons nearby.
Each lid fits snugly, and the small imperfections in rim thickness feel reassuringly human. When I reach for a jar, the tactile contrast between the cool clay body and the warm cork top hits pleasantly.
Over time the jars have acquired faint marks that read like gentle memories of daily cooking rhythms.
Steps
- Form small cylindrical jars with slightly thicker rims to seat cork lids.
- Refine the jar exteriors with a sponge to achieve the desired texture.
- Dry jars fully and test cork fit for a gentle snugness.
- Store dry goods inside or use for small items on a shelf.
- Keep away from prolonged moisture exposure to maintain the clay finish.
Tiny animal figurines that bring whimsy to shelves

A pair of tiny animal figures sits near a stack of books, each rendered with minimal lines and an earnest tilt. The surfaces are softly smudged where fingers smoothed the forms, giving them a slightly worn friendliness.
These small figures often catch the eye and prompt a quiet smile; their simplified posture reads like a small companion rather than a detailed sculpture. When dusting, I find myself rearranging them from time to time, moving one to the windowsill for a different light angle.
They feel like miniature witnesses to daily life.
Steps
- Shape small simplified animal silhouettes from clay, focusing on gesture rather than detail.
- Refine features with a small tool to suggest eyes or limbs.
- Allow the figures to dry completely on a flat surface.
- Place them on shelves, windowsills, or desks as little decorative companions.
- Rotate their positions occasionally to enjoy different light and angles.
Round mirror frame with sunburst clay accents

A round mirror gains a handmade halo when framed with tiny sunburst accents of clay. The small rays vary in length and texture, creating a lively perimeter that catches glimpses of light.
When morning light hits the frame, the little shadows produced feel cheerful rather than ornate. The tactile array invites a quick inspection each time I pass, and the mirror suddenly feels less like a utility and more like a crafted object that participates in the room’s mood.
The clay accents bring a grounded warmth to the reflective surface.
Steps
- Create small tapered rays from clay and texture each with subtle grooves.
- Arrange the rays around a round mirror backing to form a halo composition.
- Press the bases of the rays slightly to secure them once the glue or adhesive has been prepared.
- Allow the assembled frame to set fully before hanging.
- Mount the mirror at eye level to enjoy the sunburst effect in natural light.
Layered centerpiece with tiny stackable forms
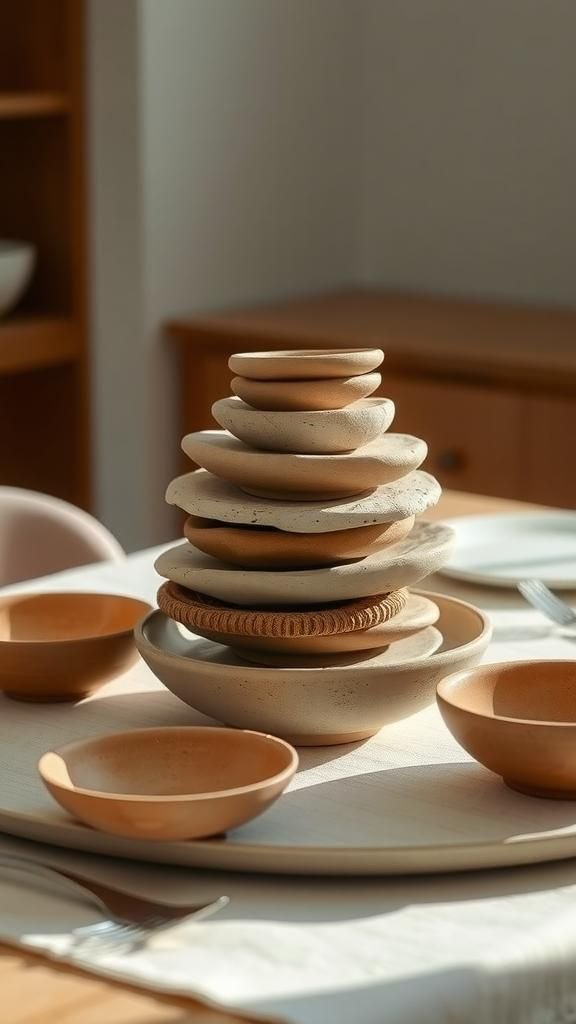
A low centerpiece composed of stacked clay forms sits at the middle of my dining table, alternating discs and shallow bowls to create a small landscape. The layers play with height in a subtle way, and the surfaces carry a slow, tactile quality that feels meditative.
During meals the centerpiece becomes a neutral anchor that accommodates candles or seasonal foliage without stealing focus. Getting close, the faint ridges where forms meet reveal the maker’s hand, and that micro-architecture creates a satisfying visual rhythm across the table.
Steps
- Create discs and shallow bowl forms in complementary sizes from clay.
- Dry components partially to leather-hard before stacking for stability.
- Join pieces together by blending seams gently with a damp sponge or tool.
- Allow the assembled centerpiece to dry completely on a stable surface.
- Arrange candles, foliage, or leave bare as a sculptural table piece.
Table of Contents